Preparing an OKE environment
Contents
- Create Public SSH Key to access all the Bastion and Worker nodes
- Create a compartment for OKE
- Create Container Clusters (OKE)
- Create Bastion Node to access Cluster
- Setup OCI CLI to download kubeconfig and access OKE Cluster
Create Public SSH Key to access all the Bastion and Worker nodes
Create SSH key using ssh-keygen on linux terminal to access (ssh) the Compute
instances (worker/bastion) in OCI.
ssh-keygen -t rsa -N "" -b 2048 -C demokey -f id_rsa
Create a compartment for OKE
Within your tenancy, there must be a compartment to contain the necessary network resources (VCN, subnets, internet gateway, route table, security lists).
- Go to OCI console, and use the top-left Menu to select the Identity > Compartments option.
- Click the
Create Compartmentbutton. - Enter the compartment name(For example, WCCStorage) and description(OKE compartment), the click the
Create Compartmentbutton.
Create Container Clusters (OKE)
- In the Console, open the navigation menu. Go to
Developer Servicesand clickKubernetes Clusters (OKE).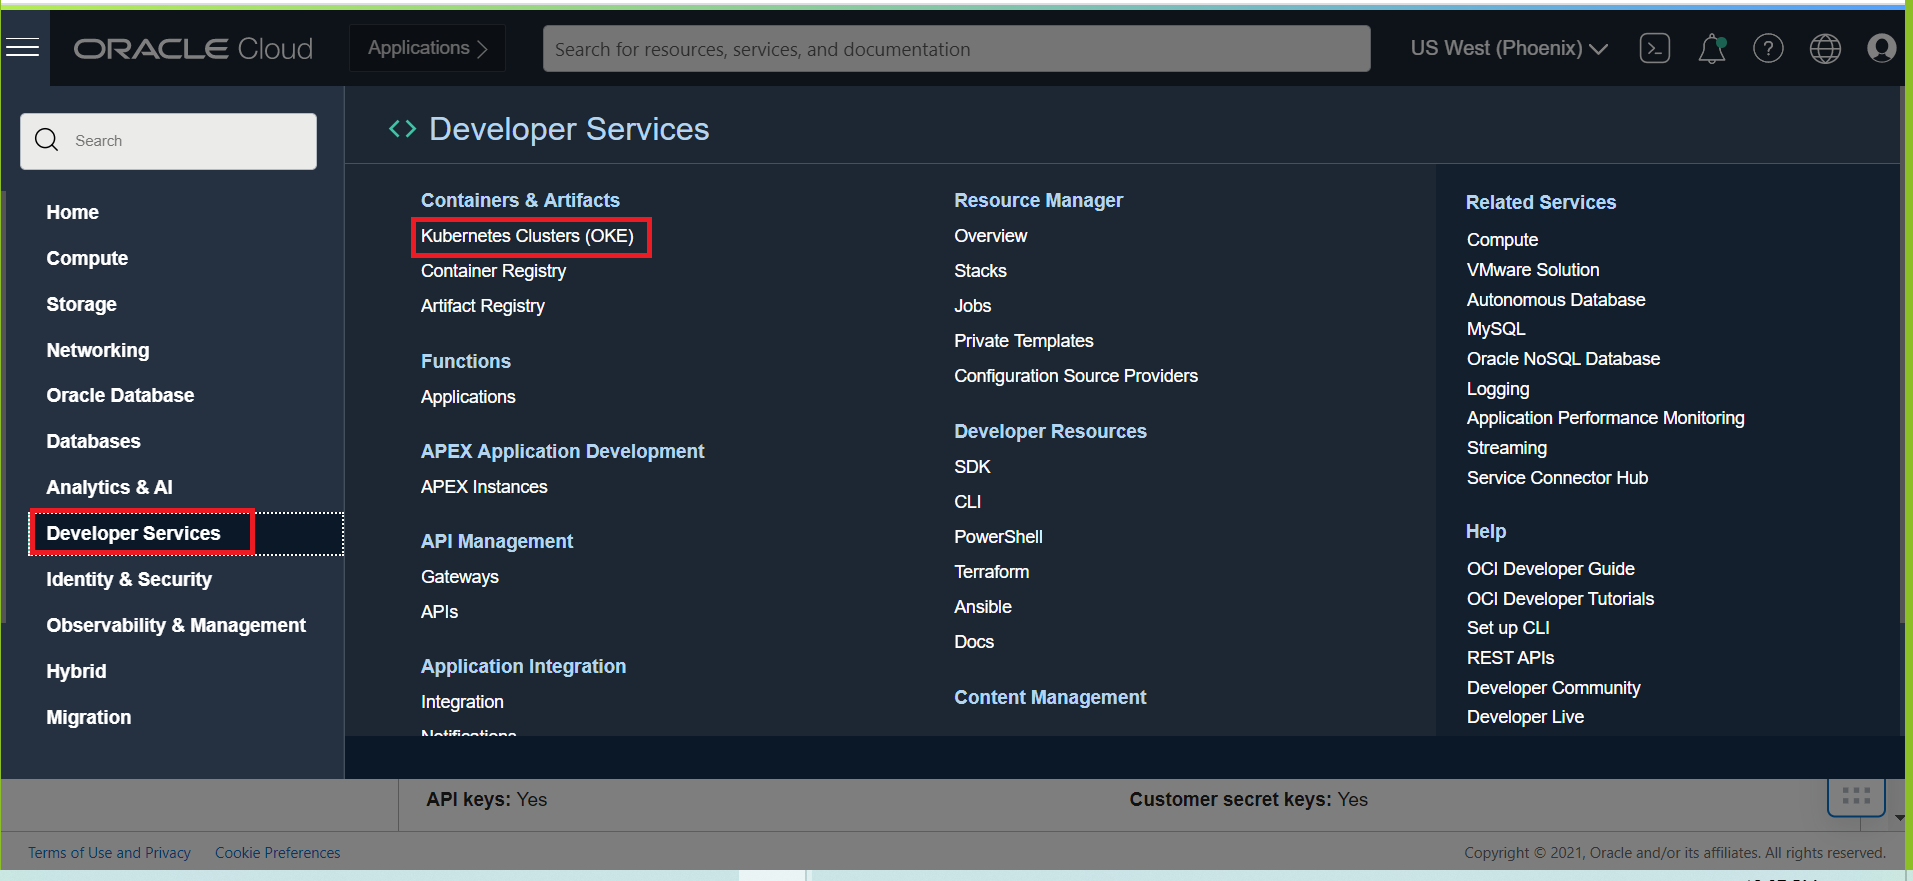
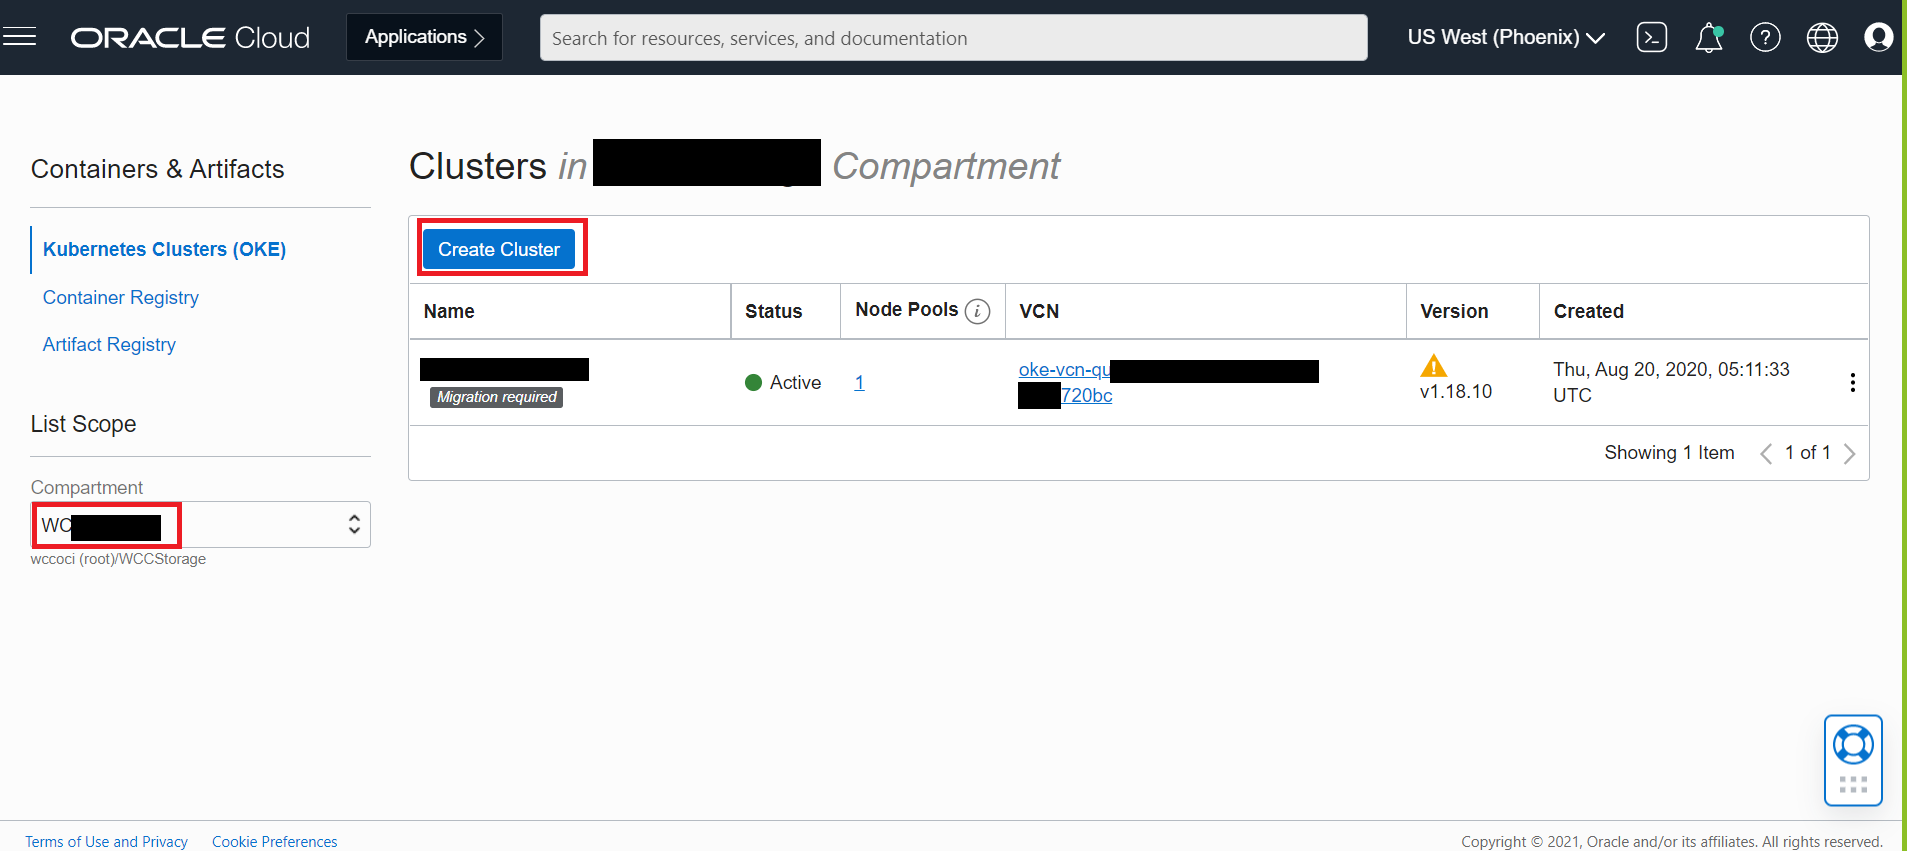
- Choose a Compartment you have permission to work in. Here we will use WCCStorage compartment.
- On the Cluster List page, select your Compartment and click Create Cluster.
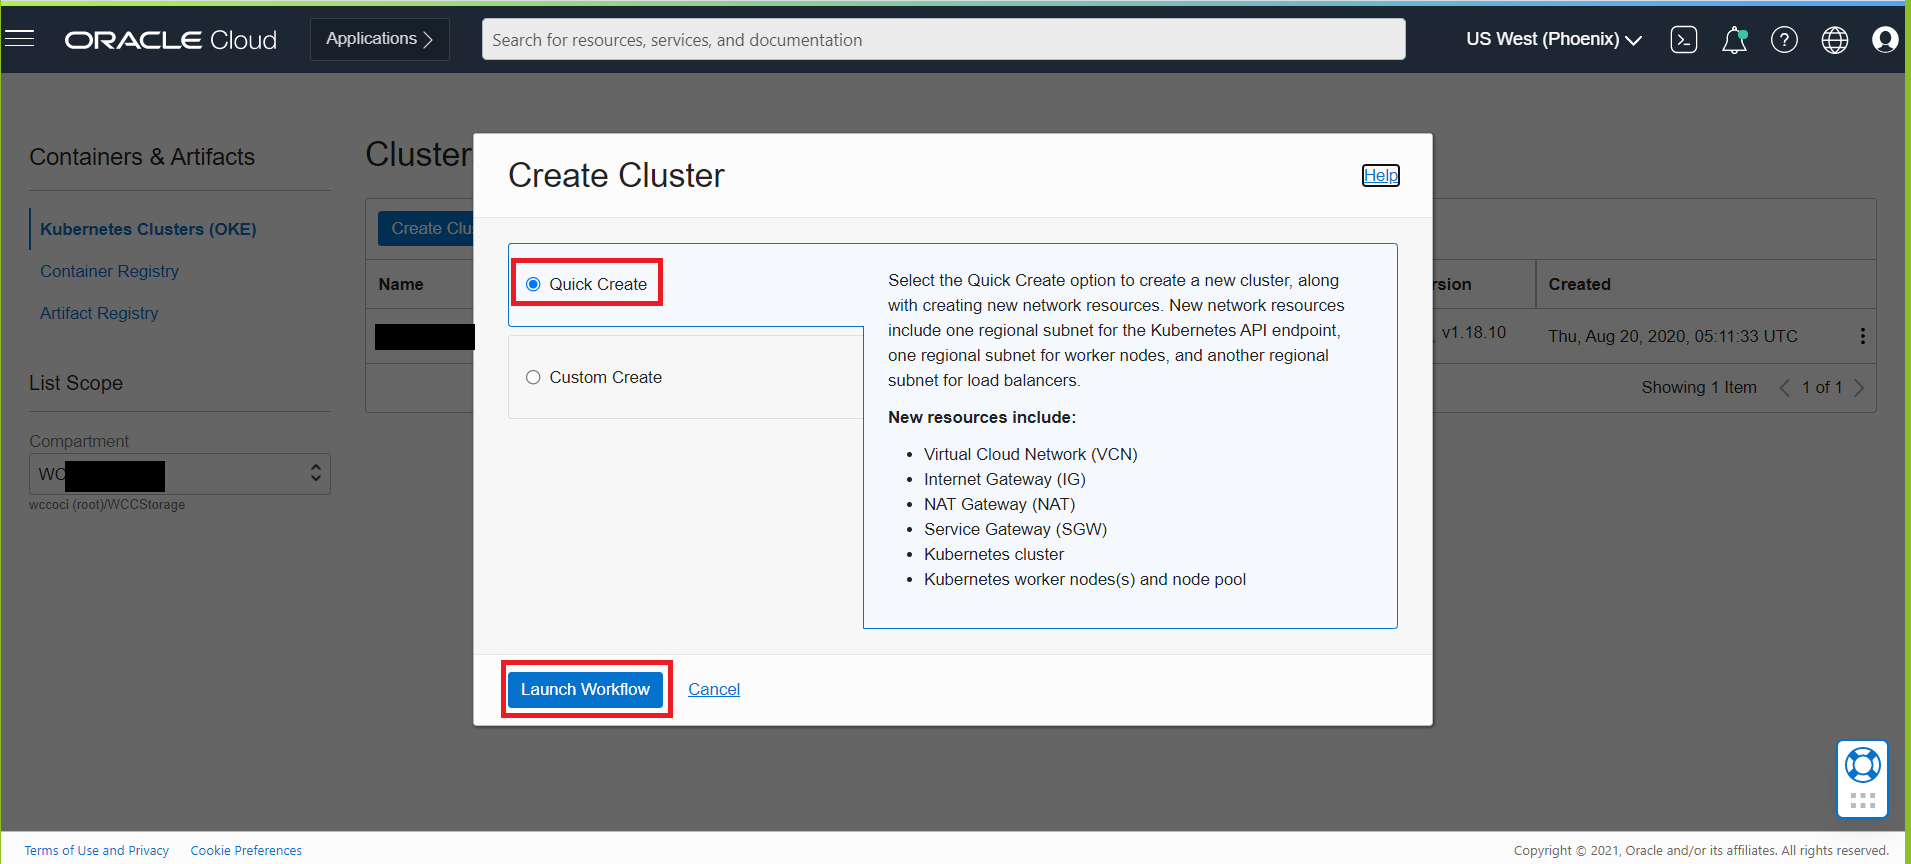
- In the Create Cluster dialog, select Quick Create and click Launch Workflow.
- On the Create Cluster page specify the values as per your environment (like the sample values shown below)
- NAME: WCCOKEPHASE1
- COMPARTMENT: WCCStorage
- KUBERNETES VERSION: v1.23.4
- CHOOSE VISIBILITY TYPE: Private
- SHAPE: VM.Standard.E3.Flex (Choose the available shape for worker node pool. The list shows only those shapes available in your tenancy that are supported by Container Engine for Kubernetes. See Supported Images and Shapes for Worker Nodes.)
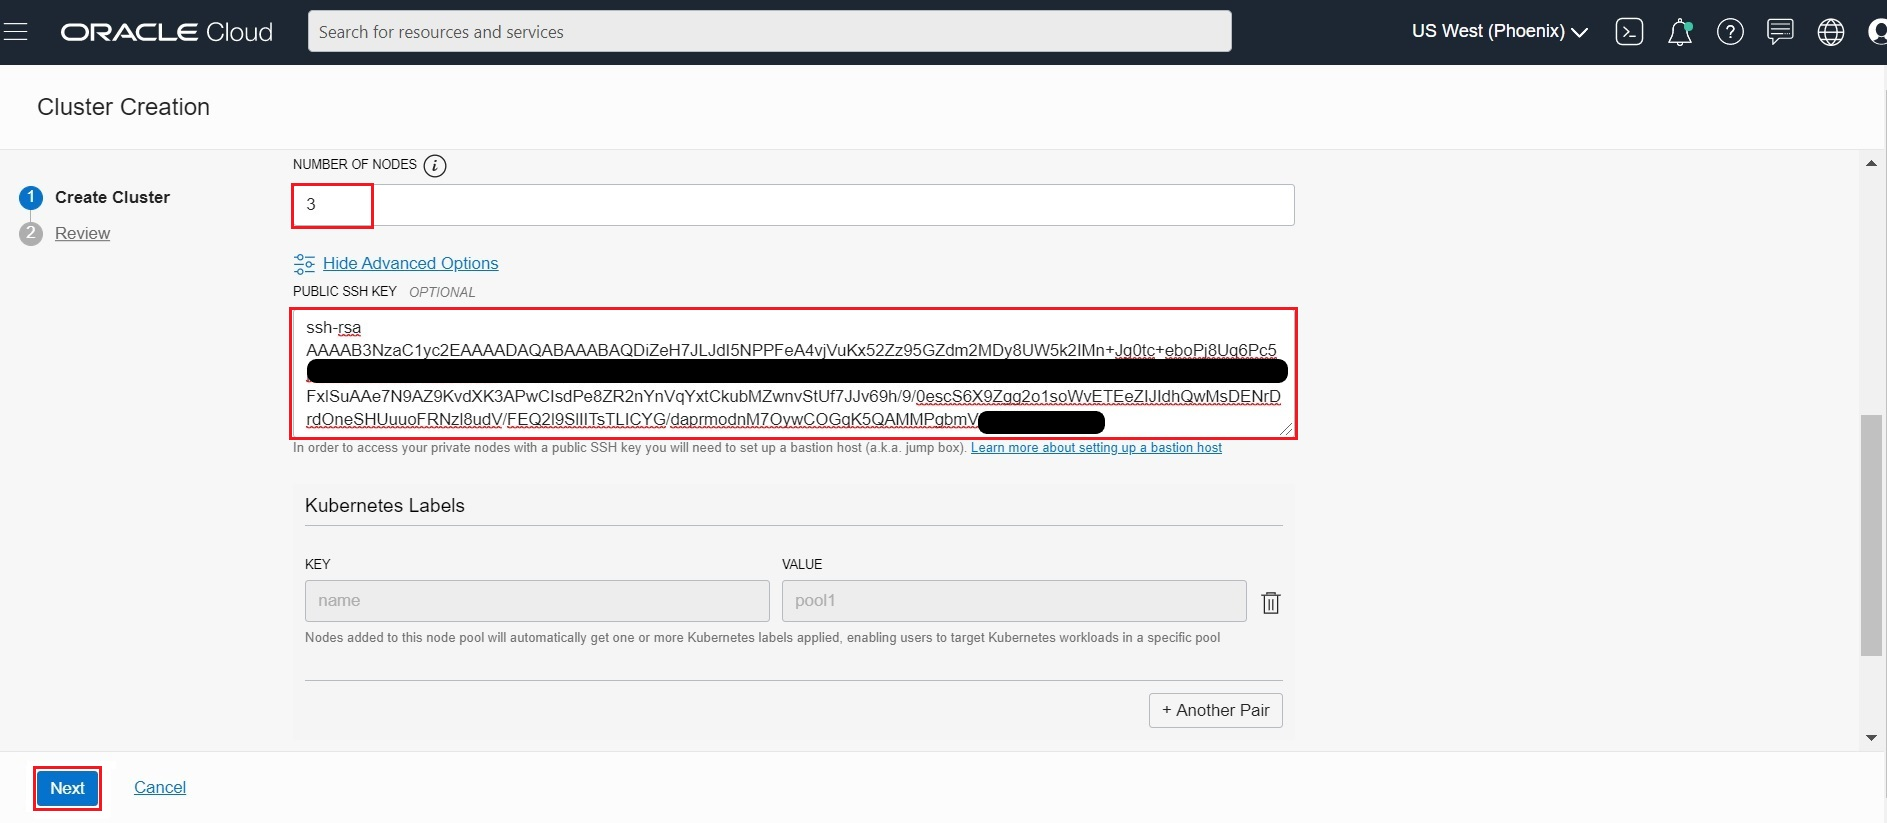
- NUMBER OF NODES: 3 (The number of worker nodes to create in the node pool, placed in the regional subnet created for the ‘quick cluster’).
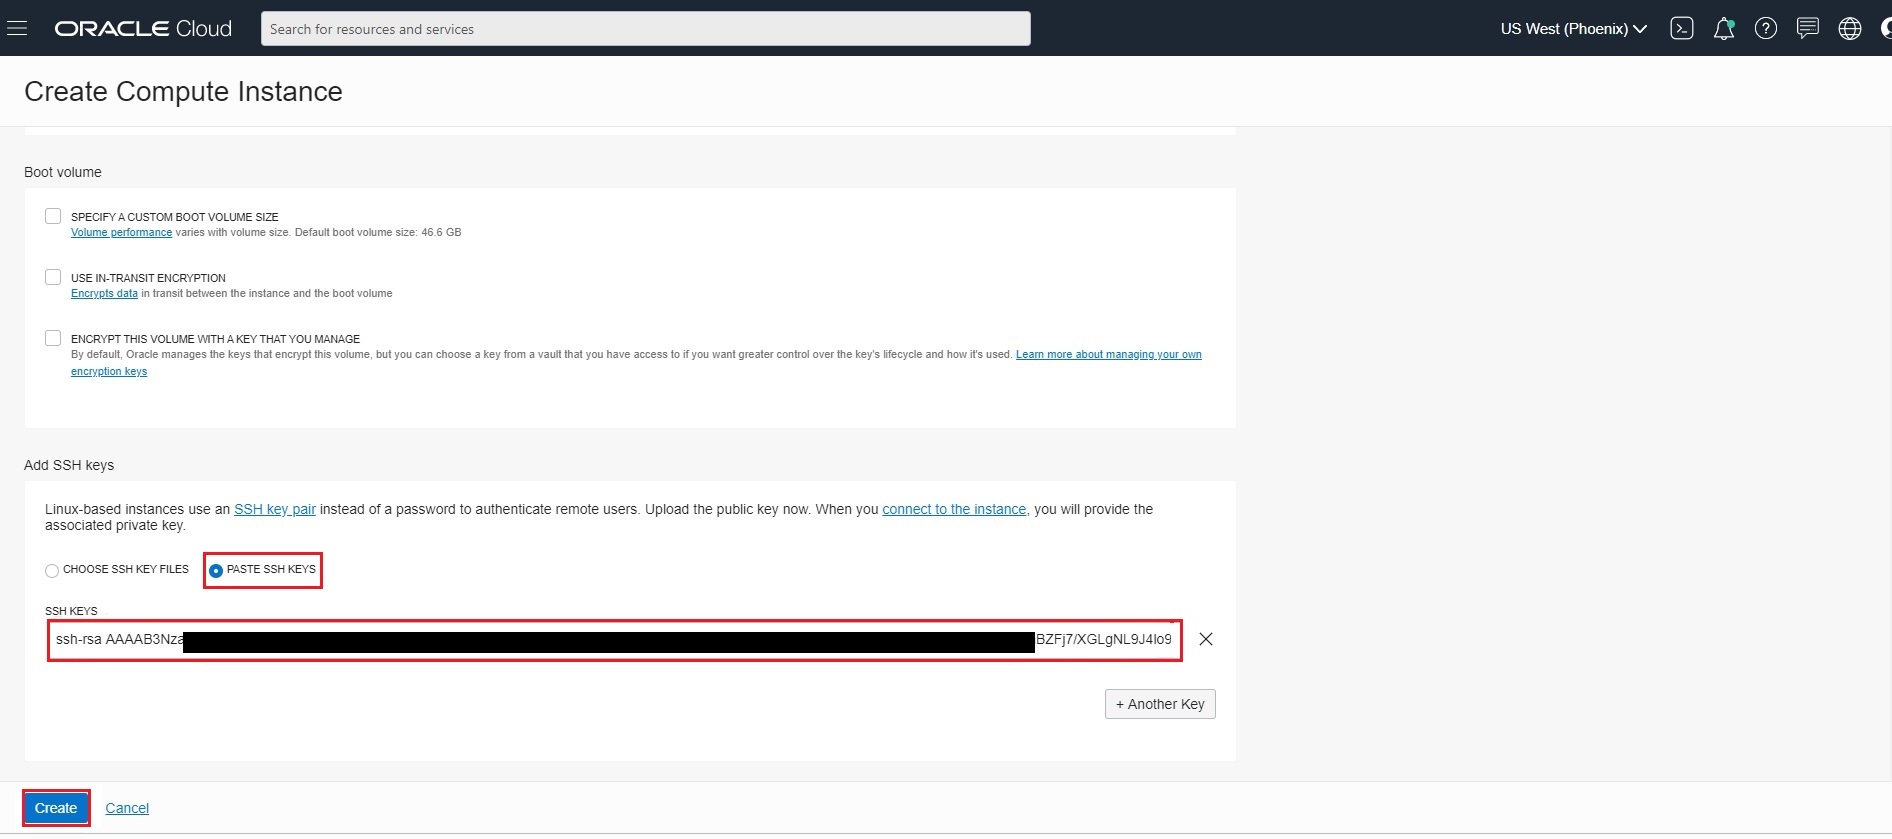
- Click Show Advanced Options and enter PUBLIC SSK KEY: ssh-rsa AA……bmVnWgX/ demokey (The public key id_rsa.pub created at Step1)
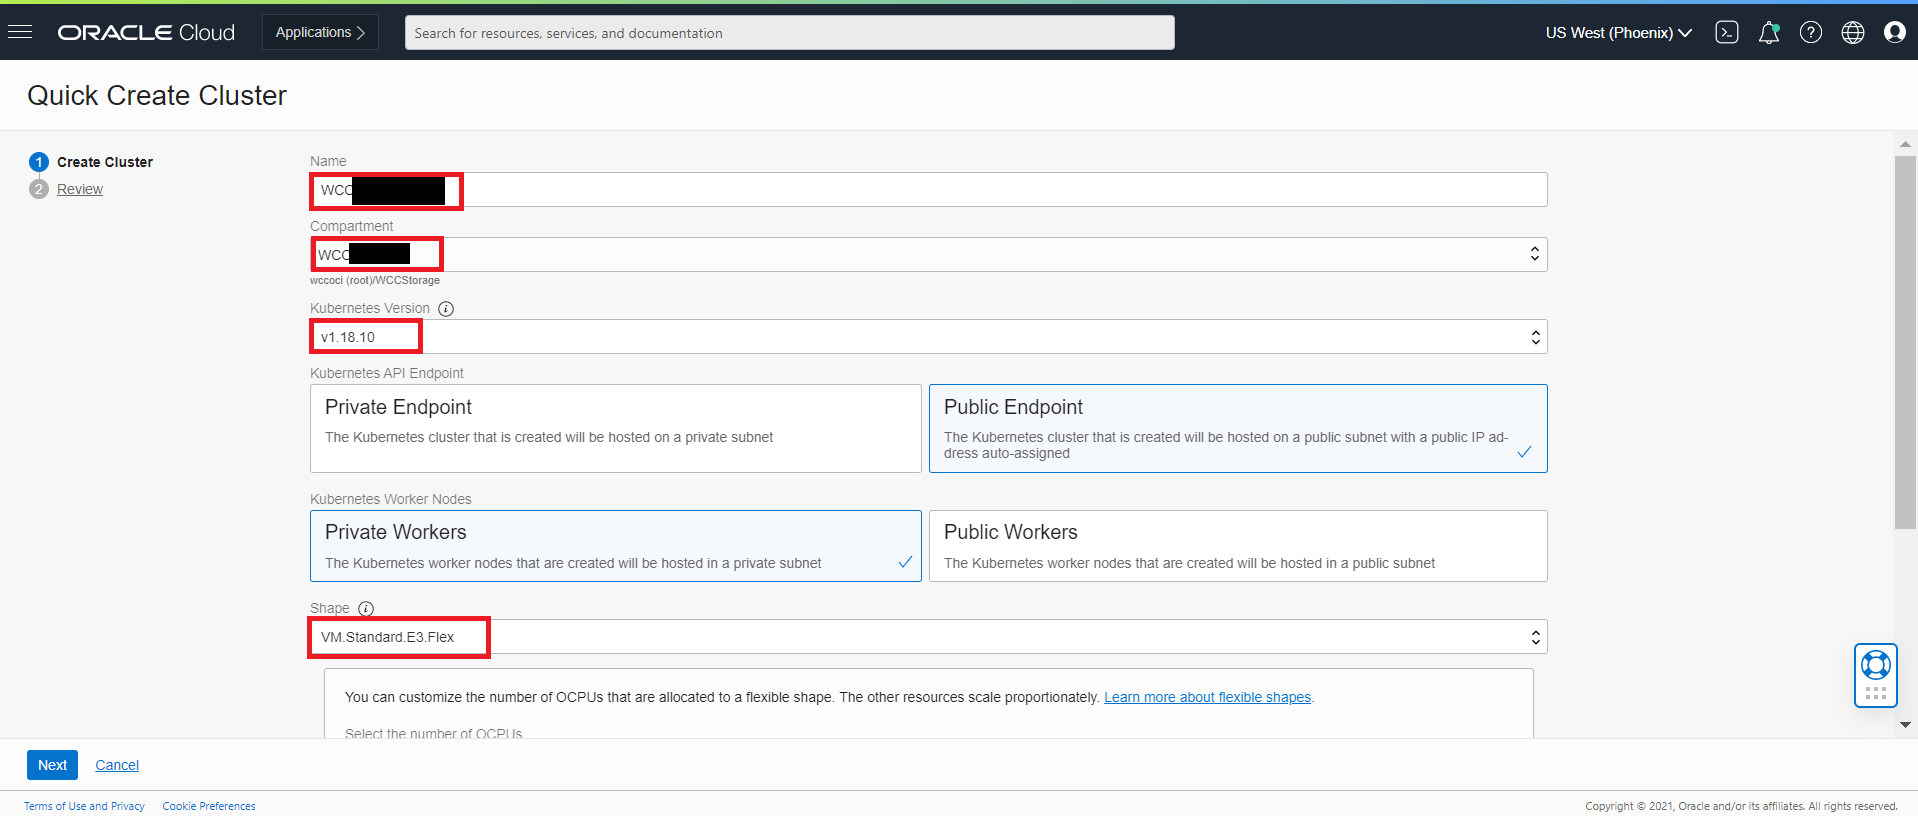
- Click Next to review the details you entered for the new cluster.
- Click
Create Clusterto create the new network resources and the new cluster.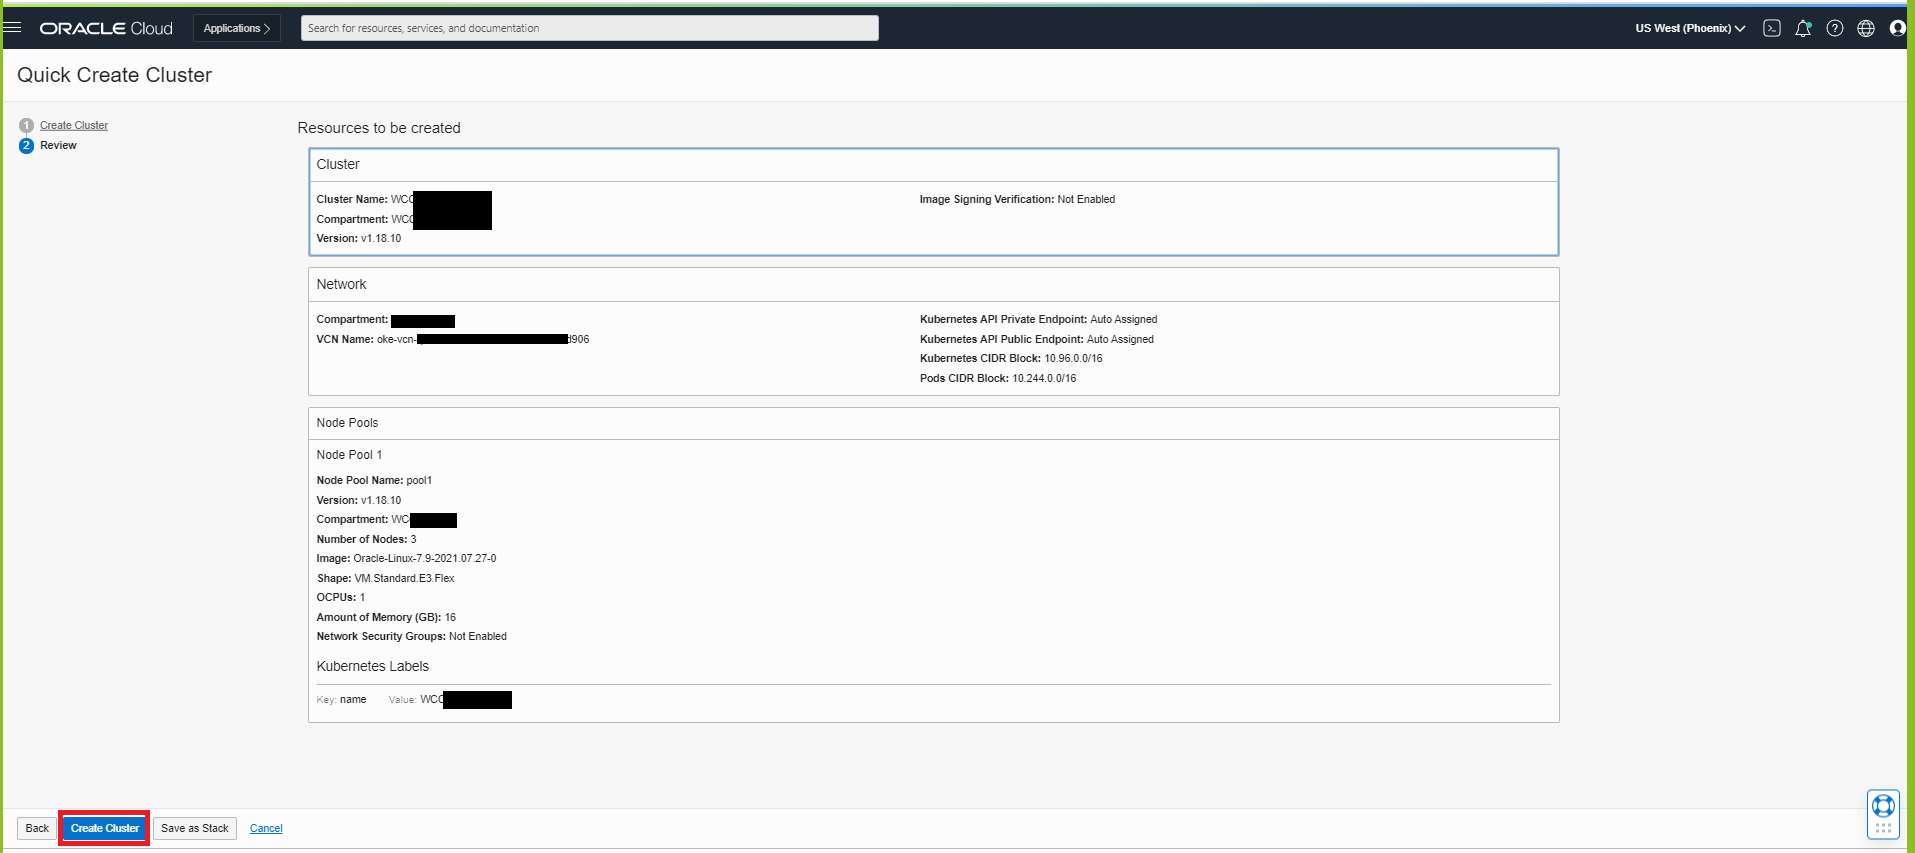
- Container Engine for Kubernetes starts creating resources (as shown in the Creating cluster and associated network resources dialog). Click Close to return to the Console.

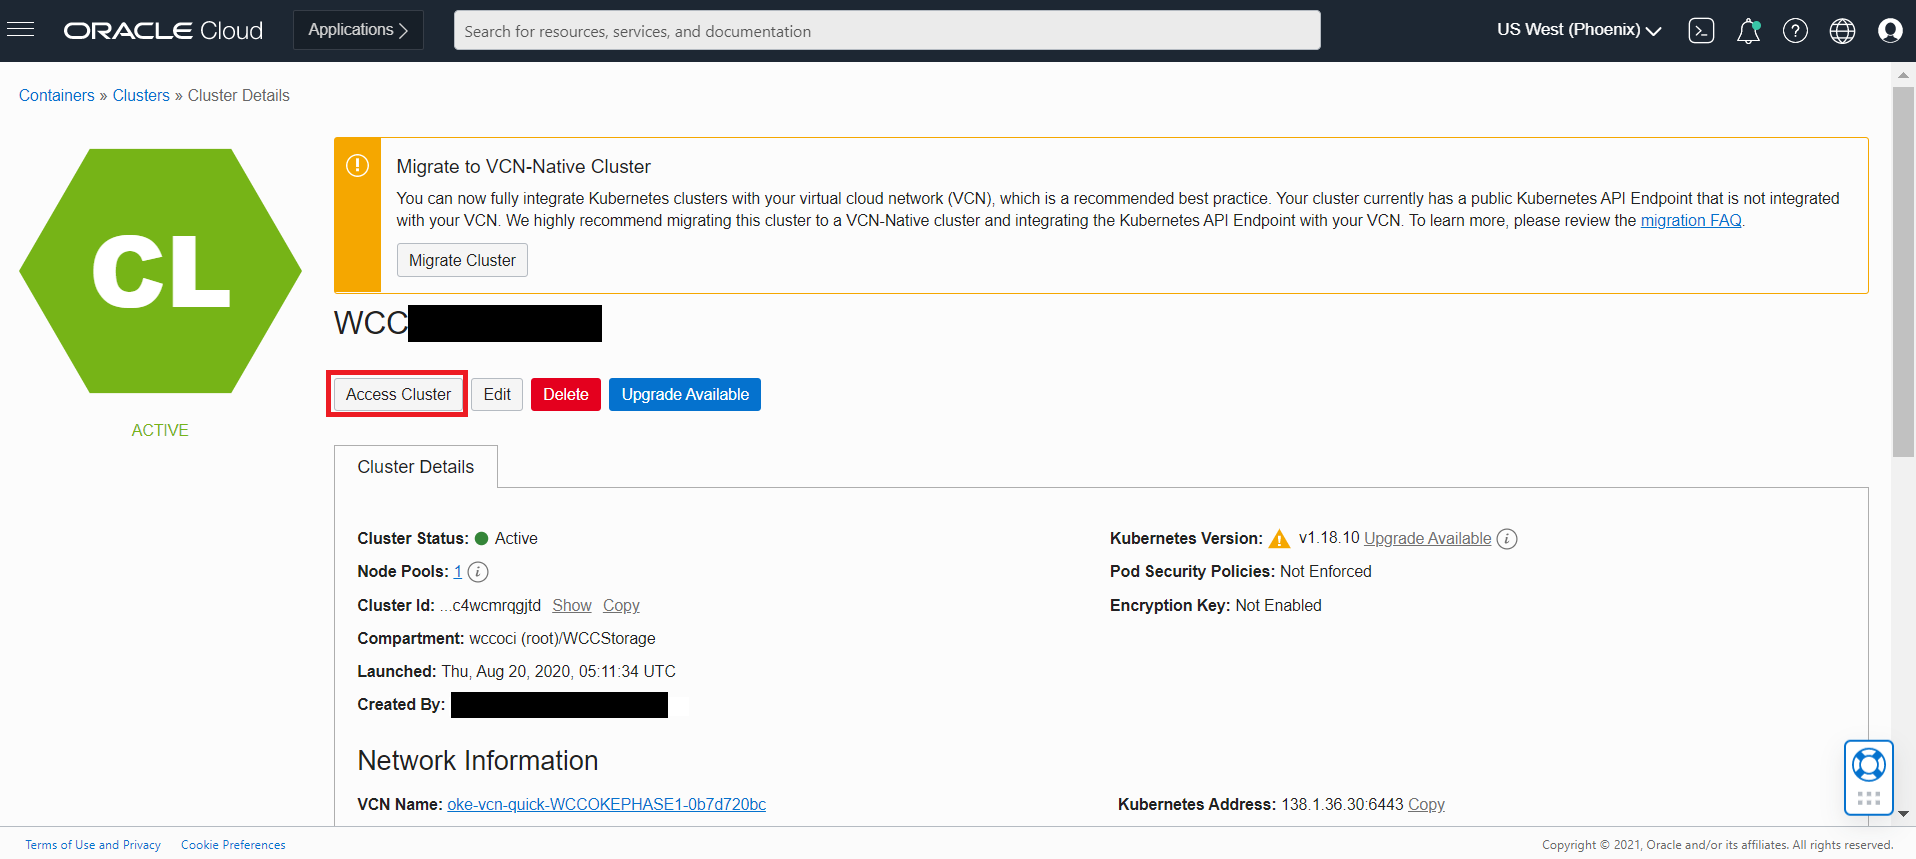
- Initially, the new cluster appears in the Console with a status of Creating. When the cluster has been created, it has a status of Active.
- Click on the
Node Poolson Resources and thenViewto view the Node Pool and worker node status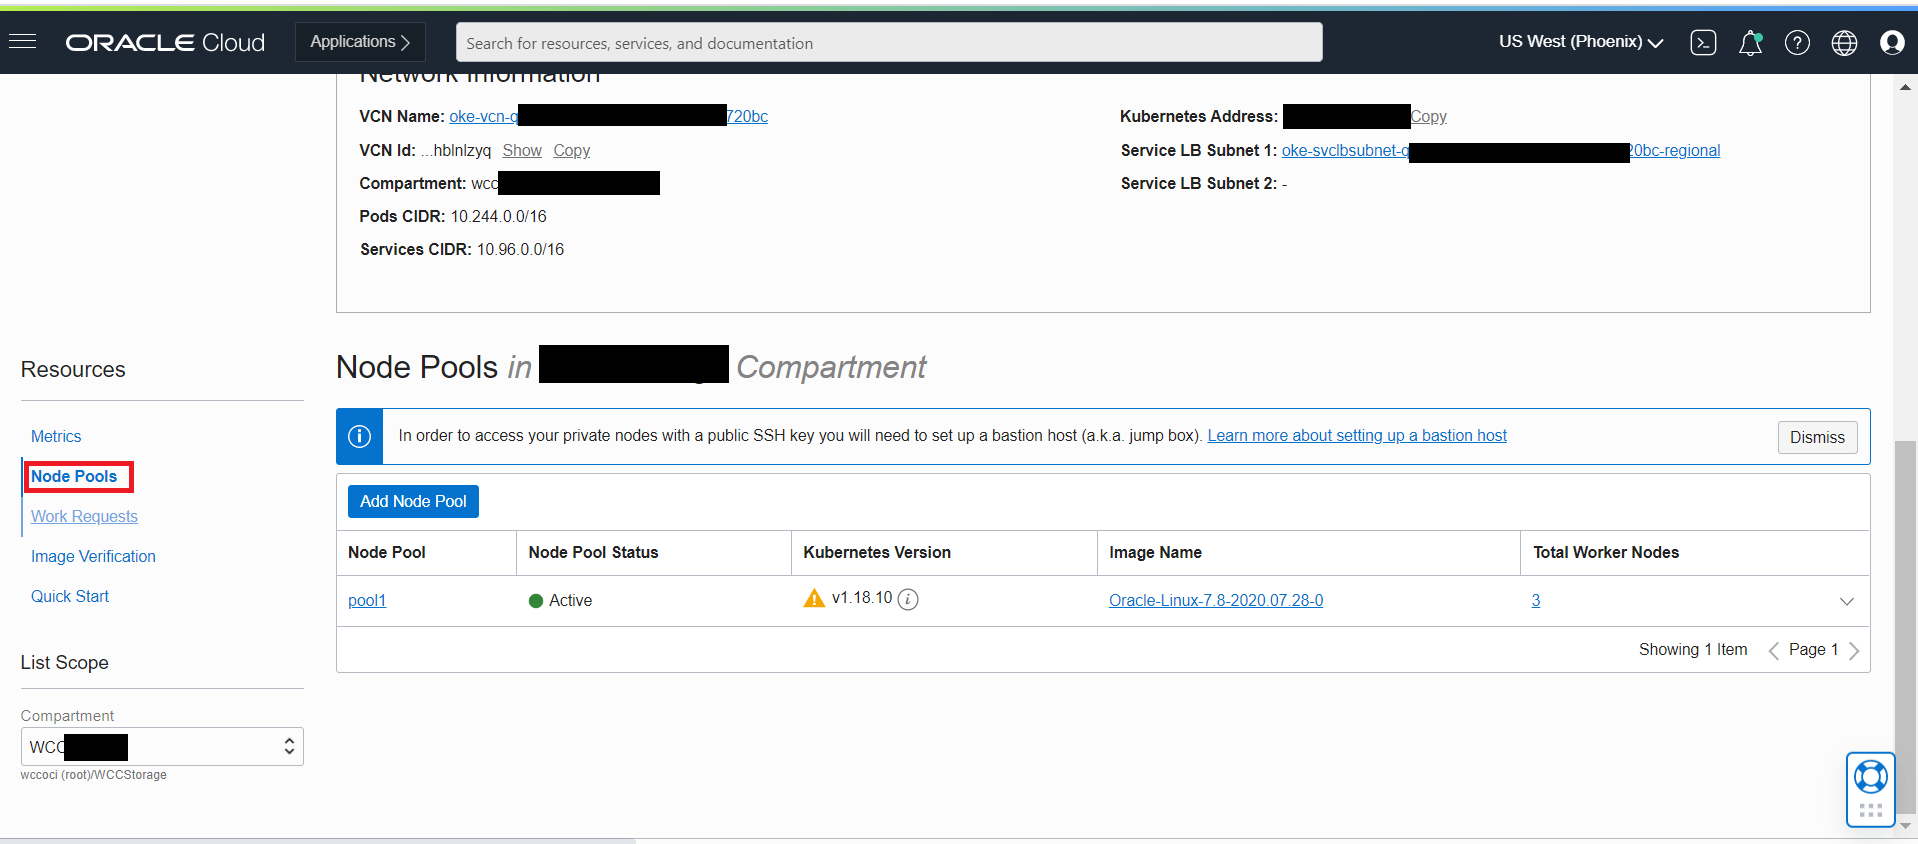
- You can view the status of Worker node and make sure all Node State in Active and Kubernetes Node Condition is Ready.The worker node gets listed in the kubectl command once the
Kubernetes Node Conditionis Ready.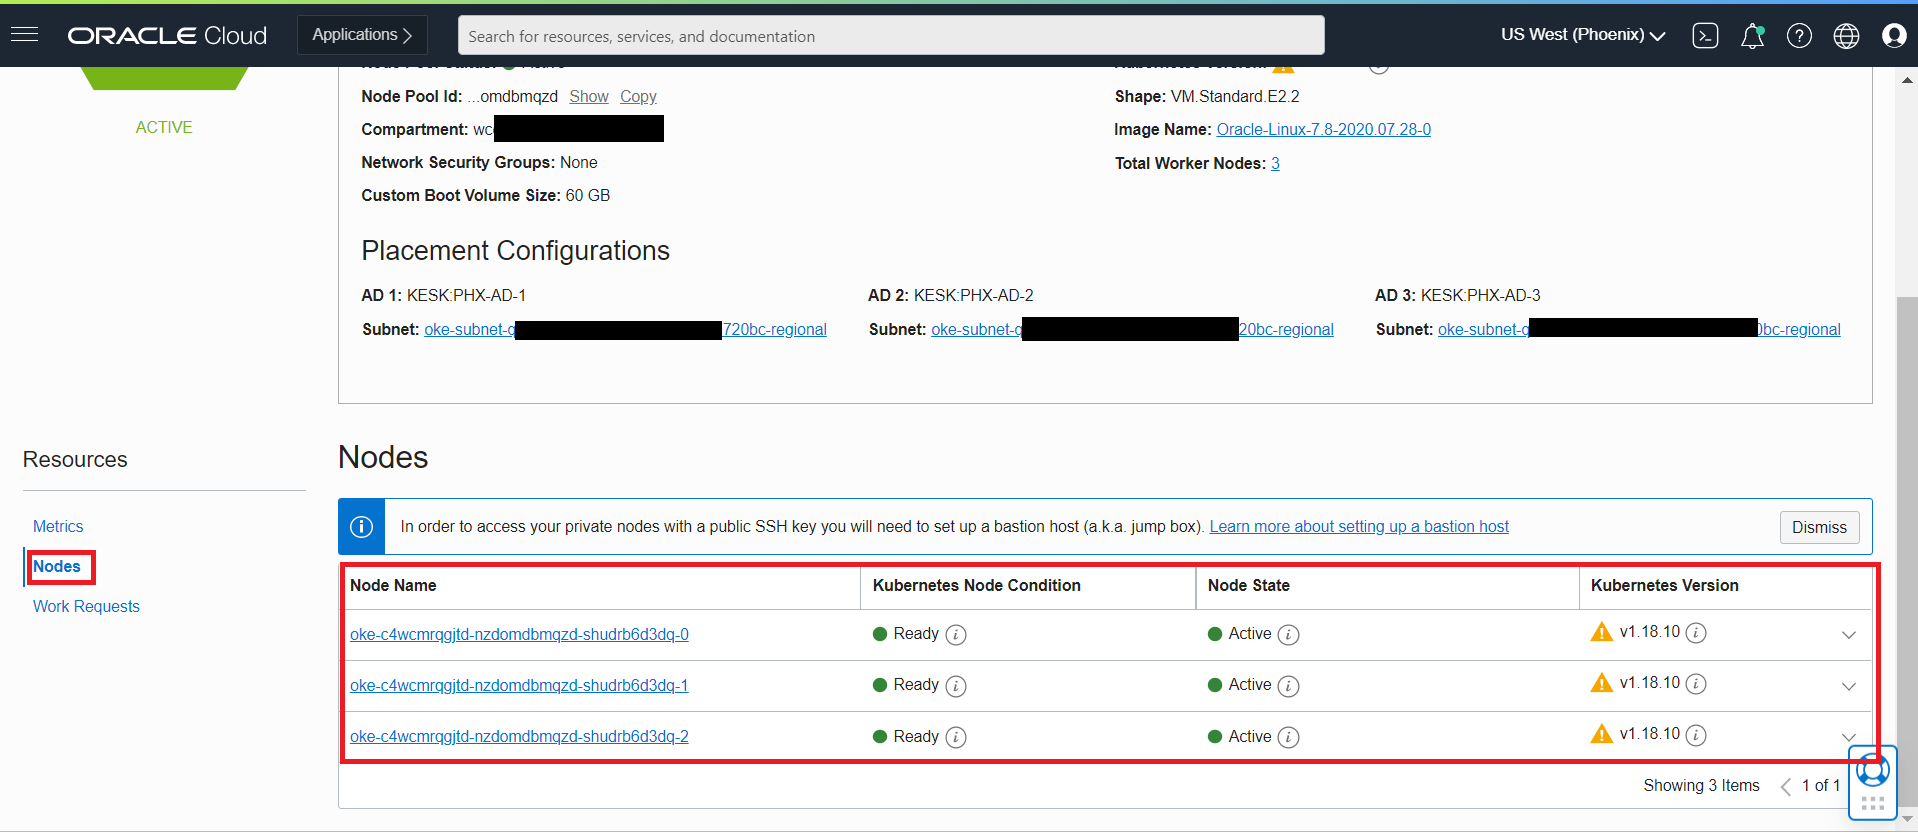
- To access the Cluster, Click on
Access Clusteron the ClusterWCCOKEPHASE1page.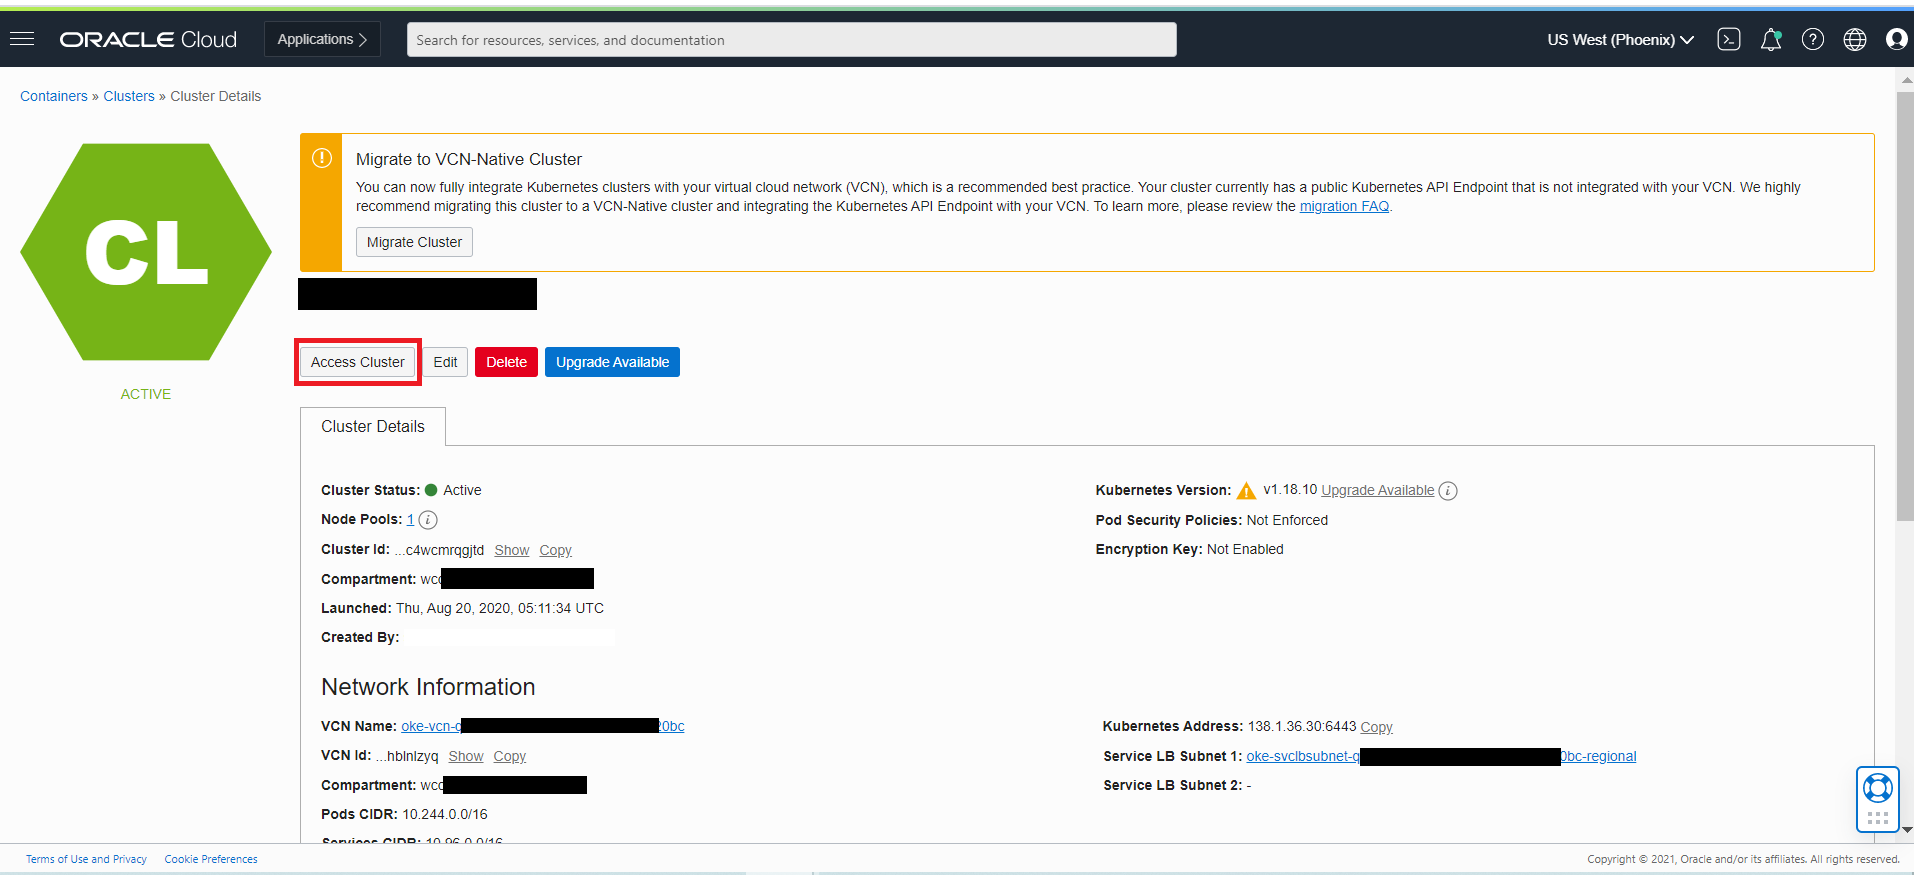
- We will be creating the bastion node and then access the Cluster.
Create Bastion Node to access Cluster
Setup a bastion node for accessing internal resources.
We will create the bastion node in same VCN following below steps, so that we can ssh into worker nodes.
Here we will choose CIDR Block: 10.0.22.0/24 . You can choose a different block, if you want.
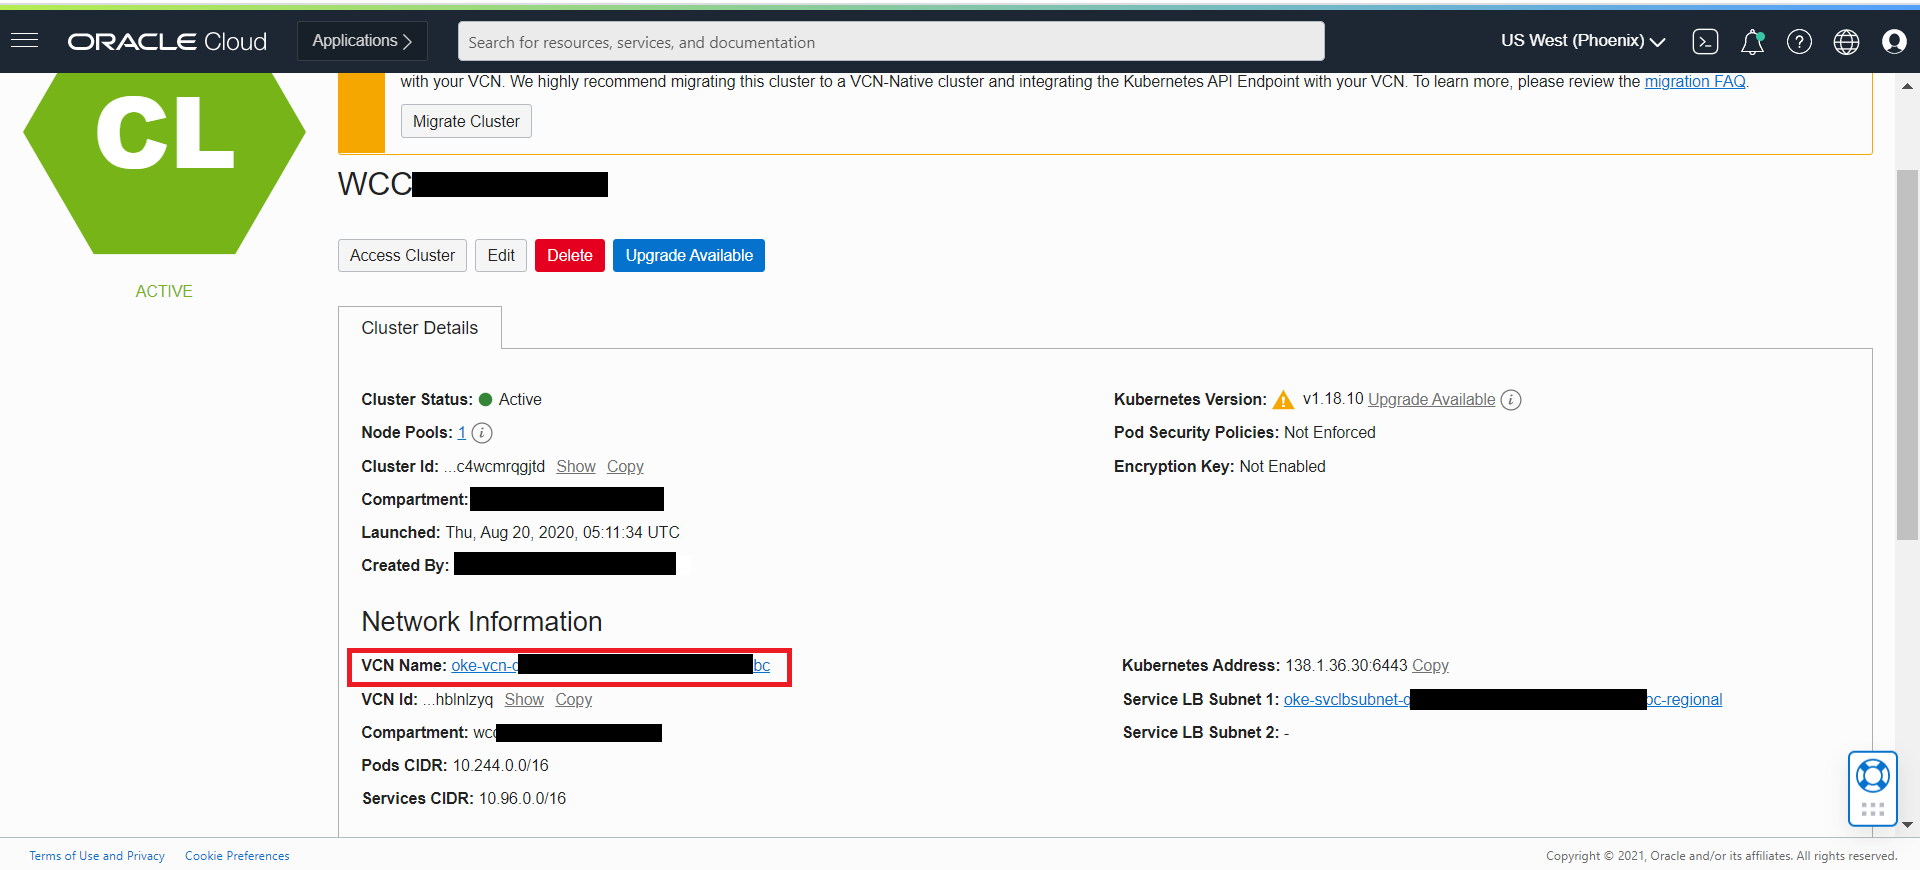
-
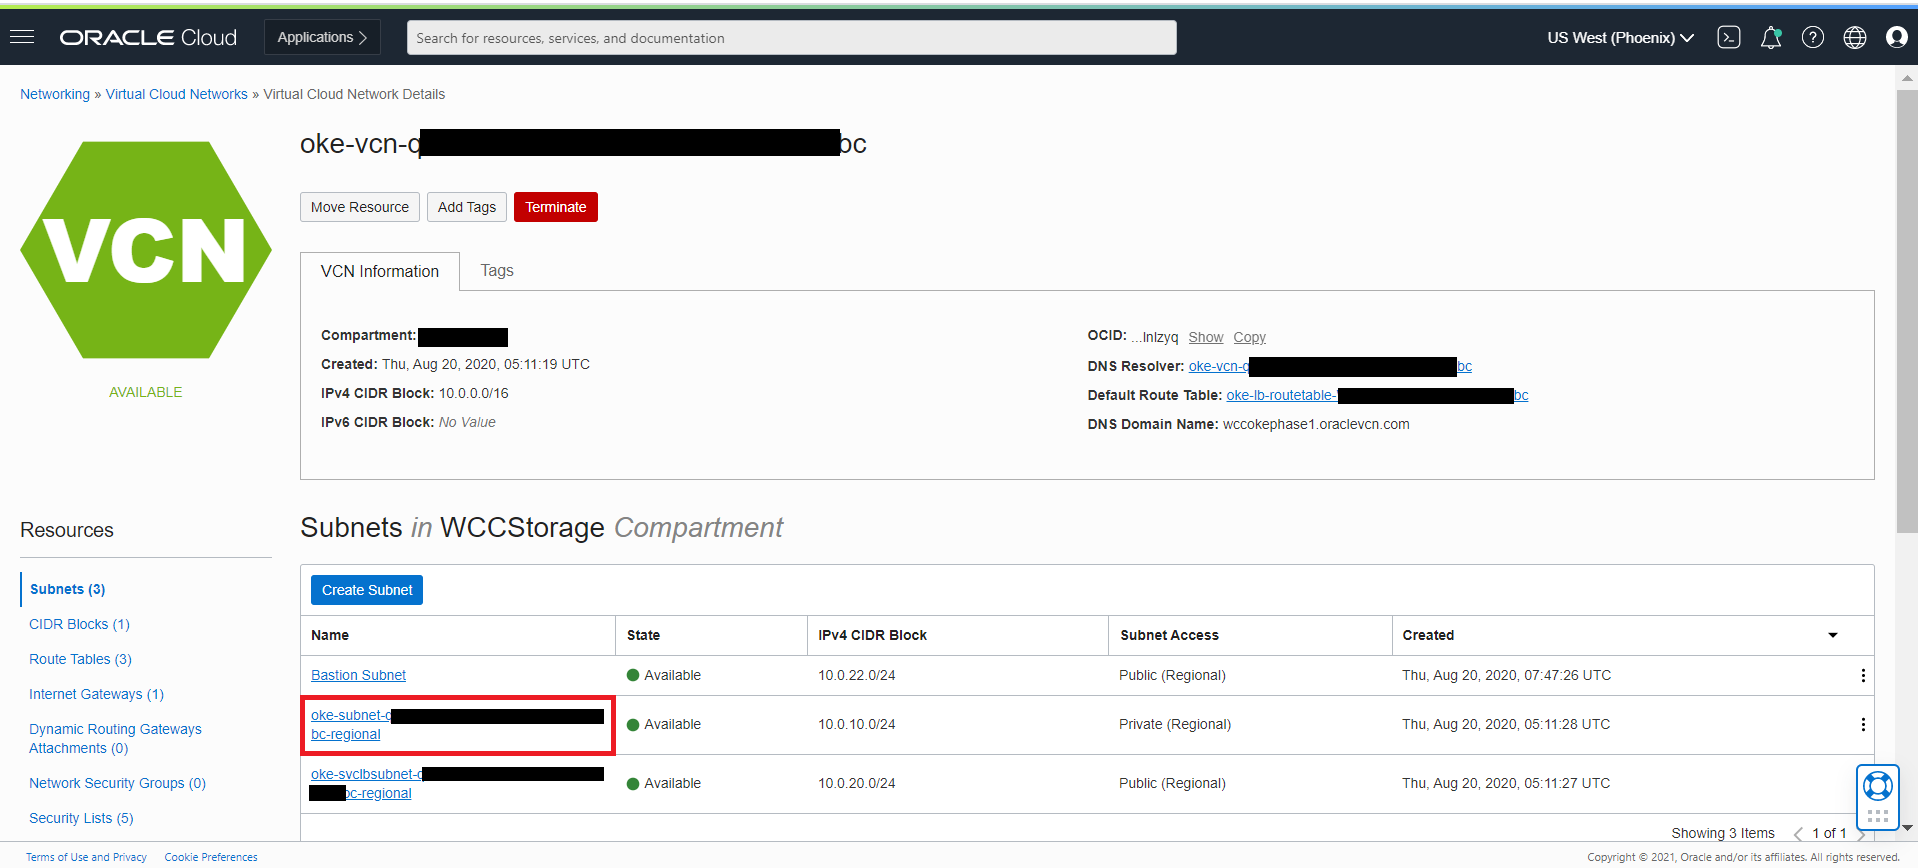
Click on the VCN Name from the Cluster Page as shown below
-
Next Click on
Security Listand thenCreate Security List
-
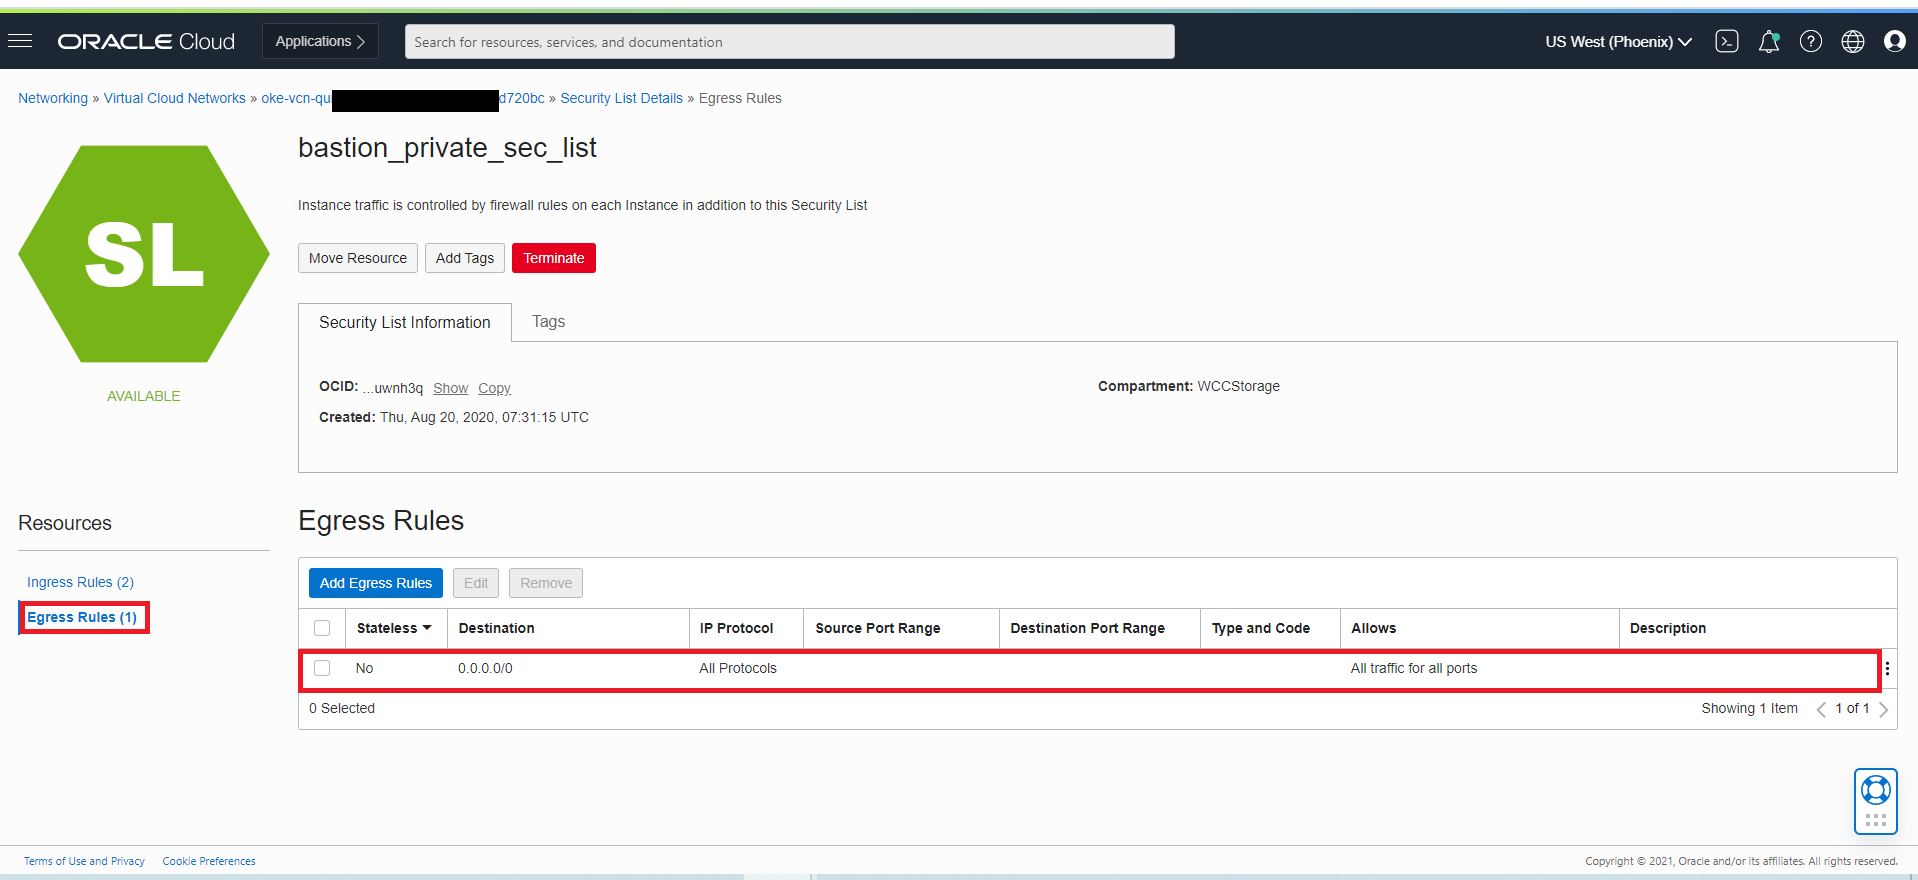
Create a
bastion-private-sec-listsecurity with below Ingress and Egress Rules.Ingress Rules:
 Egress Rules:
-
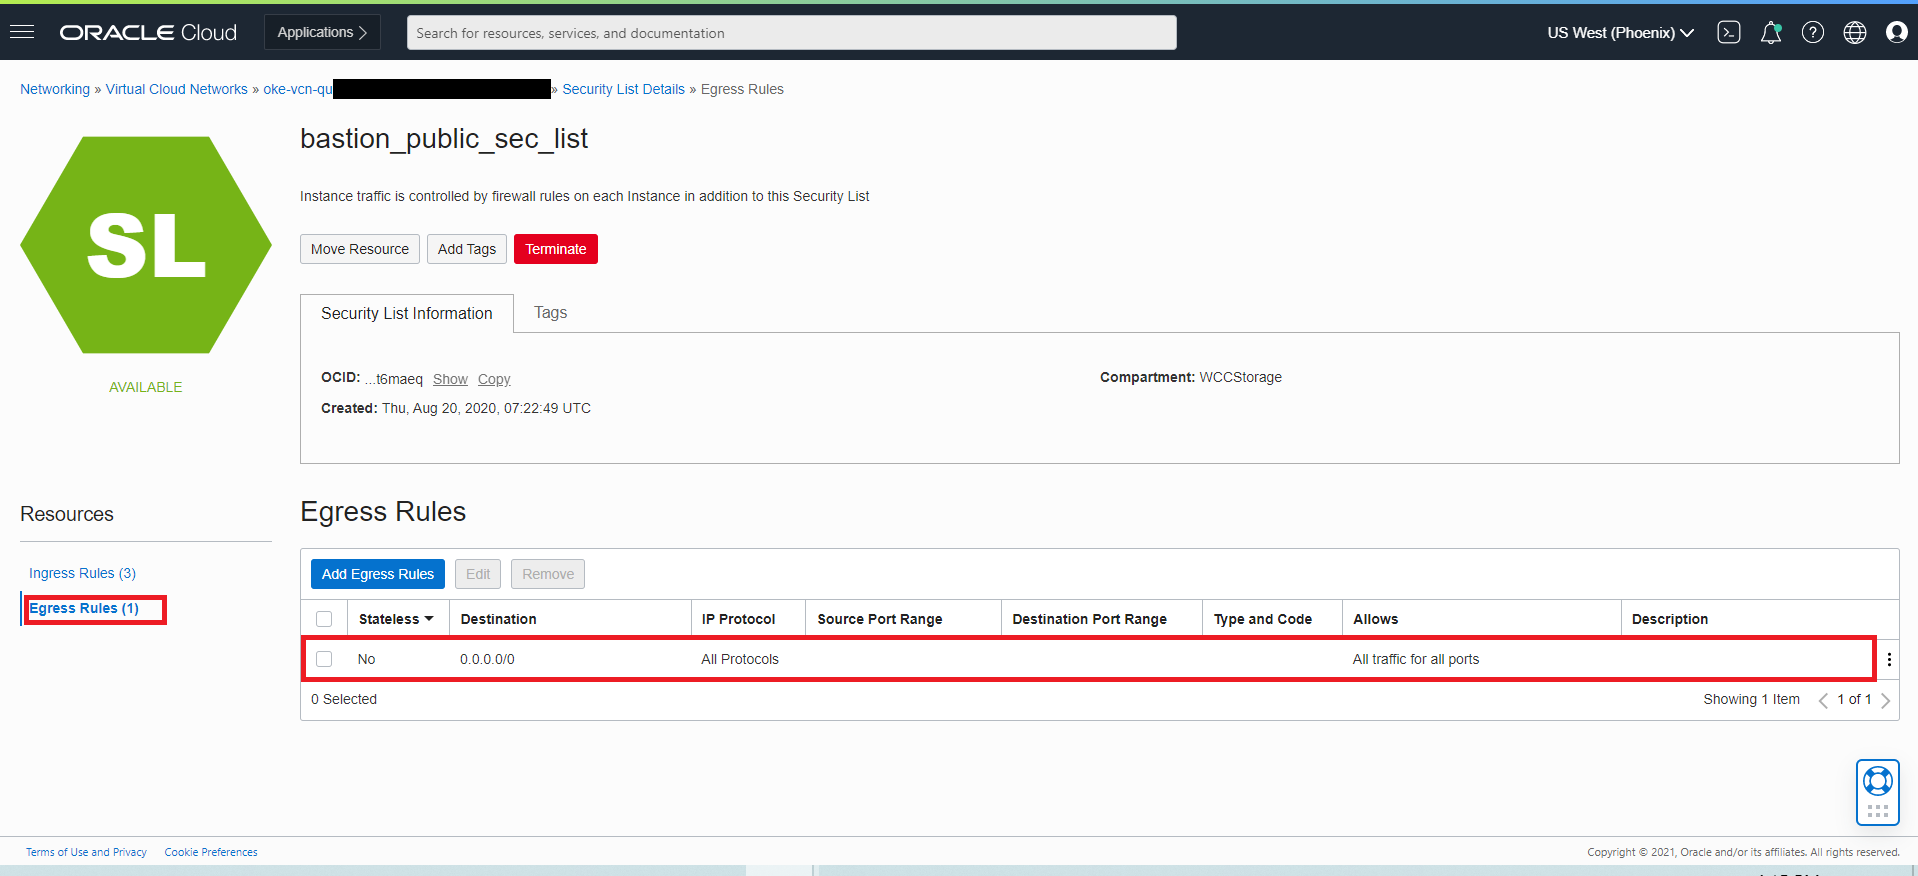
Create a
bastion-public-sec-listsecurity with below Ingress and Egress Rules.Ingress Rules:
 Egress Rules:
-
Create the
bastion-route-tablewithInternet Gateway, so that we can add to bastion instance for internet access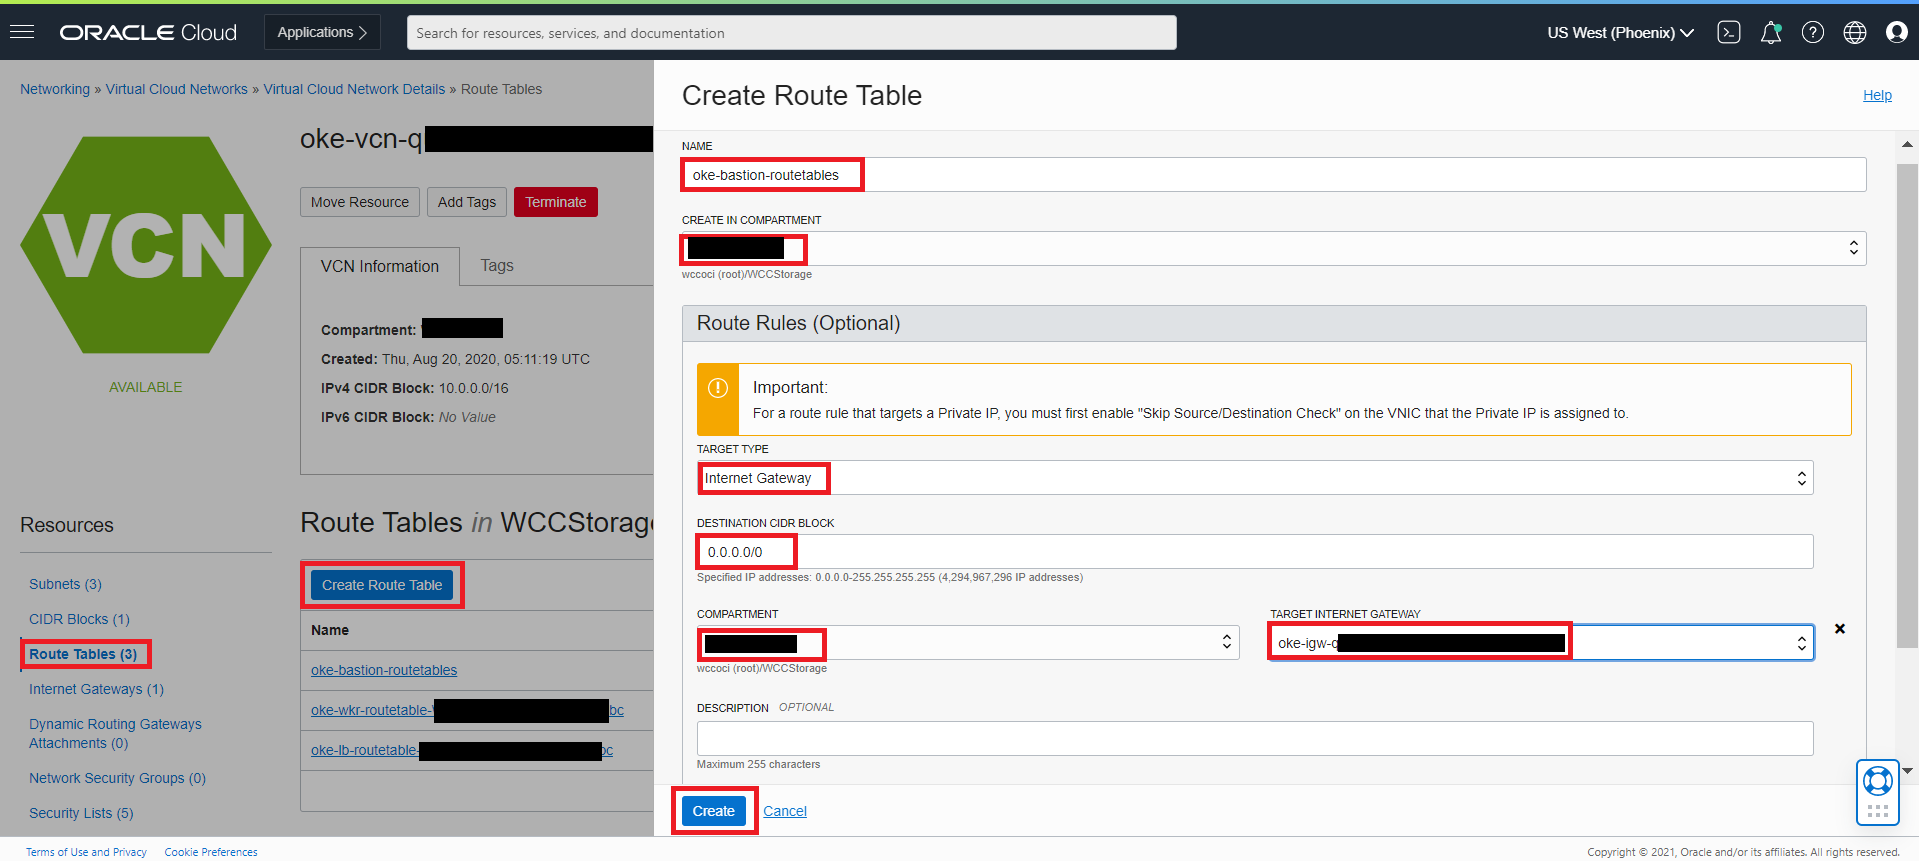
-
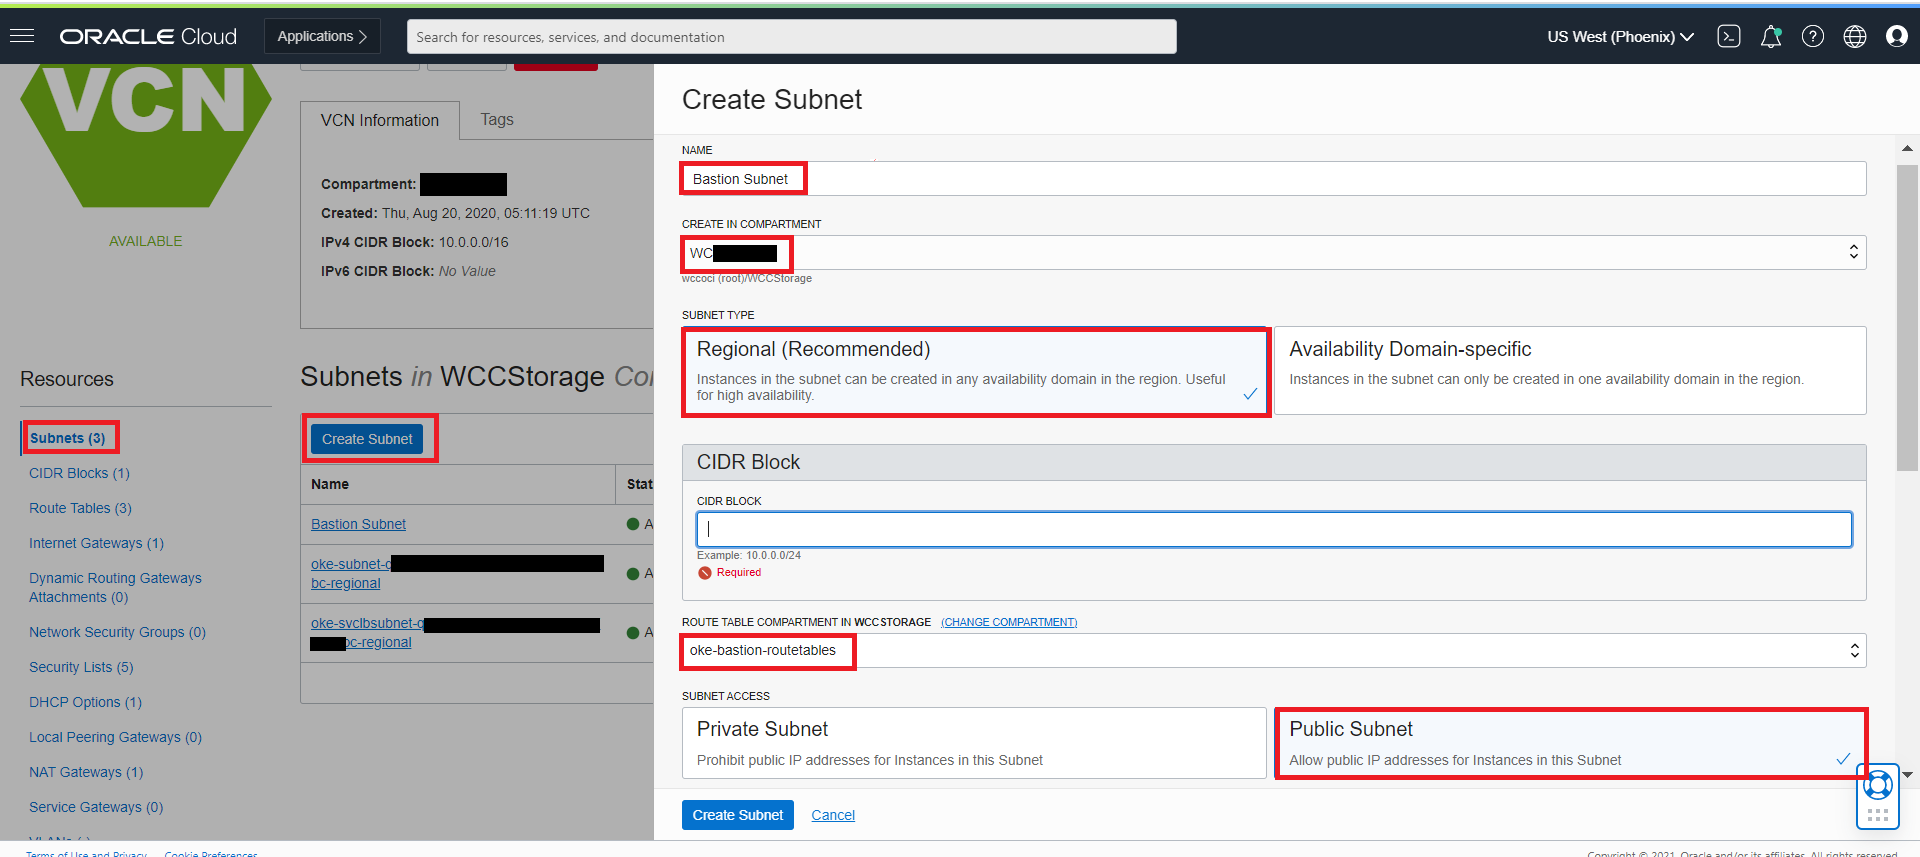
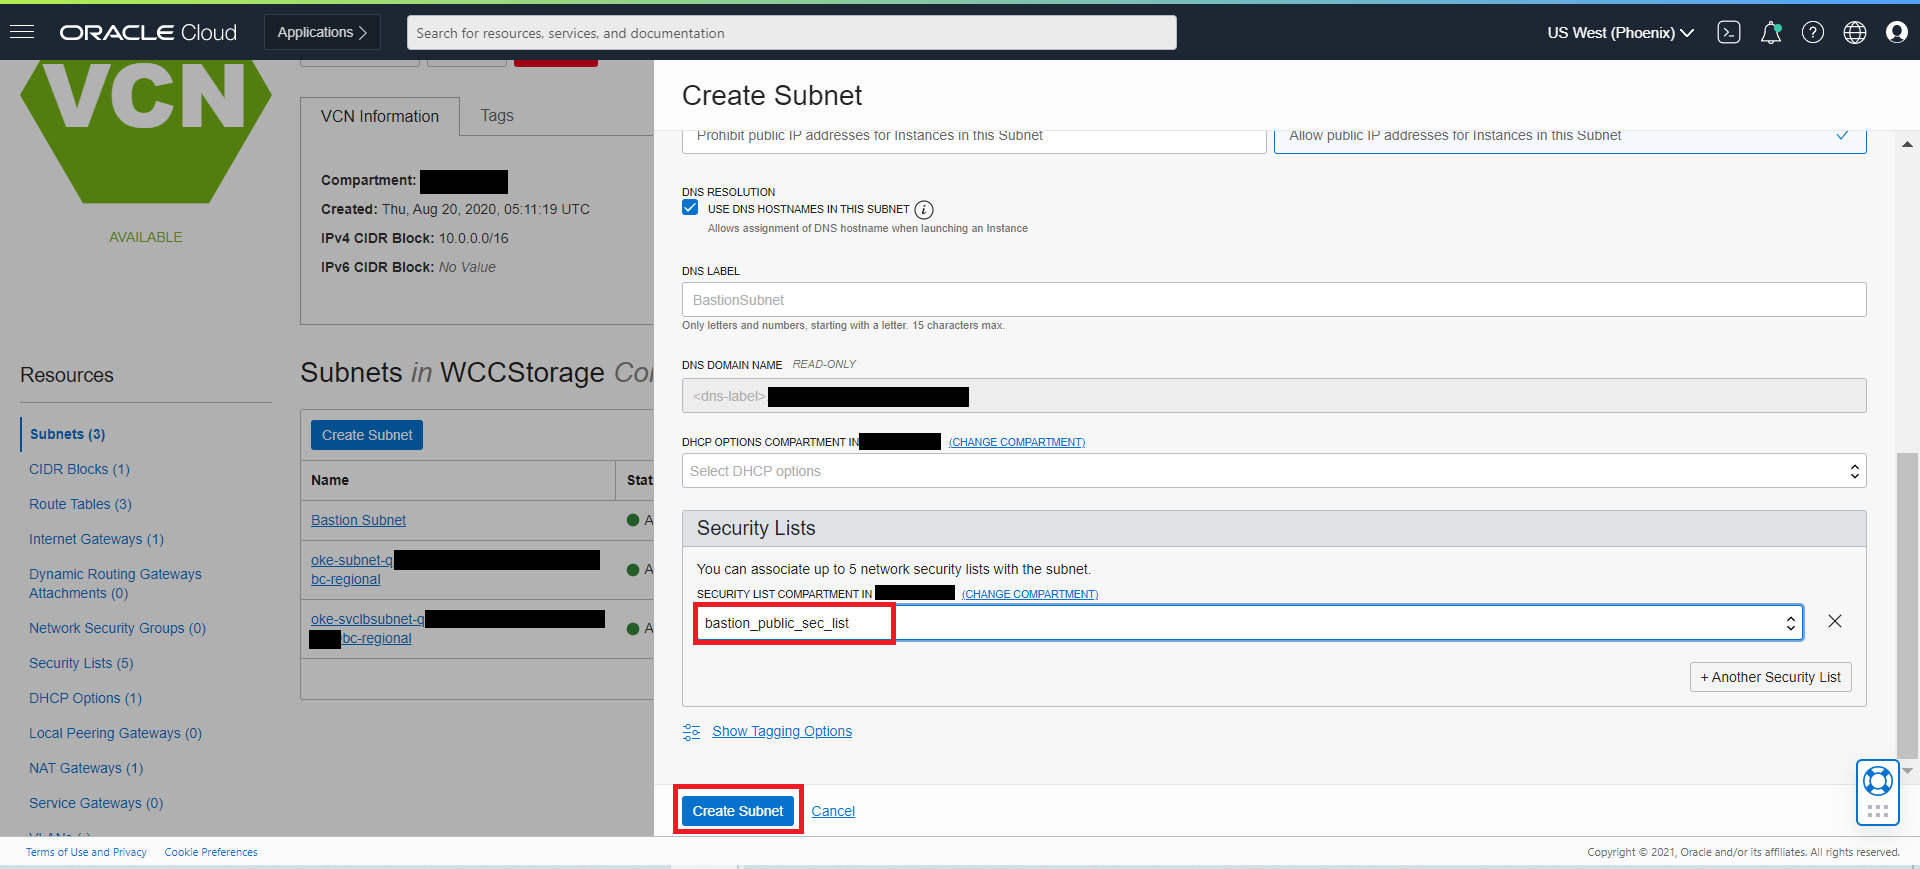
Next create a Regional Public Subnet for bastion instance with name
bastion-subnetwith below details:- CIDR BLOCK: 10.0.22.0/24
- ROUTE TABLE: oke-bastion-routetables
- SUBNET ACCESS: PUBLIC SUBNET
- Security List: bastion-public-sec-list
- DHCP OPTIONS: Select the Default DHCP Options
-
Next Click on the Private Subnet which has Worker Nodes
-
And then add the
bastion-private-sec-listto Worker Private Subnet, so that bastion instance can access the Worker nodes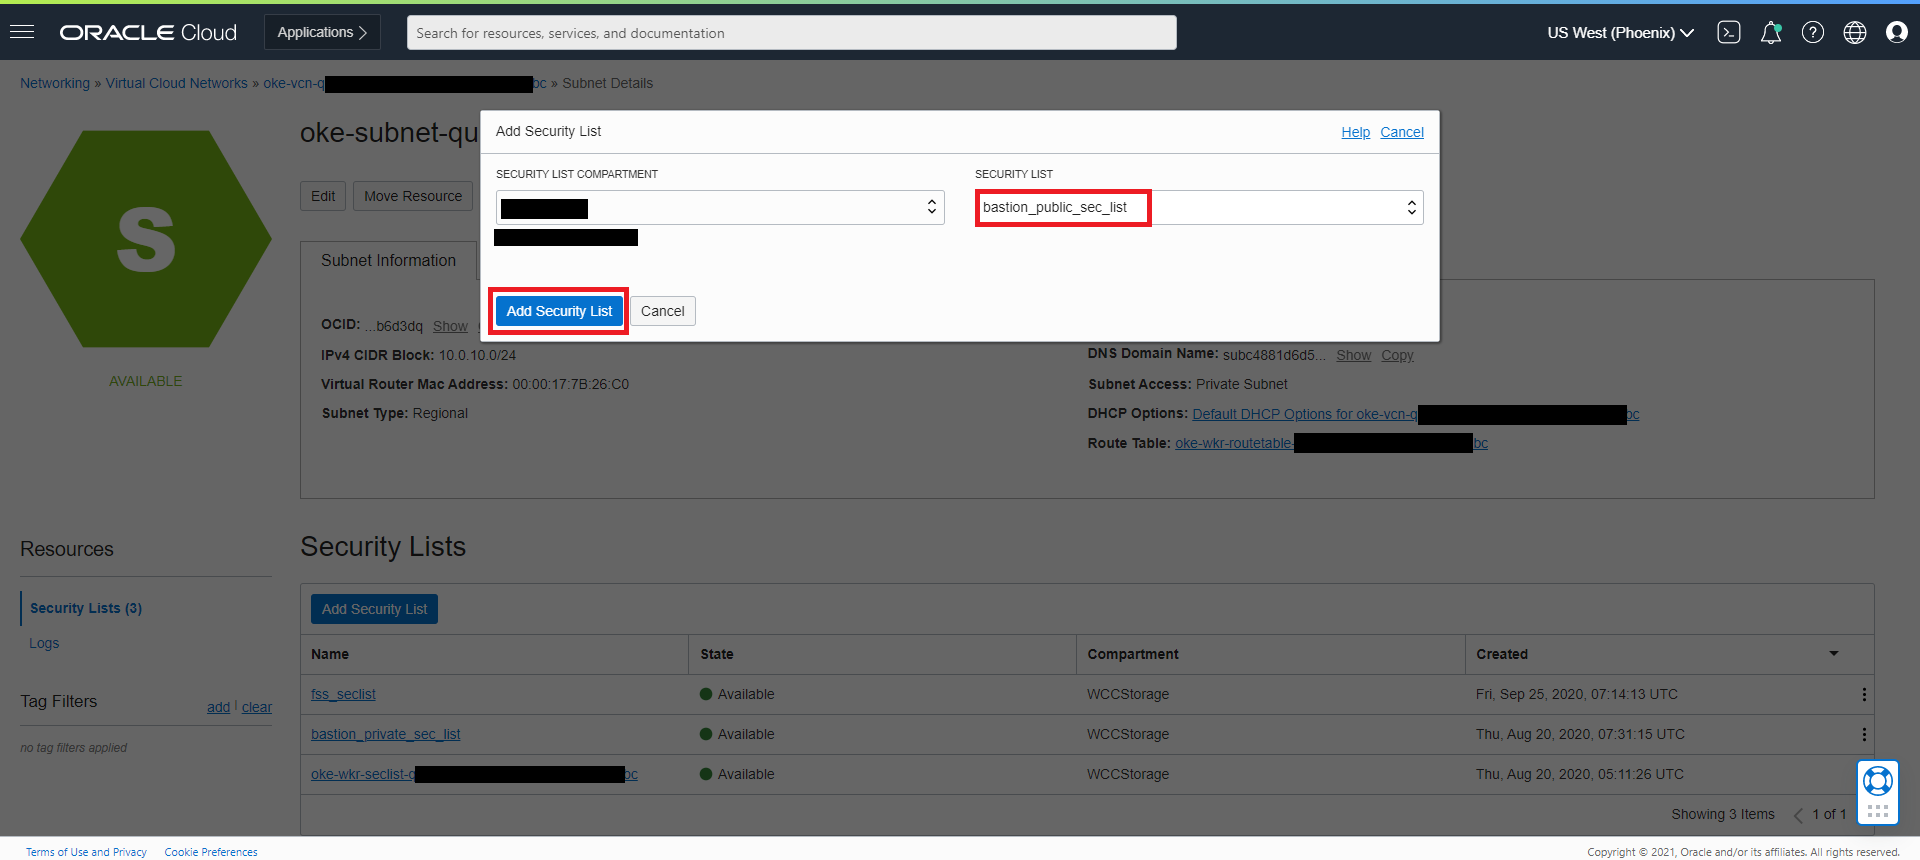
-
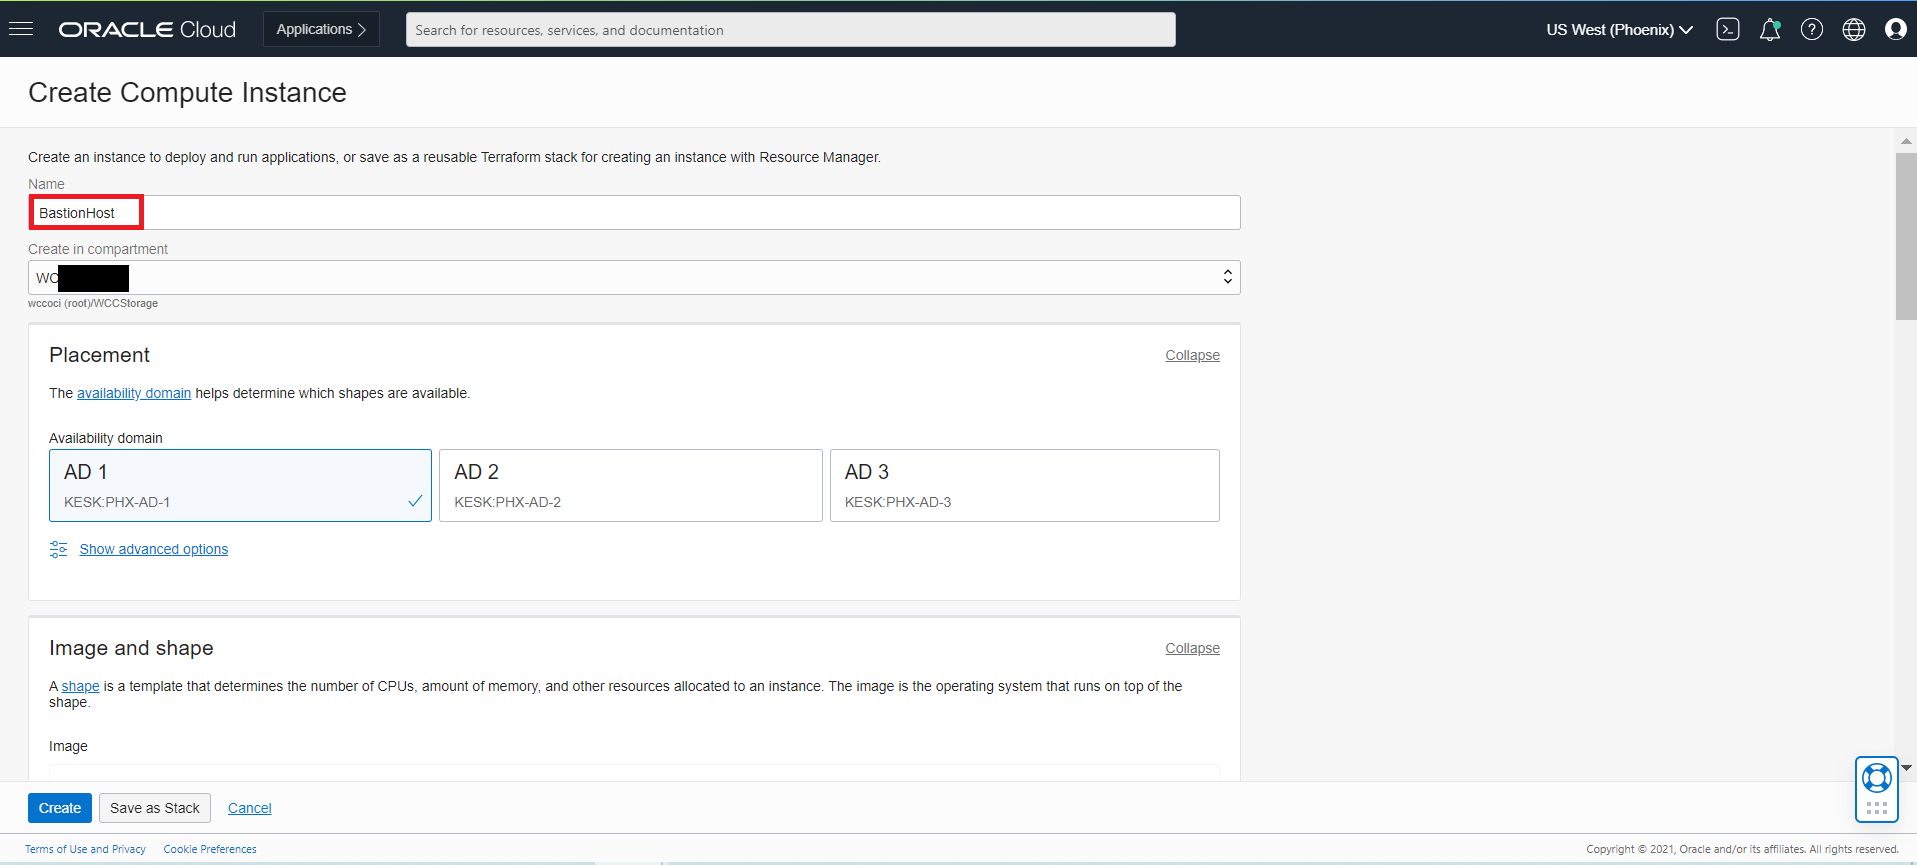
Next Create Compute Instance
oke-bastionwith below details- Name: BastionHost
- Image: Oracle Linux 7.X
- Availability Domain: Choose any AD which has limit for creating Instance
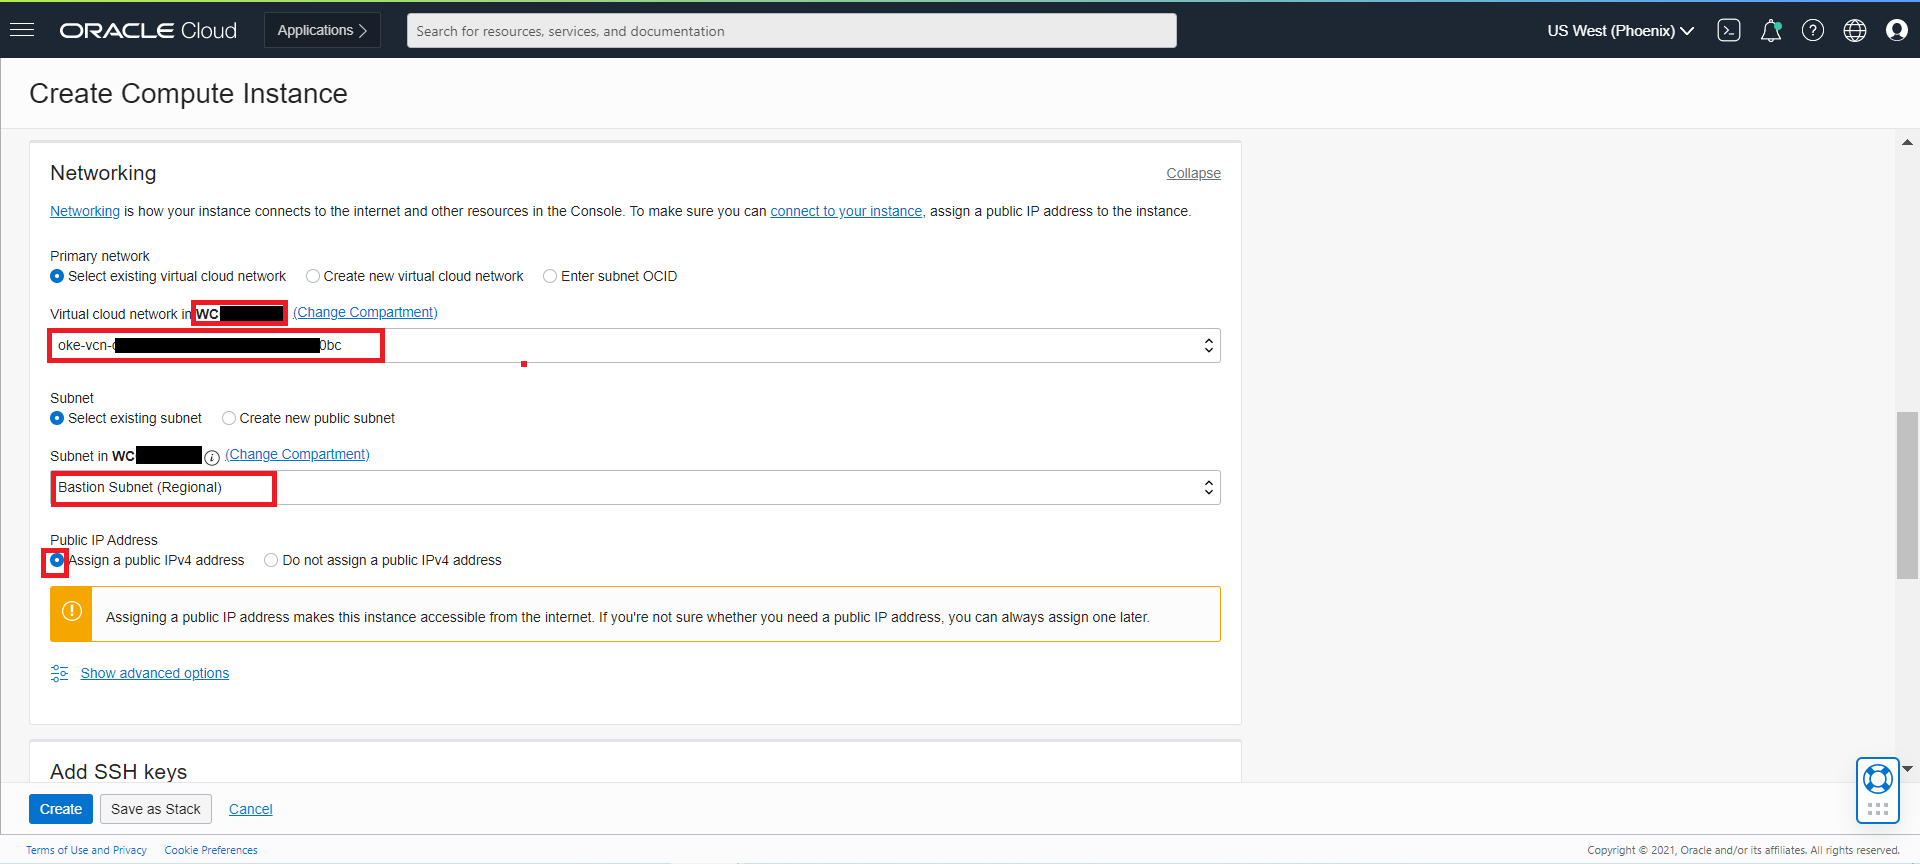
- VIRTUAL CLOUD NETWORK COMPARTMENT: WCCStorage( i.e., OKE Compartment)
- SELECT A VIRTUAL CLOUD NETWORK: Select VCN created by Quick Cluster
- SUBNET COMPARTMENT: WCCStorage ( i.e., OKE Compartment)
- SUBNET: bastion-subnet (create above)
- SELECT ASSIGN A PUBLIC IP ADDRESS
- SSH KEYS: Copy content of id_rsa.pub created in Step1
-
Once bastion Instance
BastionHostis created, get the Public IP to ssh into the bastion instance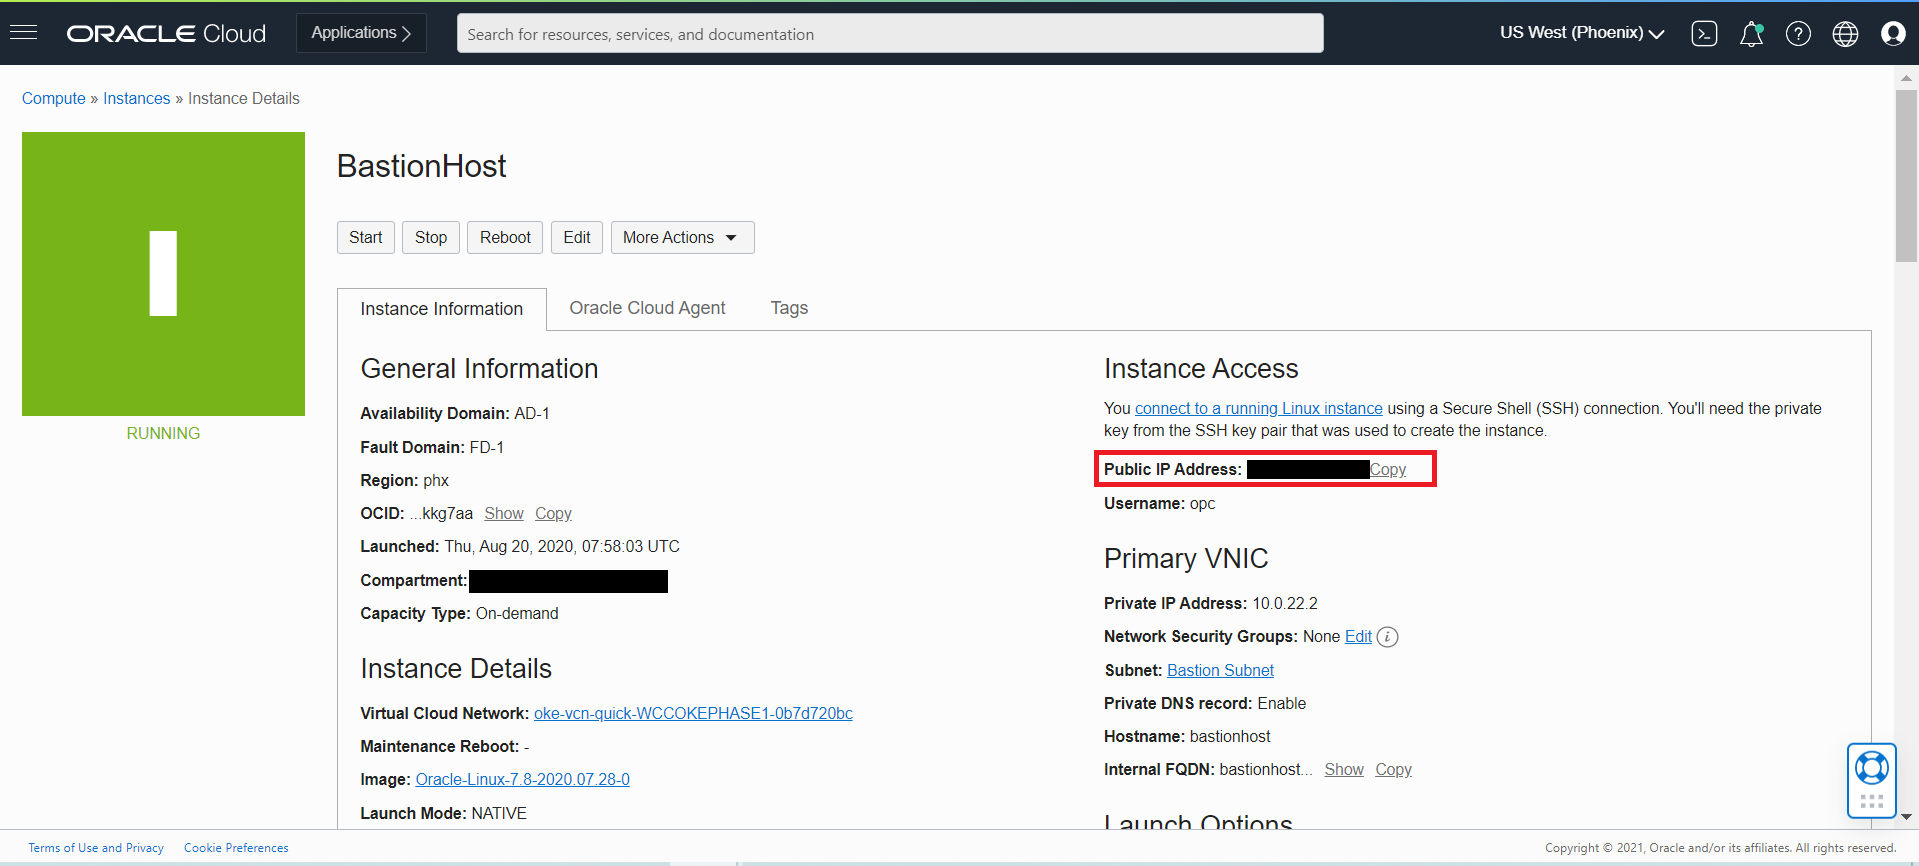
-
Login to bastion host as below
ssh -i <your_ssh_bastion.key> opc@123.456.xxx.xxx
Setup OCI CLI
- Install OCI CLI
bash -c "$(curl -L https://raw.githubusercontent.com/oracle/oci-cli/master/scripts/install/install.sh)" - Respond to the Installation Script Prompts.
- To download the kubeconfig later after setup, we need to setup the oci config file. Follow the below command and enter the details when prompted
$ oci setup configClick here to see the Sample Output$ oci setup config This command provides a walkthrough of creating a valid CLI config file. The following links explain where to find the information required by this script: User API Signing Key, OCID and Tenancy OCID: https://docs.cloud.oracle.com/Content/API/Concepts/apisigningkey.htm#Other Region: https://docs.cloud.oracle.com/Content/General/Concepts/regions.htm General config documentation: https://docs.cloud.oracle.com/Content/API/Concepts/sdkconfig.htm Enter a location for your config [/home/opc/.oci/config]: Enter a user OCID: ocid1.user.oc1..aaaaaaaao3qji52eu4ulgqvg3k4yf7xxxxxxxxxxxxxxxxxxxxxxxxxxxxxx Enter a tenancy OCID: ocid1.tenancy.oc1..aaaaaaaaf33wodv3uhljnn5etiuafoxxxxxxxxxxxxxxxxxxxxxxxxxxxxxx Enter a region (e.g. ap-hyderabad-1, ap-melbourne-1, ap-mumbai-1, ap-osaka-1, ap-seoul-1, ap-sydney-1, ap-tokyo-1, ca-montreal-1, ca-toronto-1, eu-amsterdam-1, eu-frankfurt-1, eu-zurich-1, me-jeddah-1, sa-saopaulo-1, uk-gov-london-1, uk-london-1, us-ashburn-1, us-gov-ashburn-1, us-gov-chicago-1, us-gov-phoenix-1, us-langley-1, us-luke-1, us-phoenix-1): us-phoenix-1 Do you want to generate a new API Signing RSA key pair? (If you decline you will be asked to supply the path to an existing key.) [Y/n]: Y Enter a directory for your keys to be created [/home/opc/.oci]: Enter a name for your key [oci_api_key]: Public key written to: /home/opc/.oci/oci_api_key_public.pem Enter a passphrase for your private key (empty for no passphrase): Private key written to: /home/opc/.oci/oci_api_key.pem Fingerprint: 74:d2:f2:db:62:a9:c4:bd:9b:4f:6c:d8:31:1d:a1:d8 Config written to /home/opc/.oci/config If you haven't already uploaded your API Signing public key through the console, follow the instructions on the page linked below in the section 'How to upload the public key': https://docs.cloud.oracle.com/Content/API/Concepts/apisigningkey.htm#How2 - Now you need to upload the created public key in $HOME/.oci (oci_api_key_public.pem) to OCI console
Login to OCI Console and navigate to
User Settings, which is in the drop down under your OCI userprofile, located at the top-right corner of the page.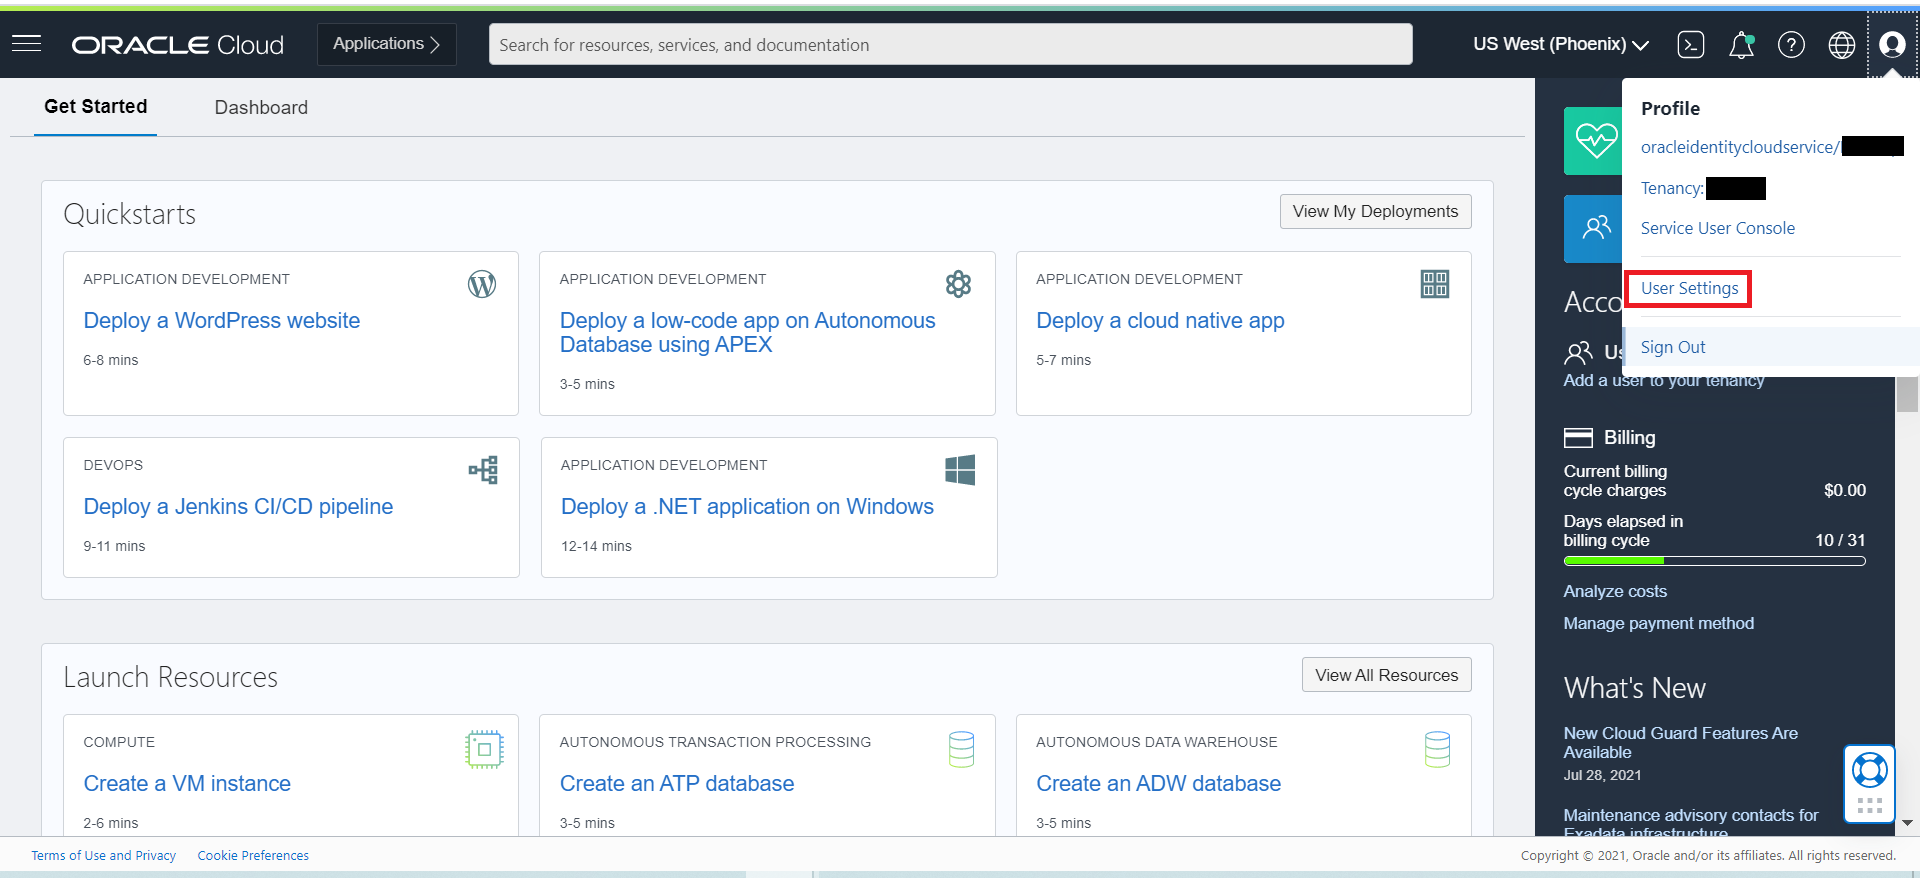
- On User Details page, Click
Api Keyslink, located near bottom-left corner of the page and then Click theAdd API Keybutton. Copy the content ofoci_api_key_public.pemand ClickAdd.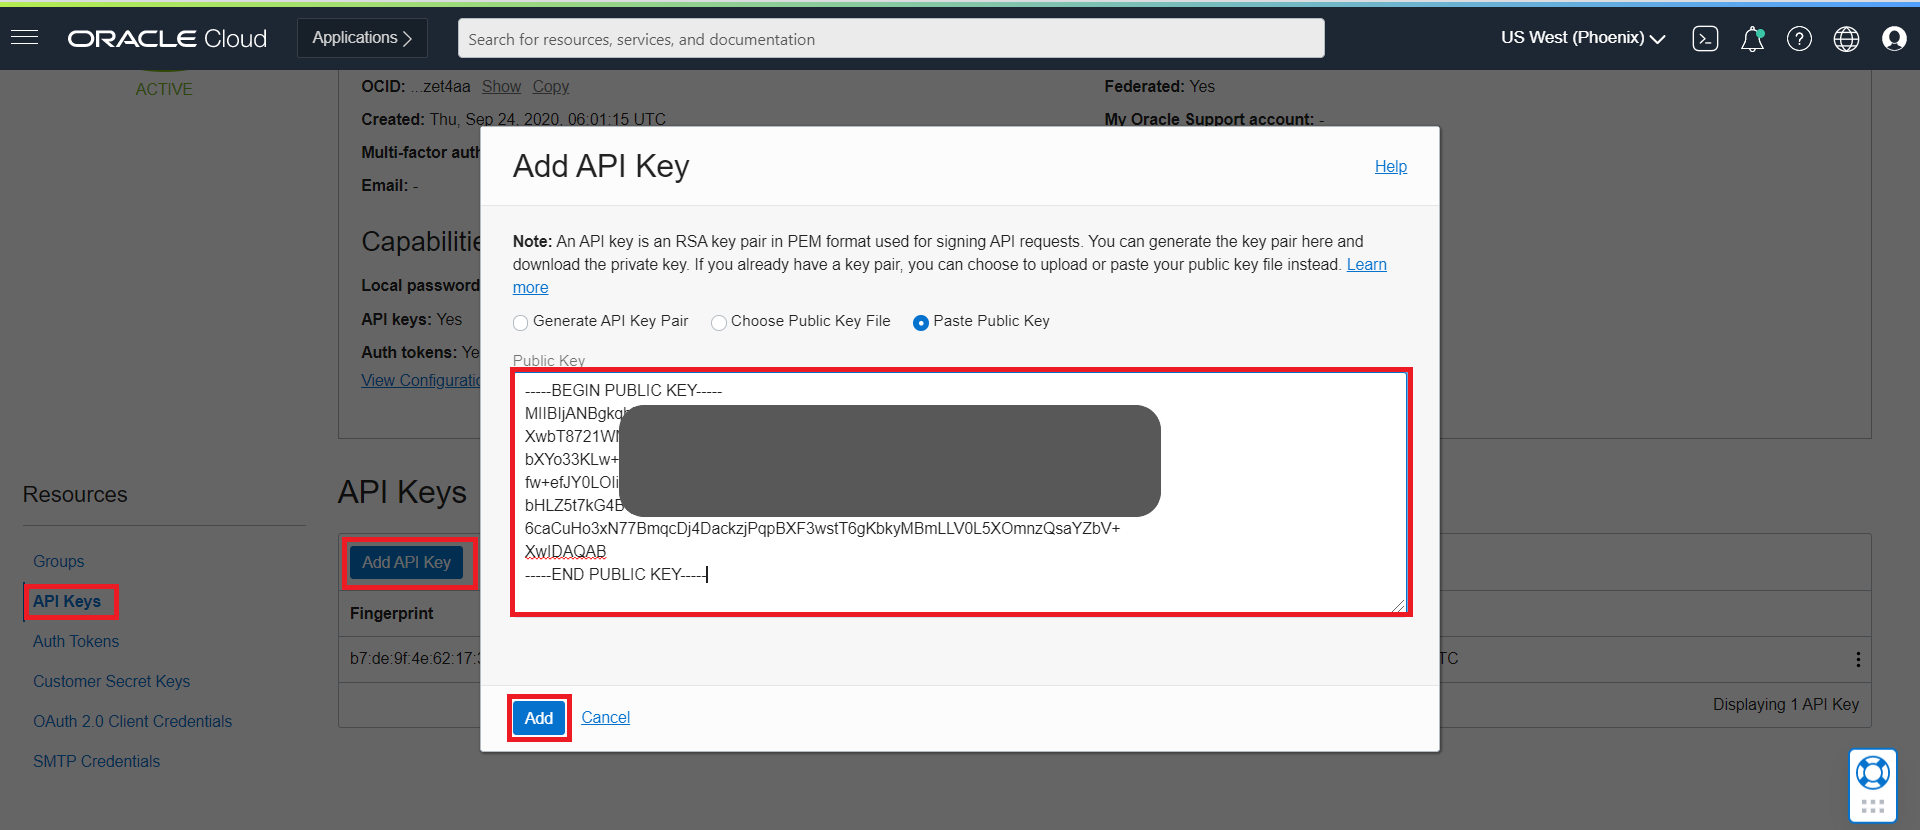
- Now you can use the oci cli to access the OCI resources.
- To access the Cluster, Click on
Access Clusteron the ClusterWCCOKEPHASE1page - To access the Cluster from Bastion node perform steps as per the
Local Access.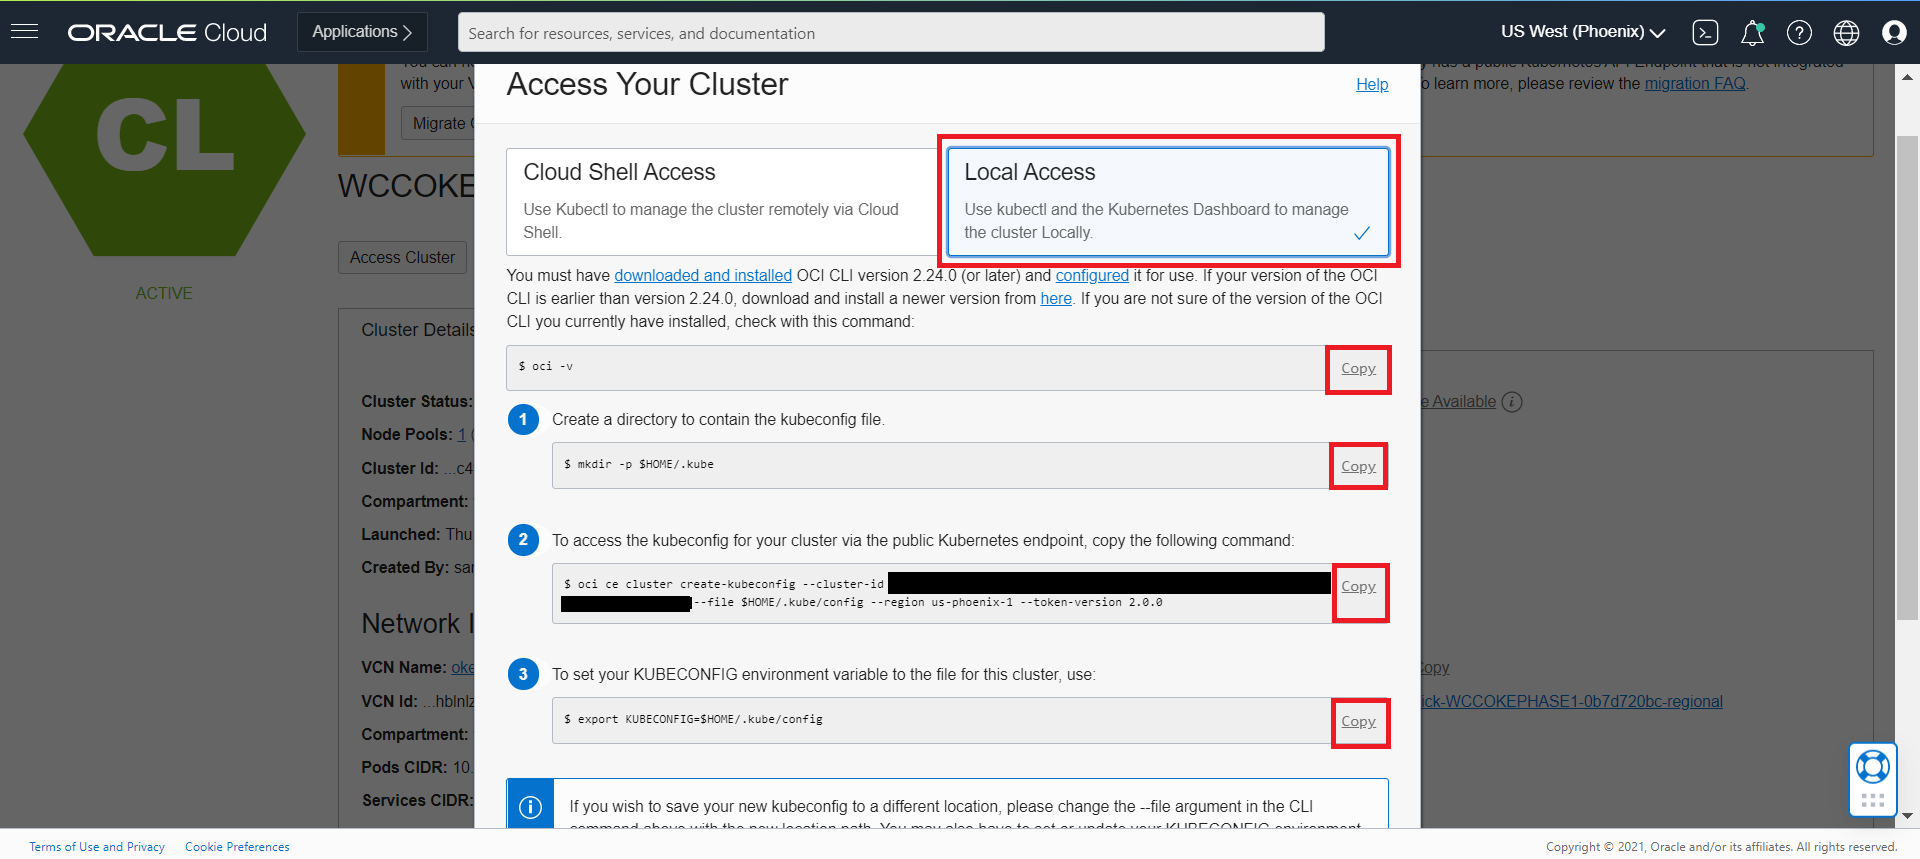
$ oci -v $ mkdir -p $HOME/.kube $ oci ce cluster create-kubeconfig --cluster-id ocid1.cluster.oc1.phx.aaaaaaaaae4xxxxxxxxxxxxxxxxxxxxxxxxxxxxxxxxxxxxxxxxxxxrqgjtd --file $HOME/.kube/config --region us-phoenix-1 --token-version 2.0.0 $ export KUBECONFIG=$HOME/.kube/config - Install kubectl Client to access the Cluster
$ curl -LO https://dl.k8s.io/release/v1.15.7/bin/linux/amd64/kubectl $ sudo mv kubectl /bin/ $ sudo chmod +x /bin/kubectl - Access the Cluster from bastion node
$ kubectl get nodes NAME STATUS ROLES AGE VERSION 10.0.10.197 Ready node 14d v1.23.4 10.0.10.206 Ready node 14d v1.23.4 10.0.10.50 Ready node 14d v1.23.4 - Install required add-ons for Oracle WebCenter Content Cluster setup
- Install helm v3
$ wget https://get.helm.sh/helm-v3.5.4-linux-amd64.tar.gz $ tar -zxvf helm-v3.5.4-linux-amd64.tar.gz $ sudo mv linux-amd64/helm /bin/helm $ helm version version.BuildInfo{Version:"v3.5.4", GitCommit:"1b5edb69df3d3a08df77c9902dc17af864ff05d1", GitTreeState:"clean", GoVersion:"go1.15.11"} - Install git
sudo yum install git -y
- Install helm v3