Create Oracle WebCenter Content domain
Contents
- Run the create domain script
- Create Container Clusters (OKE)
- Verify the results
- Verify the pods
- Verify the services
- Expose service for IBR intradoc port
- Expose service for UCM intradoc port
Run the create domain script
Run the create domain script, specifying your inputs file and an output directory to store the generated artifacts:
$ cd ${WORKDIR}/create-wcc-domain/domain-home-on-pv/

$ ./create-domain.sh \
  -i create-domain-inputs.yaml \
  -o <path to output-directory>
The script will perform the following steps:
- Create a directory for the generated Kubernetes YAML files for this domain if it does not
already exist. The path name is
<path to output-directory>/weblogic-domains/<domainUID>. If the directory already exists, its contents must be removed before using this script. - Create a Kubernetes job that will start up a utility Oracle WebCenter Content container and run offline WLST scripts to create the domain on the shared storage.
- Run and wait for the job to finish.
- Create a Kubernetes domain YAML file,
domain.yaml, in the “output” directory that was created above. This YAML file can be used to create the Kubernetes resource using thekubectl create -forkubectl apply -fcommand.
Run the managed-server-wrapper script
Run oke-start-managed-server-wrapper.sh script, which intrenally applies the domain YAML. This script also applies initial configurations for Managed Server containers and readies Managed Servers for future inter-container communications.
$ cd ${WORKDIR}/create-wcc-domain/domain-home-on-pv/

$ ./oke-start-managed-servers-wrapper.sh -o <path_to_output_directory> -l <load_balancer_external_ip> -p <load_balancer_port> -s <ssl_termination>
Note: A value for parameter
-sneeds to be provided only if SSL termination at loadbalancer is being used - acceptable value is eithertrueorfalse. If this parameter value is not supplied, the script assumes that ssl termination at loadbalancer is not being used and by default the value will be taken asfalse.
Run the startup configuration scripts for IPM and WCCADF applications as applicable
Run the script configure-ipm-connection.sh to do startup configurations if IPM is enabled.
$ cd ${WORKDIR}/create-wcc-domain/domain-home-on-pv/
$ ./configure-ipm-connection.sh -l <load_balancer_external_ip> -p <load_balancer_port>
Run the script configure-wccadf-domain.sh to do startup configurations if ADFUI is enabled.
$ cd ${WORKDIR}/create-wcc-domain/domain-home-on-pv/
$ ./configure-wccadf-domain.sh -n <node_ip>
Patch the domain for the changes to be applied to the domain.
#STOP
$ kubectl patch domain DOMAINUID -n NAMESPACE --type='json' -p='[{"op": "replace", "path": "/spec/serverStartPolicy", "value": "NEVER" }]'

sleep 2m

#START
$ kubectl patch domain DOMAINUID -n NAMESPACE --type='json' -p='[{"op": "replace", "path": "/spec/serverStartPolicy", "value": "IF_NEEDED" }]'
Verify the results
The create domain script will verify that the domain was created, and will report failure if there was any error. However, it may be desirable to manually verify the domain, even if just to gain familiarity with the various Kubernetes objects that were created by the script.
Generated YAML files with the default inputs
$ cat output/weblogic-domains/wccinfra/domain.yaml
# Copyright (c) 2017, 2021, Oracle and/or its affiliates.
# Licensed under the Universal Permissive License v 1.0 as shown at https://oss.oracle.com/licenses/upl.
#
# This is an example of how to define a Domain resource.
#
apiVersion: "weblogic.oracle/v8"
kind: Domain
metadata:
  name: wccinfra
  namespace: wccns
  labels:
    weblogic.domainUID: wccinfra
spec:
  # The WebLogic Domain Home
  domainHome: /u01/oracle/user_projects/domains/wccinfra
  maxClusterConcurrentStartup: 1

  # The domain home source type
  # Set to PersistentVolume for domain-in-pv, Image for domain-in-image, or FromModel for model-in-image
  domainHomeSourceType: PersistentVolume

  # The WebLogic Server image that the WebLogic Kubernetes Operator uses to start the domain
  image: "phx.ocir.io/xxxxxxxxxx/oracle/wccontent/oracle/wccontent:x.x.x.x"

  # imagePullPolicy defaults to "Always" if image version is :latest
  imagePullPolicy: "IfNotPresent"

  # Identify which Secret contains the credentials for pulling an image
  imagePullSecrets:
  - name: image-secret

  # Identify which Secret contains the WebLogic Admin credentials (note that there is an example of
  # how to create that Secret at the end of this file)
  webLogicCredentialsSecret:
    name: wccinfra-domain-credentials

  # Whether to include the server out file into the pod's stdout, default is true
  includeServerOutInPodLog: true

  # Whether to enable log home
  logHomeEnabled: true

  # Whether to write HTTP access log file to log home
  httpAccessLogInLogHome: true

  # The in-pod location for domain log, server logs, server out, introspector out, and Node Manager log files
  logHome: /u01/oracle/user_projects/domains/logs/wccinfra
  # An (optional) in-pod location for data storage of default and custom file stores.
  # If not specified or the value is either not set or empty (e.g. dataHome: "") then the
  # data storage directories are determined from the WebLogic domain home configuration.
  dataHome: ""


  # serverStartPolicy legal values are "NEVER", "IF_NEEDED", or "ADMIN_ONLY"
  # This determines which WebLogic Servers the WebLogic Kubernetes Operator will start up when it discovers this Domain
  # - "NEVER" will not start any server in the domain
  # - "ADMIN_ONLY" will start up only the administration server (no managed servers will be started)
  # - "IF_NEEDED" will start all non-clustered servers, including the administration server and clustered servers up to the replica count
  serverStartPolicy: "IF_NEEDED"

  serverPod:
    # an (optional) list of environment variable to be set on the servers
    env:
    - name: JAVA_OPTIONS
      value: "-Dweblogic.StdoutDebugEnabled=false"
    - name: USER_MEM_ARGS
      value: "-Djava.security.egd=file:/dev/./urandom -Xms256m -Xmx1024m "
    volumes:
    - name: weblogic-domain-storage-volume
      persistentVolumeClaim:
        claimName: wccinfra-domain-pvc
    volumeMounts:
    - mountPath: /u01/oracle/user_projects/domains
      name: weblogic-domain-storage-volume

  # adminServer is used to configure the desired behavior for starting the administration server.
  adminServer:
    # serverStartState legal values are "RUNNING" or "ADMIN"
    # "RUNNING" means the listed server will be started up to "RUNNING" mode
    # "ADMIN" means the listed server will be start up to "ADMIN" mode
    serverStartState: "RUNNING"
    # adminService:
    #   channels:
    # The Admin Server's NodePort
    #    - channelName: default
    #      nodePort: 30701
    # Uncomment to export the T3Channel as a service
    #    - channelName: T3Channel

  # clusters is used to configure the desired behavior for starting member servers of a cluster.
  # If you use this entry, then the rules will be applied to ALL servers that are members of the named clusters.
  clusters:
  - clusterName: ibr_cluster
    serverService:
      precreateService: true
    serverStartState: "RUNNING"
    serverPod:
      # Instructs Kubernetes scheduler to prefer nodes for new cluster members where there are not
      # already members of the same cluster.
      affinity:
        podAntiAffinity:
          preferredDuringSchedulingIgnoredDuringExecution:
            - weight: 100
              podAffinityTerm:
                labelSelector:
                  matchExpressions:
                    - key: "weblogic.clusterName"
                      operator: In
                      values:
                        - $(CLUSTER_NAME)
                topologyKey: "kubernetes.io/hostname"
    replicas: 1
  # The number of managed servers to start for unlisted clusters
  # replicas: 1

  # Istio
  # configuration:
  #   istio:
  #     enabled:
  #     readinessPort:

  - clusterName: ucm_cluster
    clusterService:
         annotations:
            traefik.ingress.kubernetes.io/affinity: "true"
            traefik.ingress.kubernetes.io/service.sticky.cookie: "true"
            traefik.ingress.kubernetes.io/session-cookie-name: JSESSIONID
    serverService:
      precreateService: true
    serverStartState: "RUNNING"
    serverPod:
      # Instructs Kubernetes scheduler to prefer nodes for new cluster members where there are not
      # already members of the same cluster.
      affinity:
        podAntiAffinity:
          preferredDuringSchedulingIgnoredDuringExecution:
            - weight: 100
              podAffinityTerm:
                labelSelector:
                  matchExpressions:
                    - key: "weblogic.clusterName"
                      operator: In
                      values:
                        - $(CLUSTER_NAME)
                topologyKey: "kubernetes.io/hostname"
    replicas: 3
  # The number of managed servers to start for unlisted clusters
  # replicas: 1
    - clusterName: ipm_cluster
    clusterService:
         annotations:
            traefik.ingress.kubernetes.io/affinity: "true"
            traefik.ingress.kubernetes.io/service.sticky.cookie: "true"
            traefik.ingress.kubernetes.io/session-cookie-name: JSESSIONID
    serverService:
      precreateService: true
    serverStartState: "RUNNING"
    serverPod:
      # Instructs Kubernetes scheduler to prefer nodes for new cluster members where there are not
      # already members of the same cluster.
      affinity:
        podAntiAffinity:
          preferredDuringSchedulingIgnoredDuringExecution:
            - weight: 100
              podAffinityTerm:
                labelSelector:
                  matchExpressions:
                    - key: "weblogic.clusterName"
                      operator: In
                      values:
                        - $(CLUSTER_NAME)
                topologyKey: "kubernetes.io/hostname"
    replicas: 3
  # The number of managed servers to start for unlisted clusters
  # replicas: 1
  - clusterName: capture_cluster
    clusterService:
         annotations:
            traefik.ingress.kubernetes.io/affinity: "true"
            traefik.ingress.kubernetes.io/service.sticky.cookie: "true"
            traefik.ingress.kubernetes.io/session-cookie-name: JSESSIONID
    serverService:
      precreateService: true
    serverStartState: "RUNNING"
    serverPod:
      # Instructs Kubernetes scheduler to prefer nodes for new cluster members where there are not
      # already members of the same cluster.
      affinity:
        podAntiAffinity:
          preferredDuringSchedulingIgnoredDuringExecution:
            - weight: 100
              podAffinityTerm:
                labelSelector:
                  matchExpressions:
                    - key: "weblogic.clusterName"
                      operator: In
                      values:
                        - $(CLUSTER_NAME)
                topologyKey: "kubernetes.io/hostname"
    replicas: 3
  # The number of managed servers to start for unlisted clusters
  # replicas: 1
  - clusterName: wccadf_cluster
    clusterService:
         annotations:
            traefik.ingress.kubernetes.io/affinity: "true"
            traefik.ingress.kubernetes.io/service.sticky.cookie: "true"
            traefik.ingress.kubernetes.io/session-cookie-name: WCCSID
    serverService:
      precreateService: true
    serverStartState: "RUNNING"
    serverPod:
      # Instructs Kubernetes scheduler to prefer nodes for new cluster members where there are not
      # already members of the same cluster.
      affinity:
        podAntiAffinity:
          preferredDuringSchedulingIgnoredDuringExecution:
            - weight: 100
              podAffinityTerm:
                labelSelector:
                  matchExpressions:
                    - key: "weblogic.clusterName"
                      operator: In
                      values:
                        - $(CLUSTER_NAME)
                topologyKey: "kubernetes.io/hostname"
    replicas: 3
  # The number of managed servers to start for unlisted clusters
  # replicas: 1
Verify the domain
To confirm that the domain was created, enter the following command:
$ kubectl describe domain DOMAINUID -n NAMESPACE
Replace DOMAINUID with the domainUID and NAMESPACE with the actual namespace.
[opc@bastionhost domain-home-on-pv]$ kubectl describe domain wccinfra -n wccns
Name:         wccinfra
Namespace:    wccns
Labels:       weblogic.domainUID=wccinfra
Annotations:  kubectl.kubernetes.io/last-applied-configuration:
                {"apiVersion":"weblogic.oracle/v8","kind":"Domain","metadata":{"annotations":{},"labels":{"weblogic.domainUID":"wccinfra"},"name":"wccinfr...
API Version:  weblogic.oracle/v8
Kind:         Domain
Metadata:
  Creation Timestamp:  2021-08-24T12:26:19Z
  Generation:          33
  Managed Fields:
    API Version:  weblogic.oracle/v8
    Fields Type:  FieldsV1
    fieldsV1:
      f:metadata:
        f:annotations:
          .:
          f:kubectl.kubernetes.io/last-applied-configuration:
        f:labels:
          .:
          f:weblogic.domainUID:
    Manager:      kubectl
    Operation:    Update
    Time:         2021-09-30T10:56:07Z
    API Version:  weblogic.oracle/v8
    Fields Type:  FieldsV1
    fieldsV1:
      f:status:
        .:
        f:clusters:
        f:conditions:
        f:introspectJobFailureCount:
        f:servers:
        f:startTime:
    Manager:         Kubernetes Java Client
    Operation:       Update
    Time:            2021-10-04T20:06:17Z
  Resource Version:  115422662
  Self Link:         /apis/weblogic.oracle/v8/namespaces/wccns/domains/wccinfra
  UID:               e283c968-b80b-404b-aa1e-711080d7cc38
Spec:
  Admin Server:
    Server Start State:  RUNNING
  Clusters:
    Cluster Name:  ibr_cluster
    Replicas:      1
    Server Pod:
      Affinity:
        Pod Anti Affinity:
          Preferred During Scheduling Ignored During Execution:
            Pod Affinity Term:
              Label Selector:
                Match Expressions:
                  Key:       weblogic.clusterName
                  Operator:  In
                  Values:
                    $(CLUSTER_NAME)
              Topology Key:  kubernetes.io/hostname
            Weight:          100
    Server Service:
      Precreate Service:  true
    Server Start State:   RUNNING
    Cluster Name:         ucm_cluster
    Cluster Service:
      Annotations:
        traefik.ingress.kubernetes.io/affinity:               true
        traefik.ingress.kubernetes.io/service.sticky.cookie:  true
        traefik.ingress.kubernetes.io/session-cookie-name:    JSESSIONID
    Replicas:                                                 3
    Server Pod:
      Affinity:
        Pod Anti Affinity:
          Preferred During Scheduling Ignored During Execution:
            Pod Affinity Term:
              Label Selector:
                Match Expressions:
                  Key:       weblogic.clusterName
                  Operator:  In
                  Values:
                    $(CLUSTER_NAME)
              Topology Key:  kubernetes.io/hostname
            Weight:          100
    Server Service:
      Precreate Service:        true
    Server Start State:         RUNNING
        Cluster Name:         ipm_cluster
    Cluster Service:
      Annotations:
        traefik.ingress.kubernetes.io/affinity:               true
        traefik.ingress.kubernetes.io/service.sticky.cookie:  true
        traefik.ingress.kubernetes.io/session-cookie-name:    JSESSIONID
    Replicas:                                                 3
    Server Pod:
      Affinity:
        Pod Anti Affinity:
          Preferred During Scheduling Ignored During Execution:
            Pod Affinity Term:
              Label Selector:
                Match Expressions:
                  Key:       weblogic.clusterName
                  Operator:  In
                  Values:
                    $(CLUSTER_NAME)
              Topology Key:  kubernetes.io/hostname
            Weight:          100
    Server Service:
      Precreate Service:  true
    Server Start State:   RUNNING
    Cluster Name:         capture_cluster
    Cluster Service:
      Annotations:
        traefik.ingress.kubernetes.io/affinity:               true
        traefik.ingress.kubernetes.io/service.sticky.cookie:  true
        traefik.ingress.kubernetes.io/session-cookie-name:    JSESSIONID
    Replicas:                                                 3
    Server Pod:
      Affinity:
        Pod Anti Affinity:
          Preferred During Scheduling Ignored During Execution:
            Pod Affinity Term:
              Label Selector:
                Match Expressions:
                  Key:       weblogic.clusterName
                  Operator:  In
                  Values:
                    $(CLUSTER_NAME)
              Topology Key:  kubernetes.io/hostname
            Weight:          100
    Server Service:
      Precreate Service:  true
    Server Start State:   RUNNING
    Cluster Name:         wccadf_cluster
    Cluster Service:
      Annotations:
        traefik.ingress.kubernetes.io/affinity:               true
        traefik.ingress.kubernetes.io/service.sticky.cookie:  true
        traefik.ingress.kubernetes.io/session-cookie-name:    WCCSID
    Replicas:                                                 3
    Server Pod:
      Affinity:
        Pod Anti Affinity:
          Preferred During Scheduling Ignored During Execution:
            Pod Affinity Term:
              Label Selector:
                Match Expressions:
                  Key:       weblogic.clusterName
                  Operator:  In
                  Values:
                    $(CLUSTER_NAME)
              Topology Key:  kubernetes.io/hostname
            Weight:          100
    Server Service:
      Precreate Service:  true
    Server Start State:   RUNNING
  Data Home:
  Domain Home:                  /u01/oracle/user_projects/domains/wccinfra
  Domain Home Source Type:      PersistentVolume
  Http Access Log In Log Home:  true
  Image:                        phx.ocir.io/xxxxxxxxxx/oracle/wccontent:x.x.x.x
  Image Pull Policy:            IfNotPresent
  Image Pull Secrets:
    Name:                          image-secret
  Include Server Out In Pod Log:   true
  Log Home:                        /u01/oracle/user_projects/domains/logs/wccinfra
  Log Home Enabled:                true
  Max Cluster Concurrent Startup:  1
  Server Pod:
    Env:
      Name:   JAVA_OPTIONS
      Value:  -Dweblogic.StdoutDebugEnabled=false
      Name:   USER_MEM_ARGS
      Value:  -Djava.security.egd=file:/dev/./urandom -Xms256m -Xmx1024m
    Volume Mounts:
      Mount Path:  /u01/oracle/user_projects/domains
      Name:        weblogic-domain-storage-volume
    Volumes:
      Name:  weblogic-domain-storage-volume
      Persistent Volume Claim:
        Claim Name:     wccinfra-domain-pvc
  Server Start Policy:  IF_NEEDED
  Web Logic Credentials Secret:
    Name:  wccinfra-domain-credentials
Status:
  Clusters:
    Cluster Name:      ibr_cluster
    Maximum Replicas:  5
    Minimum Replicas:  0
    Ready Replicas:    1
    Replicas:          1
    Replicas Goal:     1
    Cluster Name:      ucm_cluster
    Maximum Replicas:  5
    Minimum Replicas:  0
    Ready Replicas:    3
    Replicas:          3
    Replicas Goal:     3
    Cluster Name:      ipm_cluster
    Maximum Replicas:  5
    Minimum Replicas:  0
    Ready Replicas:    3
    Replicas:          3
    Replicas Goal:     3
    Cluster Name:      capture_cluster
    Maximum Replicas:  5
    Minimum Replicas:  0
    Ready Replicas:    3
    Replicas:          3
    Replicas Goal:     3
    Cluster Name:      wccadf_cluster
    Maximum Replicas:  5
    Minimum Replicas:  0
    Ready Replicas:    3
    Replicas:          3
    Replicas Goal:     3

  Conditions:
    Last Transition Time:        2021-09-30T11:04:35.889547Z
    Reason:                      ServersReady
    Status:                      True
    Type:                        Available
  Introspect Job Failure Count:  0
  Servers:
    Desired State:  RUNNING
    Health:
      Activation Time:  2021-09-30T10:58:38.381000Z
      Overall Health:   ok
      Subsystems:
        Subsystem Name:  ServerRuntime
        Symptoms:
    Node Name:      10.0.10.135
    Server Name:    adminserver
    State:          RUNNING
    Cluster Name:   ibr_cluster
    Desired State:  RUNNING
    Health:
      Activation Time:  2021-09-30T11:01:09.987000Z
      Overall Health:   ok
      Subsystems:
        Subsystem Name:  ServerRuntime
        Symptoms:
    Node Name:      10.0.10.135
    Server Name:    ibr_server1
    State:          RUNNING
    Cluster Name:   ibr_cluster
    Desired State:  SHUTDOWN
    Server Name:    ibr_server2
    Cluster Name:   ibr_cluster
    Desired State:  SHUTDOWN
    Server Name:    ibr_server3
    Cluster Name:   ibr_cluster
    Desired State:  SHUTDOWN
    Server Name:    ibr_server4
    Cluster Name:   ibr_cluster
    Desired State:  SHUTDOWN
    Server Name:    ibr_server5
    Cluster Name:   ucm_cluster
    Desired State:  RUNNING
    Health:
      Activation Time:  2021-09-30T11:00:36.369000Z
      Overall Health:   ok
      Subsystems:
        Subsystem Name:  ServerRuntime
        Symptoms:
    Node Name:      10.0.10.142
    Server Name:    ucm-server1
    State:          RUNNING
    Cluster Name:   ucm_cluster
    Desired State:  RUNNING
    Health:
      Activation Time:  2021-09-30T11:02:35.448000Z
      Overall Health:   ok
      Subsystems:
        Subsystem Name:  ServerRuntime
        Symptoms:
    Node Name:      10.0.10.135
    Server Name:    ucm-server2
    State:          RUNNING
    Cluster Name:   ucm_cluster
    Desired State:  RUNNING
    Health:
      Activation Time:  2021-09-30T11:04:32.314000Z
      Overall Health:   ok
      Subsystems:
        Subsystem Name:  ServerRuntime
        Symptoms:
    Node Name:      10.0.10.142
    Server Name:    ucm-server3
    State:          RUNNING
    Cluster Name:   ucm_cluster
    Desired State:  SHUTDOWN
    Server Name:    ucm-server4
    Cluster Name:   ucm_cluster
    Desired State:  SHUTDOWN
    Server Name:    ucm-server5
    Cluster Name:   ipm_cluster
    Desired State:  RUNNING
    Health:
      Activation Time:  2021-09-30T11:04:32.314000Z
      Overall Health:   ok
      Subsystems:
        Subsystem Name:  ServerRuntime
        Symptoms:
    Node Name:      MyNodeName
    Server Name:    ipm_server1
    State:          RUNNING
    Cluster Name:   ipm_cluster
    Desired State:  SHUTDOWN
    Server Name:    ipm_server2
    Cluster Name:   ipm_cluster
    Desired State:  SHUTDOWN
    Server Name:    ipm_server3
    Cluster Name:   ipm_cluster
    Desired State:  SHUTDOWN
    Server Name:    ipm_server4
    Cluster Name:   ipm_cluster
    Desired State:  SHUTDOWN
    Server Name:    ipm_server5
    Cluster Name:   capture_cluster
    Desired State:  RUNNING
    Health:
      Activation Time:  2021-09-30T11:04:32.314000Z
      Overall Health:   ok
      Subsystems:
        Subsystem Name:  ServerRuntime
        Symptoms:
    Node Name:      MyNodeName
    Server Name:    capture_server1
    State:          RUNNING
    Cluster Name:   capture_cluster
    Desired State:  SHUTDOWN
    Server Name:    capture_server2
    Cluster Name:   capture_cluster
    Desired State:  SHUTDOWN
    Server Name:    capture_server3
    Cluster Name:   capture_cluster
    Desired State:  SHUTDOWN
    Server Name:    capture_server4
    Cluster Name:   capture_cluster
    Desired State:  SHUTDOWN
    Server Name:    capture_server5
    Cluster Name:   wccadf_cluster
    Desired State:  RUNNING
    Health:
      Activation Time:  2021-09-30T11:04:32.314000Z
      Overall Health:   ok
      Subsystems:
        Subsystem Name:  ServerRuntime
        Symptoms:
    Node Name:      MyNodeName
    Server Name:    wccadf_server1
    State:          RUNNING
    Cluster Name:   wccadf_cluster
    Desired State:  SHUTDOWN
    Server Name:    wccadf_server2
    Cluster Name:   wccadf_cluster
    Desired State:  SHUTDOWN
    Server Name:    wccadf_server3
    Cluster Name:   wccadf_cluster
    Desired State:  SHUTDOWN
    Server Name:    wccadf_server4
    Cluster Name:   wccadf_cluster
    Desired State:  SHUTDOWN
    Server Name:    wccadf_server5

  Start Time:       2021-08-24T12:26:20.033714Z
Events:             <none>
In the Status section of the output, the available servers and clusters are listed.
Note that if this command is issued soon after the script finishes, there may be
no servers available yet, or perhaps only the Administration Server but no Managed Servers.
The WebLogic Kubernetes Operator will start up the Administration Server first and wait for it to become ready before starting the Managed Servers.
Verify the pods
Enter the following command to see the pods running the servers:
$ kubectl get pods -n NAMESPACE
Here is an example of the output of this command. You can verify that an Administration Server and Managed Servers for ucm and ibr cluster are running.
$ kubectl get pod -n wccns
NAME                                                READY   STATUS      RESTARTS   AGE
rcu                                                 1/1     Running     0          54d
wccinfra-adminserver                                1/1     Running     0          18d
wccinfra-create-fmw-infra-sample-domain-job-xqnn4   0/1     Completed   0          54d
wccinfra-ibr-server1                                1/1     Running     0          18d
wccinfra-ucm-server1                                1/1     Running     0          18d
wccinfra-ucm-server2                                1/1     Running     0          18d
wccinfra-ucm-server3                                1/1     Running     0          18d
wccinfra-ipm-server1                                1/1     Running     0          18d
wccinfra-ipm-server2                                1/1     Running     0          18d
wccinfra-ipm-server3                                1/1     Running     0          18d
wccinfra-capture-server1                            1/1     Running     0          18d
wccinfra-capture-server2                            1/1     Running     0          18d
wccinfra-capture-server3                            1/1     Running     0          18d
wccinfra-wccadf-server1                             1/1     Running     0          18d
wccinfra-wccadf-server2                             1/1     Running     0          18d
wccinfra-wccadf-server3                             1/1     Running     0          18d
Verify the services
Enter the following command to see the services for the domain:
$ kubectl get services -n NAMESPACE
Here is an example of the output of this command.
$ kubectl get services -n wccns
NAME                               TYPE           CLUSTER-IP      EXTERNAL-IP       PORT(S)          AGE
oracle-db                          LoadBalancer   10.96.4.194     141.148.xxx.xxx   1521:30011/TCP   15d
wccinfra-adminserver               ClusterIP      None            <none>            7001/TCP         43h
wccinfra-capture-server1           ClusterIP      None            <none>            16400/TCP        43h
wccinfra-capture-server2           ClusterIP      None            <none>            16400/TCP        43h
wccinfra-capture-server3           ClusterIP      None            <none>            16400/TCP        43h
wccinfra-capture-server4           ClusterIP      10.96.162.97    <none>            16400/TCP        43h
wccinfra-capture-server5           ClusterIP      10.96.86.213    <none>            16400/TCP        43h
wccinfra-cluster-capture-cluster   ClusterIP      10.96.107.96    <none>            16400/TCP        2d13h
wccinfra-cluster-ibr-cluster       ClusterIP      10.96.123.229   <none>            16250/TCP        2d13h
wccinfra-cluster-ipm-cluster       ClusterIP      10.96.130.117   <none>            16000/TCP        2d13h
wccinfra-cluster-ucm-cluster       ClusterIP      10.96.24.88     <none>            16200/TCP        119s
wccinfra-cluster-wccadf-cluster    ClusterIP      10.96.11.113    <none>            16225/TCP        2d13h
wccinfra-ibr-server1               ClusterIP      None            <none>            16250/TCP        43h
wccinfra-ibr-server2               ClusterIP      10.96.57.47     <none>            16250/TCP        43h
wccinfra-ibr-server3               ClusterIP      10.96.75.252    <none>            16250/TCP        43h
wccinfra-ibr-server4               ClusterIP      10.96.120.224   <none>            16250/TCP        43h
wccinfra-ibr-server5               ClusterIP      10.96.34.58     <none>            16250/TCP        43h
wccinfra-ipm-server1               ClusterIP      None            <none>            16000/TCP        43h
wccinfra-ipm-server2               ClusterIP      None            <none>            16000/TCP        43h
wccinfra-ipm-server3               ClusterIP      None            <none>            16000/TCP        43h
wccinfra-ipm-server4               ClusterIP      10.96.44.8      <none>            16000/TCP        43h
wccinfra-ipm-server5               ClusterIP      10.96.77.81     <none>            16000/TCP        43h
wccinfra-ucm-server1               ClusterIP      None            <none>            16200/TCP        43h
wccinfra-ucm-server2               ClusterIP      None            <none>            16200/TCP        43h
wccinfra-ucm-server3               ClusterIP      None            <none>            16200/TCP        43h
wccinfra-ucm-server4               ClusterIP      10.96.132.1     <none>            16200/TCP        43h
wccinfra-ucm-server5               ClusterIP      10.96.199.161   <none>            16200/TCP        43h
wccinfra-wccadf-server1            ClusterIP      None            <none>            16225/TCP        43h
wccinfra-wccadf-server2            ClusterIP      None            <none>            16225/TCP        43h
wccinfra-wccadf-server3            ClusterIP      None            <none>            16225/TCP        43h
wccinfra-wccadf-server4            ClusterIP      10.96.156.42    <none>            16225/TCP        43h
wccinfra-wccadf-server5            ClusterIP      10.96.194.175   <none>            16225/TCP        43h
Expose service for IBR intradoc port
-
Get the IP address for the node, hosting ibr managed server pod. In this sample, node running wccinfra-ibr-server1 pod has ip ‘10.0.10.xx’
$ kubectl get pods -n wccns -o wide #output NAME READY STATUS RESTARTS AGE IP NODE NOMINATED NODE READINESS GATES wccinfra-adminserver 1/1 Running 0 4h50m 10.244.0.150 10.0.10.xxx <none> <none> wccinfra-create-fmw-infra-sample-domain-job-zbsxr 0/1 Completed 0 7d22h 10.244.1.25 10.0.10.xx <none> <none> wccinfra-ibr-server1 1/1 Running 0 4h48m 10.244.1.38 10.0.10.xx <none> <none> wccinfra-ucm-server1 1/1 Running 0 4h48m 10.244.1.39 10.0.10.xx <none> <none> wccinfra-ucm-server2 1/1 Running 0 4h46m 10.244.0.151 10.0.10.xxx <none> <none> wccinfra-ucm-server3 1/1 Running 0 4h44m 10.244.1.40 10.0.10.xx <none> <none> -
Expose the IBR intradoc port as a NodePort
Note: Choose NodePort value from a range (default: 30000-32767). In this sample, we have chosen nodePort value as
30555$ cd ${WORKDIR}/create-wcc-domain/domain-home-on-pv/ kubectl expose service/wccinfra-cluster-ibr-cluster --name wccinfra-cluster-ibr-cluster-ext --port=5555 --type=NodePort -n wccns --dry-run=true -o yaml > wccinfra-cluster-ibr-cluster-ext.yaml sed -i -e '/targetPort:*/a\ \ \ \ nodePort: 30555' wccinfra-cluster-ibr-cluster-ext.yaml kubectl -n wccns apply -f wccinfra-cluster-ibr-cluster-ext.yaml -
Verify ibr service name ‘wccinfra-cluster-ibr-cluster-ext’
$ kubectl get svc -n wccns NAME TYPE CLUSTER-IP EXTERNAL-IP PORT(S) wccinfra-cluster-ibr-cluster-ext NodePort 10.109.247.52 <none> 5555:30555/TCP -
Create the outgoing provider by providing following details and restart the servers.
Please provide the NodePort value (in the above sample - 30555), as
Server Port.Server Host Name: <your-ibr-managed-server-node-ip> Server Port: 30555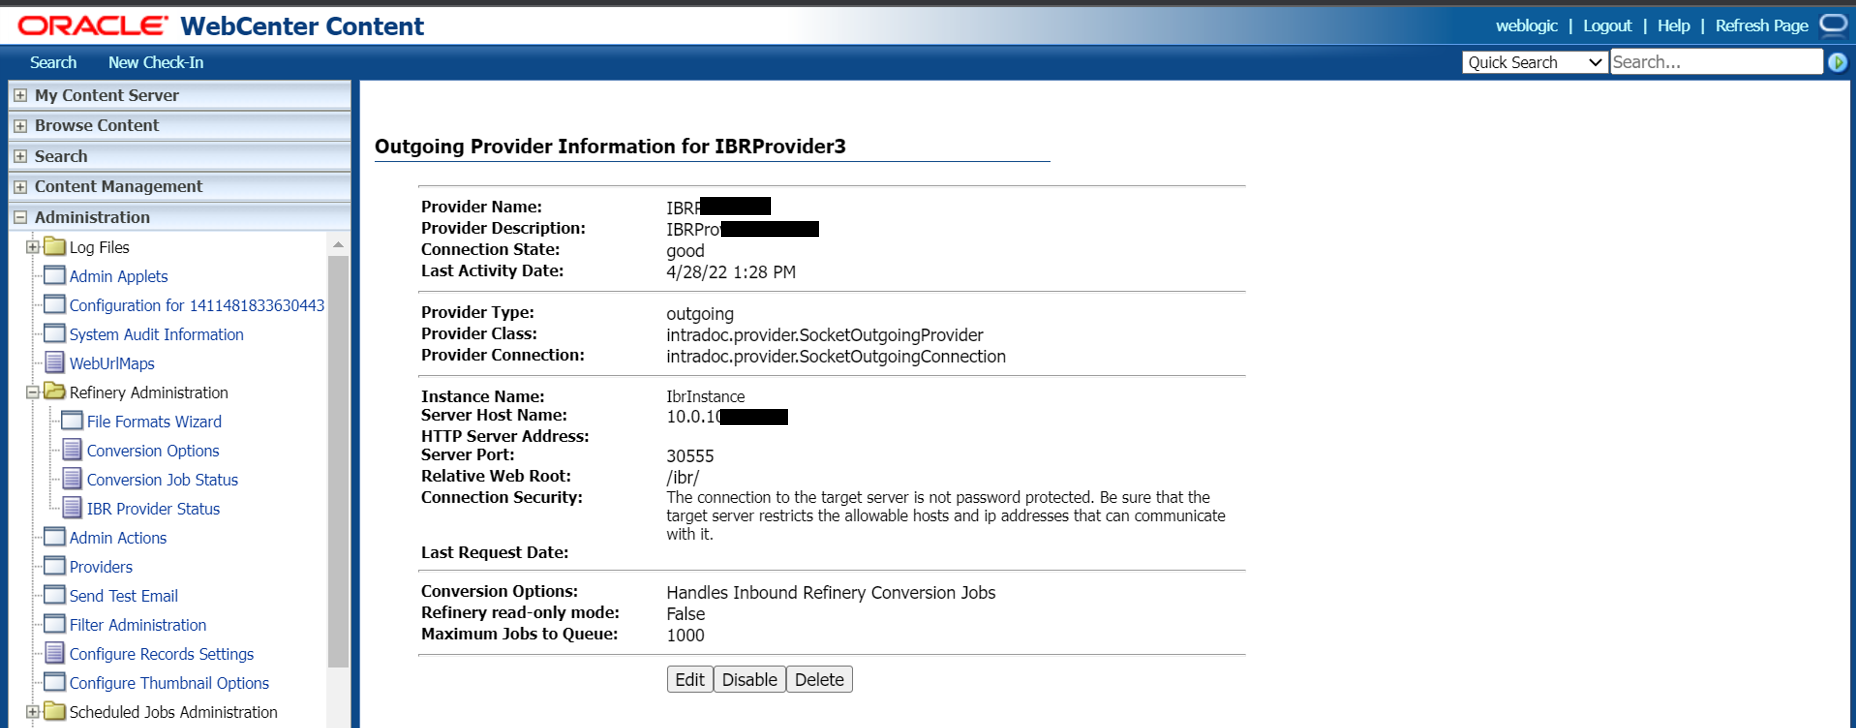
Expose service for UCM intradoc port
-
Get the IP address for the node, hosting ucm managed server pod. In this sample, node running wccinfra-ucm-server1 pod has ip ‘10.0.10.xx’
$ kubectl get pods -n wccns -o wide #output NAME READY STATUS RESTARTS AGE IP NODE NOMINATED NODE READINESS GATES wccinfra-adminserver 1/1 Running 0 4h50m 10.244.0.150 10.0.10.xxx <none> <none> wccinfra-create-fmw-infra-sample-domain-job-zbsxr 0/1 Completed 0 7d22h 10.244.1.25 10.0.10.xx <none> <none> wccinfra-ibr-server1 1/1 Running 0 4h48m 10.244.1.38 10.0.10.xx <none> <none> wccinfra-ucm-server1 1/1 Running 0 4h48m 10.244.1.39 10.0.10.xx <none> <none> wccinfra-ucm-server2 1/1 Running 0 4h46m 10.244.0.151 10.0.10.xxx <none> <none> wccinfra-ucm-server3 1/1 Running 0 4h44m 10.244.1.40 10.0.10.xx <none> <none> -
Expose the UCM intradoc port as a NodePort
Note: Choose NodePort value from a range (default: 30000-32767). In this sample, we have chosen nodePort value as
30444$ cd ${WORKDIR}/create-wcc-domain/domain-home-on-pv/ $ kubectl expose service/wccinfra-cluster-ucm-cluster --name wccinfra-cluster-ucm-cluster-ext --port=4444 --type=NodePort -n wccns --dry-run=true -o yaml > wccinfra-cluster-ucm-cluster-ext.yaml $ sed -i -e '/targetPort:*/a\ \ \ \ nodePort: 30444' wccinfra-cluster-ucm-cluster-ext.yaml $ kubectl -n wccns apply -f wccinfra-cluster-ucm-cluster-ext.yaml -
Verify ucm service name ‘wccinfra-cluster-ucm-cluster-ext’
$ kubectl get svc -n wccns
NAME                            TYPE      CLUSTER-IP    EXTERNAL-IP PORT(S)
wccinfra-cluster-ucm-cluster-ext NodePort 10.109.247.52 <none>     4444:30444/TCP