Azure Kubernetes Service (AKS)
Contents
Introduction
This document is the reference for the Azure Marketplace offer for WebLogic Server on Azure Kubernetes Service. The offer makes it easy to get started with WebLogic Server on Azure. The offer handles all the initial setup, creating the AKS cluster, container registry, load-balancer, WebLogic Kubernetes Operator installation, and domain creation using the model-in-image domain home source type.
To deploy the offer from the Azure portal, see WebLogic Server on Azure .
Note
With the exception of the resource group, and the username and password for the Oracle Single Sign-On fields, each panel of the offer has been configured with sensible defaults. If you were referred to this guidance by another guidance, it is appropriate to accept the defaults for each panel.
Azure Kubernetes Service (AKS) makes it simple to deploy a managed Kubernetes cluster in Azure. AKS reduces the complexity and operational overhead of managing Kubernetes by offloading much of that responsibility to Azure. As a hosted Kubernetes service, Azure handles critical tasks like health monitoring and maintenance for you. The Kubernetes masters are managed by Azure. You manage and maintain only the agent nodes. As a managed Kubernetes service, AKS is free - you pay for only the agent nodes within your clusters, not for the masters.
To learn more, see
<a href=“ https://docs.microsoft.com/azure/aks/intro-kubernetes"
target="_blank” rel=“noopener noreferrer”
What is Azure Kubernetes Service?
For complete details on domain home source types, see Choose a domain home source type .
It is also possible to run the WebLogic Kubernetes Operator manually, without the aid of the Azure Marketplace offer. The steps for doing so are documented in the Azure Kubernetes Service sample.
The remaining steps on this page document the user experience for the Azure Marketplace offer for WebLogic Server on Azure Kubernetes Service.
Basics
Use the Basics blade to provide the basic configuration details for deploying an Oracle WebLogic Server configured cluster. To do this, enter the values for the fields listed in the following tables.
Project details
| Field | Description |
|---|---|
| Subscription | Select a subscription to use for the charges accrued by this offer. You must have a valid active subscription associated with the Azure account that is currently logged in. If you don’t have it already, follow the steps described in Associate or add an Azure subscription to your Azure Active Directory tenant . |
| Resource group | A resource group is a container that holds related resources for an Azure solution. The resource group includes those resources that you want to manage as a group. You decide which resources belong in a resource group based on what makes the most sense for your organization. If you have an existing resource group into which you want to deploy this solution, you can enter its name here. Note deploying this solution multiple times into the same resource group is not supported. Alternatively, you can click the Create new, and enter the name so that Azure creates a new resource group before provisioning the resources. For more information about resource groups, see the Azure documentation . |
Instance details
| Field | Description |
|---|---|
| Region | Select an Azure region from the drop-down list. |
Credentials for WebLogic
| Field | Description |
|---|---|
| Username for WebLogic Administrator | Enter a user name to access the WebLogic Server Administration Console which is started automatically after the provisioning. For more information about the WebLogic Server Administration Console, see Overview of Administration Consoles in Understanding Oracle WebLogic Server. |
| Password for WebLogic Administrator | Enter a password to access the WebLogic Server Administration Console. |
| Confirm password | Re-enter the value of the preceding field. |
| Password for WebLogic Model encryption | Model in Image requires a runtime encryption secret with a secure password key. This secret is used by the operator to encrypt model and domain home artifacts before it adds them to a runtime ConfigMap or log. For more information, see Required runtime encryption secret . |
| Confirm password | Re-enter the value of the preceding field. |
Optional Basic Configuration
| Field | Description |
|---|---|
| Accept defaults for optional configuration? | If you want to retain the default values for the optional configuration, such as Name prefix for Managed Server, WebLogic Domain Name and others, set the toggle button to Yes, and click Next to configure AKS cluster. If you want to specify different values for the optional configuration, set the toggle button to No, and enter the following details. |
| Name prefix for Managed Server | Enter a prefix for the Managed Server name. |
| WebLogic Domain Name | Enter the name of the domain that will be created by the offer. |
| WebLogic Domain UID | Enter the UID of the domain that will be created by the offer. |
| Maximum dynamic cluster size | The maximum size of the dynamic WebLogic cluster created. |
| Custom Java Options to start WebLogic Server | Java VM arguments passed to the invocation of WebLogic Server. For more information, see the FAQ . |
When you are satisfied with your selections, select Next and open AKS blade.
AKS
Use the AKS blade to configure fundamental details of how Oracle WebLogic Server runs on AKS. To do this, enter the values for the fields listed in the following tables.
Azure Kubernetes Service
In this section, you can configure some options about the AKS which will run WebLogic Server.
| Field | Description |
|---|---|
| Create a new AKS cluster | If set to Yes, the deployment will create a new AKS cluster resource in the specified resource group. If set to No, you have the opportunity to select an existing AKS cluster, into which the deployment is configured. Note: the offer assumes the existing AKS cluster has no WebLogic related deployments. |
| Node size | The default VM size is 2x Standard DSv2, 2 vcpus, 7 GB memory. If you want to select a different VM size, select Change Size, select the size from the list (for example, A3) on the Select a VM size page, and select Select. For more information about sizing the virtual machine, see the Azure documentation on Sizes . |
| Minimum node count | The minimum node count in the AKS cluster. This value can be changed after deployment. For information, see AKS autoscaler . |
| Maximum node count | The maximum node count in the AKS cluster. This value can be changed after deployment. For information, see AKS autoscaler . |
| Select AKS cluster | This option is shown if Create a new AKS cluster? is set to No. If visible, select an existing Azure Kubernetes Service instance. |
Image selection
In this section, you can configure the image that is deployed using the model-in-image domain home source type. There are several options for the WebLogic image and the application image deployed therein.
| Field | Description |
|---|---|
| Create a new Azure Container Registry to store application images? | If set to Yes, the offer will create a new Azure Container Registry (ACR) to hold the images for use in the deployment. If set to No, you must specify an existing ACR. In this case, you must be sure the selected ACR has the admin account enabled. For details, please see Admin account . |
| Select ACR instance | This option is shown if Create a new Azure Container Registry to store application images? is set to No. If visible, select an existing Azure Container Registry instance. |
| Username for Oracle Single Sign-On authentication | The Oracle Single Sign-on account user name for which the Terms and Restrictions for the selected WebLogic Server image have been accepted. |
| Password for Oracle Single Sign-On authentication | The password for that account. |
| Confirm password | Re-enter the value of the preceding field. |
| Select the type of WebLogic Server Images. | If set to Patched WebLogic Server Images, you must accept the license agreement in the middleware/weblogic_cpu repository. If set to General WebLogic Server Images, you must accept the license agreement in the middleware/weblogic. Steps to accept the license agreement: log in to the
Oracle Container Registry
; navigate to the middleware/weblogic_cpu and middleware/weblogic repository; accept license agreement. See this
document
for more information. |
| Select desired combination of WebLogic Server, JDK and Operating System or fully qualified Docker tag | Select one of the supported images. |
| WebLogic Docker tag | This option is shown if Select desired combination of WebLogic Server, JDK and Operating System or fully qualified Docker tag is set to Others. If visible, input a fully qualified Docker tag. You can find the available tags from WebLogic Server Images page of Oracle Container Registry |
Application
In this section, you can deploy an application along with WebLogic Server.
| Field | Description |
|---|---|
| Deploy an application? | If set to Yes, you must specify a WAR, EAR, or JAR file suitable for deployment with the selected version of WebLogic Server. If set to No, no application is deployed. |
| Application package (.war,.ear,.jar) | With the Browse button, you can select a file from a pre-existing Azure Storage Account and Storage Container within that account. To learn how to create a Storage Account and Container, see Create a storage account and Create a Storage Container and upload application files . |
| Number of WebLogic Managed Server replicas | The initial value of the replicas field of the Domain. For information, see
Scaling
. |
Advanced
| Field | Description |
|---|---|
| Show advanced configuration? | If you want to retain the default values for the optional configuration, such as Enable Container insights, Create Persistent Volume using Azure File share service and others, set the toggle button to No, and click Next to configure TLS/SSL. If you want to specify different values for the optional configuration, set the toggle button to Yes, and enter the following details. |
| Enable Container insights | If selected, causes the deployment to create an Azure Monitoring workspace and connect it to the AKS cluster as the Azure Monitoring Agent. Azure Monitoring Agent is a tool that collects data and sends it to Azure Container Insights. Container insights gives you performance visibility by collecting memory and processor metrics from controllers, nodes, and containers that are available in Kubernetes through the Metrics API. Container logs are also collected. Metrics are written to the metrics store and log data is written to the logs store associated with your Log Analytics workspace. For more information, see Azure Monitor Agent overview and Container insights overview . |
| Create Persistent Volume using Azure File share service | If selected, an Azure Storage Account and an Azure Files share will be provisioned. The file system type is NFS. The name of the Azure Files share is weblogic. The mount point is /shared as a persistent volume in the nodes of the AKS cluster. For more information, see
Oracle WebLogic Server persistent storage
and
persistent volume with Azure Files share on AKS
. |
| Bring your own WebLogic Server Docker image from Azure Container Registry? | If the checkbox is selected, you can use your own WebLogic Server Docker image from a pre-existing Azure Container Registry instance. |
| Select existing ACR instance | This option is shown only if Bring your own WebLogic Server Docker image from Azure Container Registry? is checked. If visible, select an existing Azure Container Registry instance. |
| Please provide the image path | This option is shown only if Bring your own WebLogic Server Docker image from Azure Container Registry? is checked. If visible, the value must be a fully qualified Docker tag of an image within the specified ACR. |
When you are satisfied with your selections, select Next and open TLS/SSL blade.
TLS/SSL
With the TLS/SSL blade, you can configure Oracle WebLogic Server Administration Console on a secure HTTPS port, with your own SSL certificate provided by a Certifying Authority (CA). See Oracle WebLogic Server Keystores configuration for more information.
Select Yes or No for the option Configure WebLogic Server Administration Console, Remote Console, and cluster to use HTTPS (Secure) ports, with your own TLS/SSL certificate. If you select No, you don’t have to provide any details, and can proceed by selecting Next. If you select Yes, you must upload your existing keystores.
Enter the values for the fields listed in the following table.
Upload existing KeyStores
| Field | Description |
|---|---|
| Identity KeyStore Data file(.jks,.p12) | Upload a custom identity keystore data file by doing the following: 1. Click on the file icon. 2. Navigate to the folder where the identity keystore file resides, and select the file. 3. Click Open. |
| Password | Enter the passphrase for the custom identity keystore. |
| Confirm password | Re-enter the value of the preceding field. |
| The Identity KeyStore type (JKS,PKCS12) | Select the type of custom identity keystore. The supported values are JKS and PKCS12. |
| The alias of the server’s private key within the Identity KeyStore | Enter the alias for the private key. |
| The passphrase for the server’s private key within the Identity KeyStore | Enter the passphrase for the private key. |
| Confirm passphrase | Re-enter the value of the preceding field. |
| Trust KeyStore Data file(.jks,.p12) | Upload a custom trust keystore data file by doing the following: 1. Click on the file icon. 2. Navigate to the folder where the identity keystore file resides, and select the file. 3. Click Open. |
| Password | Enter the password for the custom trust keystore. |
| Confirm password | Re-enter the value of the preceding field. |
| The Trust KeyStore type (JKS,PKCS12) | Select the type of custom trust keystore. The supported values are JKS and PKCS12. |
When you are satisfied with your selections, select Next and open Load balancing blade.
Load balancing
Use this blade to configure load balancing. There are three options:
- Application Gateway Ingress Controller.
- Standard Load Balancer service.
- No Load Balancer.
Application Gateway Ingress Controller
In this section, you can create an Azure Application Gateway instance as the ingress controller of your WebLogic Server. This Application Gateway is pre-configured for end-to-end-SSL with TLS termination at the gateway using the provided SSL certificate and load balances across your cluster.
Select Application Gateway Ingress Controller for the option Load Balancing Options based on your preference. You must specify the details required for the Application Gateway integration by entering the values for the fields as described next.
You can specify a virtual network for the application gateway. To do this, enter the values for the fields listed in the following tables.
Configure virtual networks
| Field | Description |
|---|---|
| Virtual network | Select a virtual network in which to place the application gateway. Make sure your virtual network meets the requirements in Application Gateway virtual network and dedicated subnet . |
| Subnet | An application gateway is a dedicated deployment in your virtual network. Within your virtual network, a dedicated subnet is required for the application gateway. See Application Gateway virtual network and dedicated subnet . |
You must select one of the following three options, each described in turn.
- Generate a self-signed front-end certificate: Generate a self-signed front-end certificate and apply it during deployment.
- Upload a TLS/SSL certificate: Upload the pre-signed certificate now.
Generate a self-signed frontend certificate
| Field | Description |
|---|---|
| Trusted root certificate(.cer, .cert) | A trusted root certificate is required to allow back-end instances in the application gateway. The root certificate is a Base-64 encoded X.509(.CER) format root certificate. |
Upload a TLS/SSL certificate
| Field | Description |
|---|---|
| Frontend TLS/SSL certificate(.pfx) | For information on how to create a certificate in PFX format, see Overview of TLS termination and end to end TLS with Application Gateway . |
| Password | The password for the certificate |
| Confirm password | Re-enter the value of the preceding field. |
| Trusted root certificate(.cer, .cert) | A trusted root certificate is required to allow back-end instances in the application gateway. The root certificate is a Base-64 encoded X.509(.CER) format root certificate. |
Regardless of how you provide the certificates, there are several other options when configuring the Application Gateway, as described next.
| Field | Description |
|---|---|
| Disable cookie based affinity | Select this box to disable cookie based affinity (sometimes called “sticky sessions”). For more information, see Enable Cookie based affinity with an Application Gateway . |
| Create ingress for Administration Console. | Select Yes to create an ingress for the Administration Console with the path /console. |
| Create ingress for WebLogic Remote Console. | Select Yes to create an ingress for the Remote Console with the path /remoteconsole. |
Standard Load Balancer service
Selecting Yes here will cause the offer to provision the Azure Load Balancer as a Kubernetes load balancer service. For more information on the Standard Load Balancer see Use a public Standard Load Balancer in Azure Kubernetes Service (AKS) . You can still deploy an Azure Application Gateway even if you select No here.
If you select Yes, you have the option of configuring the Load Balancer as an internal Load Balancer. For more information on Azure internal load balancers see Use an internal load balancer with Azure Kubernetes Service (AKS) .
If you select Yes, you must fill in the following table to map the services to load balancer ports.
Service name prefix column:
You can fill in any valid value in this column.
Target and Port column:
For the ports, the recommended values are the usual 7001 for admin-server and 8001 for cluster-1.
When you are satisfied with your selections, select Next and open DNS blade.
DNS
With the DNS blade, you can provision the Oracle WebLogic Server Administration Console using a custom DNS name.
Select Yes or No for the option Custom DNS Alias? based on your preference. If you select No, you don’t have to provide any details, and can proceed by selecting Next to configure database. If you select Yes, you must choose either to configure a custom DNS alias based on an existing Azure DNS zone, or create an Azure DNS zone and a custom DNS alias. This can be done by selecting Yes or No for the option Use an existing Azure DNS Zone.
Note
For more information about the DNS zones, see Overview of DNS zones and records .
If you choose to configure a custom DNS alias based on an existing Azure DNS zone, by selecting Yes for the option Use an existing Azure DNS Zone, you must specify the DNS configuration details by entering the values for the fields listed in the following table.
| Field | Description |
|---|---|
| DNS Zone Name | Enter the DNS zone name. |
| Name of the resource group contains the DNS Zone in current subscription | Enter the name of the resource group that contains the DNS zone in the current subscription. |
| Label for Oracle WebLogic Server Administration Console | Enter a label to generate a sub-domain of the Oracle WebLogic Server Administration Console. For example, if the domain is mycompany.com and the sub-domain is admin, then the WebLogic Server Administration Console URL will be admin.mycompany.com. |
| Label for WebLogic Cluster | Specify a label to generate subdomain of WebLogic Cluster. |
If you choose to create an Azure DNS zone and a custom DNS alias, by selecting No for the option Use an existing Azure DNS Zone, you must specify the values for the following fields:
- DNS Zone Name
- Label for Oracle WebLogic Server Administration Console
- Label for WebLogic Cluster
See the preceding table for the description of these fields.
Note
In the case of creating an Azure DNS zone and a custom DNS alias, you must perform the DNS domain delegation at your DNS registry post deployment. See Delegation of DNS zones with Azure DNS .
When you are satisfied with your selections, select Next and open Database blade.
Database
Use the Database blade to configure Oracle WebLogic Server to connect to an existing database. Select Yes or No for the option Connect to Database? based on your preference. If you select No, you don’t have to provide any details, and can proceed by clicking Next. If you select Yes, you must specify the details of your database by entering the values for the fields listed in the following table.
| Field | Description |
|---|---|
| Choose database type | From the drop-down menu, select an existing database to which you want Oracle WebLogic Server to connect. The available options are: • Azure Database for PostgreSQL (with support for passwordless connection) • Oracle Database • Azure SQL (with support for passwordless connection) • MySQL (with support for passwordless connection) • Other |
| JNDI Name | Enter the JNDI name for your database JDBC connection. |
| DataSource Connection String | Enter the JDBC connection string for your database. For information about obtaining the JDBC connection string, see Obtain the JDBC Connection String for Your Database . |
| Global transactions protocol | Determines the transaction protocol (global transaction processing behavior) for the data source. For more information, see JDBC Data Source Transaction Options . IMPORTANT: The correct value for this parameter depends on the selected database type. For PostgreSQL, select EmulateTwoPhaseCommit. |
| Use passwordless datasource connection | If you select a database type that supports passwordless connection, this check box will appear. If selected, a passwordless connection to the data source will be configured. For more information, see Passwordless connections for Azure services . |
| Database Username | Enter the user name of your database. |
| Database Password | Enter the password for the database user. |
| Confirm password | Re-enter the value of the preceding field. |
| User assigned managed identity | Select a user assigned identity that is able to connect to your database. For how to create a database user for your managed identity, see https://aka.ms/javaee-db-identity . |
If you select Other as the database type, there are some additional values you must provide. WebLogic Server provides support for application data access to any database using a JDBC-compliant driver. Refer to the documentation for driver requirements .
| Field | Description |
|---|---|
| DataSource driver (.jar) | Use the Browse button to upload the JAR file for the JDBC driver to a storage container. To learn how to create a Storage Account and Container, see Create a storage account . |
| DataSource driver name | The fully qualified Java class name of the JDBC driver. |
| Test table name | The name of the database table to use when testing physical database connections. This value depends on the specified database. Some suggested values include the following. • For Oracle, use SQL ISVALID. • For PostgreSQL, SQL Server and MariaDB use SQL SELECT 1. • For Informix use SYSTABLES. |
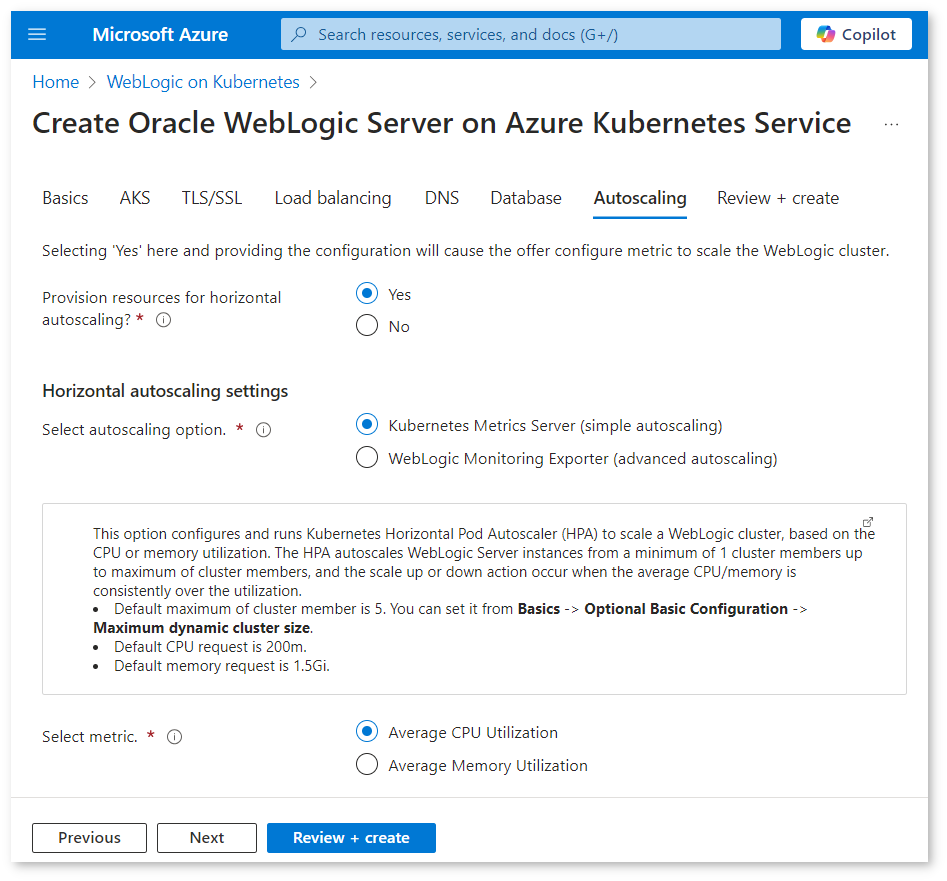
When you are satisfied with your selections, select Next and open Autoscaling blade.
Autoscaling
Use the Autoscaling blade to configure metrics that scale the WebLogic cluster. Select Yes or No for the option Provision resources for horizontal autoscaling?, based on your preference. If you select No, you don’t have to provide any details, and can proceed by clicking Review + create. If you select Yes, you must specify the details of your autoscaling settings.
You must select one of the following two options, each described in turn.
- Kubernetes Metrics Server (simple autoscaling): this option configures and runs Kubernetes Horizontal Pod Autoscaler (HPA) to scale a WebLogic cluster, based on the CPU or memory utilization.
- WebLogic Monitoring Exporter (advanced autoscaling): this option allows you to create Java metric aware KEDA scaling rules.
Kubernetes Metrics Server (simple autoscaling)
| Field | Description |
|---|---|
| Select metric | There are two options: • Average CPU Utilization • Average Memory Utilization |
| Average CPU Utilization | Pick average CPU utilization in percent. The HPA autoscales WebLogic Server instances from a minimum of 1 cluster member up to the maximum of cluster members, and the scale up or down action occurs when the average CPU is consistently over/under the utilization. |
| Average Memory Utilization | Pick average memory utilization in percent. The HPA autoscales WebLogic Server instances from a minimum of 1 cluster member up to the maximum of cluster members, and the scale up or down action occurs when the average memory is consistently over/under the utilization. |
WebLogic Monitoring Exporter (advanced autoscaling)
This option installs all the software necessary to allow you to create Java metric aware KEDA scaling rules. The offer provisions the following software. Right-click and select Open Link in New Tab to follow links and learn more:
- Install WebLogic Monitoring Exporter to scrape WebLogic Server metrics .
- Install AKS Prometheus metrics addon .
- Feed WebLogic Server metrics to Azure Monitor Managed Service for Prometheus .
- Integrate KEDA with AKS cluster .
After the provisioning is complete, you can create KEDA scaling rules. A sample rule is provided in the deployment outputs. The following steps show how to see the sample rule.
- View the resource group for this deployment in the Azure portal.
- In the Settings section, select Deployments.
- Select the oldest deployment. The name of the deployment looks similar to oracle.20210620-wls-on-aks.
- Select Outputs.
- The shellCmdtoOutputKedaScalerSample value is the base64 string of a scaler sample. Copy the value and run it in your terminal.
- For guidance on how to complete the configuration, see Tutorial: Migrate Oracle WebLogic Server to AKS with KEDA scaler based on Prometheus Metrics .
When you are satisfied with your selections, select Next and open the Tags blade.
Tags
Use the Tags blade to provide tags for resources and resource groups. Tags are name/value pairs that allow you to categorize resources and consolidate billing by applying the same tag to multiple resources and resource groups. Learn more about tags .
Enter the desired name/value pairs for resources in the table, filling out each of the following fields.
| Name | Value | Resource |
|---|---|---|
| Tag name. | Tag value. | Resources available for tagging in this offer. |
When you are satisfied with your selections, select Review + create.
Review + create
In the Review + create blade, review the details you provided for deploying Oracle WebLogic Server on AKS. If you want to make changes to any of the fields, click < previous or click on the respective blade and update the details.
If you want to use the underlying template to further customize it yourself (for example, as part of your CI/CD pipeline), download it by selecting Download a template for automation.
Click Create to start the deployment. This process may take 30 to 60 minutes.
Template outputs
After clicking Create, you will go to the Deployment is in progress page. When the deployment is complete, the page shows Your deployment is complete. In the left panel, select Outputs. These are the outputs from the deployment. The following table is a reference to the deployment outputs.
| Field | Description |
|---|---|
aksClusterName |
Name of your AKS cluster that is running the WLS cluster. Sample value: wlsonaksiyiql2i2o2u2i. |
adminConsoleInternalUrl |
The fully qualified, private link to the Administration Console portal. You can access it only inside the AKS cluster. Sample value: http://contoso.com:7001/console. |
adminConsoleExternalUrl |
This output is not always present: You must configure Networking to enable the Azure Load Balancer service or Azure Application Gateway Ingress Controller for the Administration Console. This is a fully qualified, public link to the Administration Console portal. You can access it from the public Internet. Sample value: http://contoso.com/console. |
adminConsoleExternalSecuredUrl |
This output is not always present: 1. You must configure Networking to enable the Azure Load Balancer service or Azure Application Gateway Ingress Controller for the Administration Console. 2. You must configure a custom DNS name by filling out DNS Configuration . 3. The TLS/SSL certificate used is configured by filling out TLS/SSL configuration . This is a fully qualified, secure, public link to the Administration Console portal. You can access it from the public Internet. Sample value: https://contoso.com/console. |
adminRemoteConsoleUrl |
This output is not always present: You must configure Networking to enable the Azure Load Balancer service or Azure Application Gateway Ingress Controller for the Administration Console. This is a fully qualified, public link to the WebLogic Server Remote Console . You can access it from the public Internet. Sample value: http://contoso.azure.com/remoteconsole. |
adminRemoteConsoleSecuredUrl |
This output is not always present: 1. You must configure Networking to enable the Azure Load Balancer service or Azure Application Gateway Ingress Controller for the Administration Console. 2. You must configure a custom DNS name following DNS Configuration . 3. The TLS/SSL certificate used is configured by filling out TLS/SSL configuration . This is a fully qualified, public link to the WebLogic Server Remote Console . You can access it from the public Internet. Sample value: https://contoso.com/remoteconsole. |
adminServerT3InternalUrl |
This output is not always present: 1. You must create/update the WLS cluster with advanced configuration . 2. You must enable custom T3 channel by setting enableAdminT3Tunneling=true.This is a fully qualified, private link to custom T3 channel of the Administration Server. Sample value: http://contoso.com:7005/console. |
adminServerT3ExternalUrl |
This output is not always present: 1. You must create/update the WLS cluster with advanced configuration . 2. You must enable custom T3 channel by setting enableAdminT3Tunneling=true.3. You must configure Networking to enable the Azure Load Balancer service for the Administration Server. This is a fully qualified, public link to custom T3 channel of the Administration Server. Sample value: http://20.4.56.3:7005/console/ |
clusterInternalUrl |
The fully qualified, private link to the WLS cluster. You are able to access your application with ${clusterInternalUrl}<your-app-path> inside AKS cluster.Sample value: http://contoso.com:8001/. |
clusterExternalUrl |
This output is not always present: You must configure Networking to enable the Azure Load Balancer service or Azure Application Gateway Ingress Controller for the WLS cluster. This is a fully qualified, public link to the WLS cluster. You can access your application with ${clusterExternalUrl}<your-app-path> from the public Internet.Sample value: http://contoso.azure.com/. |
clusterExternalSecuredUrl |
This output is not always present: 1. You must configure Networking to enable the Azure Load Balancer service or Azure Application Gateway Ingress Controller for the WLS cluster. 2. The TLS/SSL certificate used is configured by filling out TLS/SSL configuration . This is a fully qualified, public link to the WLS cluster. You can access your application with ${clusterExternalUrl}<your-app-path> from the public Internet.Sample value: https://contoso.azure.com/. |
clusterT3InternalUrl |
This output is not always present: 1. You must create/update the WLS cluster with advanced configuration . 2. You must enable custom T3 channel by setting enableClusterT3Tunneling=true.This is a fully qualified, private link to custom T3 channel of the WLS cluster. |
clusterT3ExternalEndpoint |
This output is not always present: 1. You must create/update the WLS cluster with advanced configuration . 2. You must enable custom T3 channel by setting enableClusterT3Tunneling=true.3. You must configure Networking to enable the Azure Load Balancer service for the WLS cluster. This is a fully qualified, public link to custom T3 channel of the WLS cluster. Sample value: http://20.4.56.3:8005/ |
kedaScalerServerAddress |
This output is the server address of that saves the WLS metrics. KEDA is able to access and retrieve metric from the address. |
shellCmdtoConnectAks |
AZ CLI command to connect to the AKS cluster. Sample value: az account set |
shellCmdtoOutputKedaScalerSample |
Sell command to display the the base64 string of a scaler sample. Sample value: echo -e YXBpVm...XV0aAo= | base64 -d > scaler.yaml |
shellCmdtoOutputWlsDomainYaml |
Shell command to display the base64 encoded string of the WLS domain resource definition. Sample value: echo -e YXBpV...mVCg== | base64 -d > domain.yaml |
shellCmdtoOutputWlsImageModelYaml |
Shell command to display the base64 encoded string of the WLS
image model
. Sample value: echo -e IyBDb...3EnC | base64 -d > model.yaml |
shellCmdtoOutputWlsImageProperties |
Shell command to display the base64 encoded string of the model properties. Sample value: echo -e IyBDF...PTUK | base64 -d > model.properties |
shellCmdtoOutputWlsVersionsandPatches |
Shell command to display the base64 encoded string of the WLS version and patches. Sample value: echo -e CldlY...gMS4= | base64 -d > version.info |