HashiCorp Vault
Oracle Backend as a Service for Spring Cloud and Microservices includes HashiCorp Vault to secure, store and tightly control access to tokens, passwords, certificates, encryption keys for protecting secrets, and other sensitive data using a user interface (UI), command-line interface (CLI), or Hypertext Transfer Protocol (HTTP) API.
TipFor more information about working with the HashiCorp Vault, see the HashiCorp Vault Documentation and Tutorials Library.
- Setup Information
- Accessing the
rootToken Production Mode - Accessing the
rootToken Development Mode - Accessing Vault Recovery Keys Production Mode
- Accessing Vault Using kubectl
- Accessing the Vault Using the Web User Interface
- Audit Logs
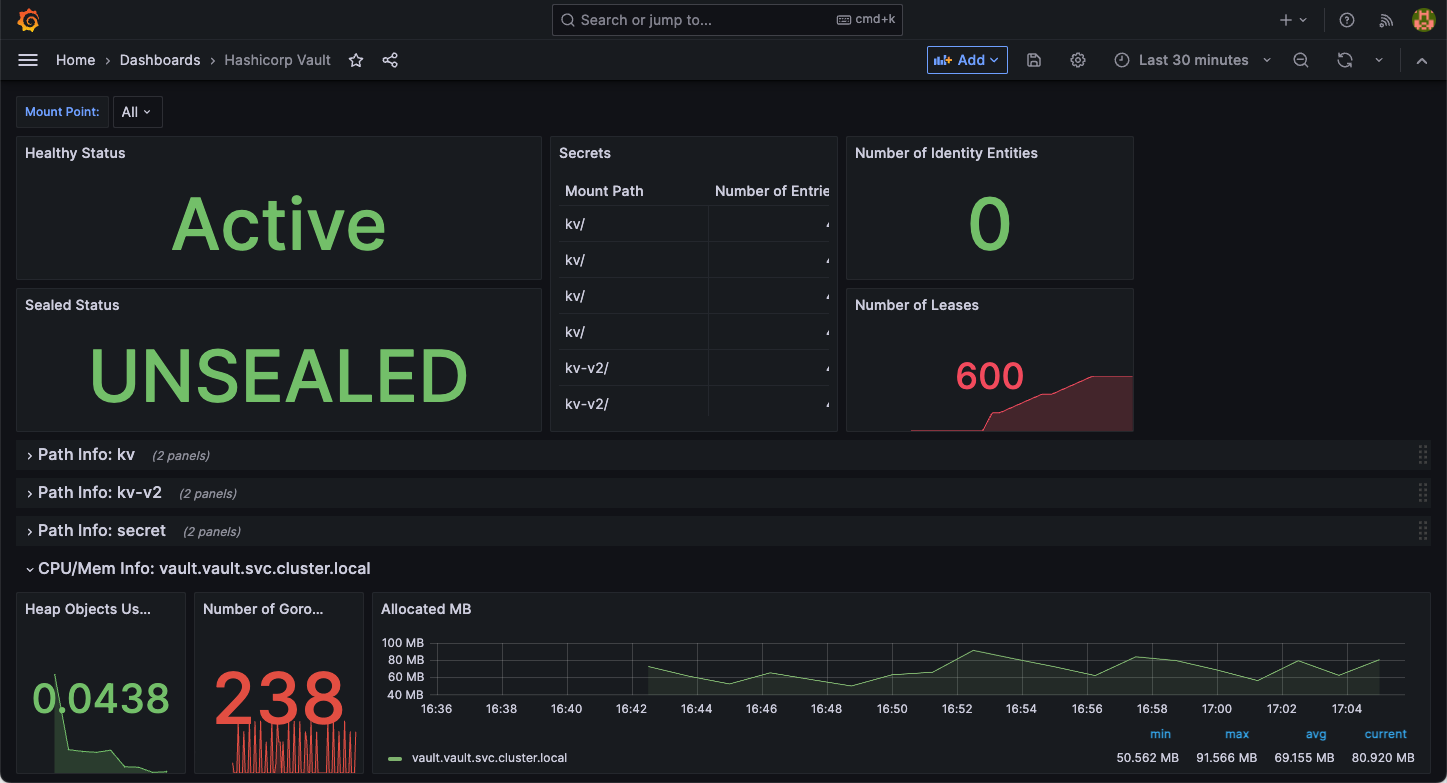
- Grafana dashboard for HashiCorp Vault
The Vault can be deployed in two different ways. See the Setup:
- Development mode
- Production mode
WarningNever run a Development mode server in production. It is insecure and will lose data on every restart (since it stores data in-memory). It is only intended for development or experimentation.
Vault uses the following Oracle Cloud Infrastructure (OCI) services when running in Production mode. When running in Development mode, only the OCI Container Engine for Kubernetes (OKE) is used.
- Object storage for storing Vault data.
- OCI Vault to automatically unseal the Vault.
- OCI Container Engine for Kubernetes for running the Vault server.
When running in Production mode, the Vault is unsealed using the
OCI Key Management Service (KMS) key. The root token can be accessed using the kubectl command-line interface. The root token
in Development mode is root.
The following Vault services are enabled during deployment. Other services can be enabled using the vault command and the web user interface:
- Token Authentication Method. The
tokenauthentication method is built-in and automatically available. It allows users to authenticate using a token, as well as create new tokens, revoke secrets by token, and more. - AppRole Authentication Method. The
approleauthentication method allows machines or applications to authenticate with Vault-defined roles. - Kubernetes Authentication Method. The
kubernetesauthentication method can be used to authenticate with Vault using a Kubernetes service account token. This method of authentication makes it easy to introduce a Vault token into a Kubernetes Pod. - Userpass Authentication Method. The
userpassauthentication method allows users to authenticate with Vault with a user name and password combination. - Key/Value Secrets Engine. The non-versioned Key/Value secrets engine is a generic Key/Value store used to store arbitrary secrets.
- Key/Value Secrets Engine Version 2. The Key/Value secrets engine is a generic Key/Value store used to store arbitrary secrets.
root tokens have the root policy attached to them. root tokens can do anything in Vault and are useful in Development mode but should be restricted in Production mode. In fact, the Vault team recommends that root tokens only be used for the initial setup. Be sure to save the initial root token in a secure way. For example:
kubectl get secret vault-root-token -n vault --template="{{index .data \"root.token\" | base64decode}}"; echo
WarningIt is very important that the token is saved in multiple places. Losing the token can result in loss of access to the Vault.
The root token is set to root in Development mode. There are no recovery keys when running in Development mode.
Vault is configured to automatically unseal (auto unseal) using OCI Vault. Initializing with auto unseal creates five recovery keys that are stored in K8s Secrets. They MUST be retrieved and stored in a second location.
WarningIt is very important that recovery keys are saved in multiple places. Losing the recovery keys can result in loss of Vault.
To extract the five recovery keys, use the following commands:
% kubectl get secret vault-recovery-keys -n vault --template="{{index .data \"recovery.key.1\" }}"; echo
% kubectl get secret vault-recovery-keys -n vault --template="{{index .data \"recovery.key.2\" }}"; echo
% kubectl get secret vault-recovery-keys -n vault --template="{{index .data \"recovery.key.3\" }}"; echo
% kubectl get secret vault-recovery-keys -n vault --template="{{index .data \"recovery.key.4\" }}"; echo
% kubectl get secret vault-recovery-keys -n vault --template="{{index .data \"recovery.key.5\" }}"; echo
-
To access the Vault using the
kubectlcommand-line interface, you need to set up Access Kubernetes Cluster. -
Test access to the Vault.
Vault Documentation contains all of the commands that you can use with the Vault CLI. For example, this command returns the current status of Vault on one of the pods:
kubectl exec pod/vault-0 -n vault -it -- vault statusThe output looks similar to this:
Key Value --- ----- Recovery Seal Type shamir Initialized true Sealed false Total Recovery Shares 5 Threshold 3 Version 1.11.3 Build Date 2022-08-26T10:27:10Z Storage Type oci Cluster Name vault-cluster-28535f69 Cluster ID 993662ee-b3ee-2a13-3354-97adae01e1ca HA Enabled true HA Cluster https://vault-0.vault-internal:8201 HA Mode active Active Since 2023-01-26T16:14:32.628291153Z -
Get the token and log in to the Vault.
To interact with the Vault in Production mode, you need to log in using a token that is stored in a K8s Secret. Get the token by running the following command. The output is the
roottoken. It is very important that the token is saved in multiple places. Losing the token can result in loss of access to the Vault. In Development mode, theroottoken isroot.Get the token with this command:
kubectl get secret vault-root-token -n vault --template="{{index .data \"root.token\" | base64decode}}"; echoLog in to the Vault and provide the token with this command:
kubectl exec pod/vault-0 -n vault -it -- vault loginThe following is sample output from logging in as the
rootuser which should only be done during the initial set up. As an administrator, you must generate separate tokens and access control lists (ACLs) for the users that need access to the Vault. See Vault Documentation. For example:Key Value --- ----- token hvs....... token_accessor Hcx....... token_duration ∞ token_renewable false token_policies ["root"] identity_policies [] policies ["root"] -
To display the enabled secret engines, process this command:
kubectl exec pod/vault-0 -n vault -it -- vault secrets listThe output looks similar to this:
Path Type Accessor Description ---- ---- -------- ----------- cubbyhole/ cubbyhole cubbyhole_a07a59ec per-token private secret storage identity/ identity identity_8b1e1a80 identity store kv-v2/ kv kv_06acc397 n/a sys/ system system_df5c39a8 system endpoints used for control, policy and debugging -
To display the enabled authentication methods, process this command:
kubectl exec pod/vault-0 -n vault -it -- vault auth listThe output looks similar to this:
Path Type Accessor Description ---- ---- -------- ----------- approle/ approle auth_approle_00ffb93b n/a kubernetes/ kubernetes auth_kubernetes_c9bb0698 n/a token/ token auth_token_68b0beb2 token based credentials userpass/ userpass auth_userpass_afb2fb02 n/a -
Create a secret at path
kv-v2/customer/acmewith acustomer_nameand acustomer_email. For example:kubectl exec pod/vault-0 -n vault -it -- vault kv put -mount=kv-v2 \ customer/acme customer_name="ACME Inc." contact_email="john.smith@acme.com"The output looks similar to this:
====== Secret Path ====== kv-v2/data/customer/acme ======= Metadata ======= Key Value --- ----- created_time 2023-01-30T15:53:41.85529383Z custom_metadata <nil> deletion_time n/a destroyed false version 1 -
Retrieve the created secret:
kubectl exec pod/vault-0 -n vault -it -- vault kv get -mount=kv-v2 customer/acmeThe output looks similar to this:
====== Secret Path ======
kv-v2/data/customer/acme

======= Metadata =======
Key                Value
---                -----
created_time       2023-01-30T15:53:41.85529383Z
custom_metadata    <nil>
deletion_time      n/a
destroyed          false
version            1

======== Data ========
Key              Value
---              -----
contact_email    john.smith@acme.com
customer_name    ACME Inc.
For more information about the Key/Value secrets engine, see the Key/Value Documentation and Versioned Key/Value Secrets Engine Tutorial.
To access the Vault, process these steps:
-
Expose the Vault web user interface (UI) using this command:
kubectl port-forward -n vault svc/vault 8200 -
Get the
roottoken.To interact with the Vault in Production mode, you need to log in using a token that is stored in a K8s Secret. Get the token by running the following command. The output is the
roottoken. It is very important that the token is saved in multiple places. Losing the token can result in loss of access to the Vault. In Development mode, theroottoken isroot. For example:kubectl get secret vault-root-token -n vault --template="{{index .data \"root.token\" | base64decode}}"; echo -
Open the Vault web user interface URL: https://localhost:8200
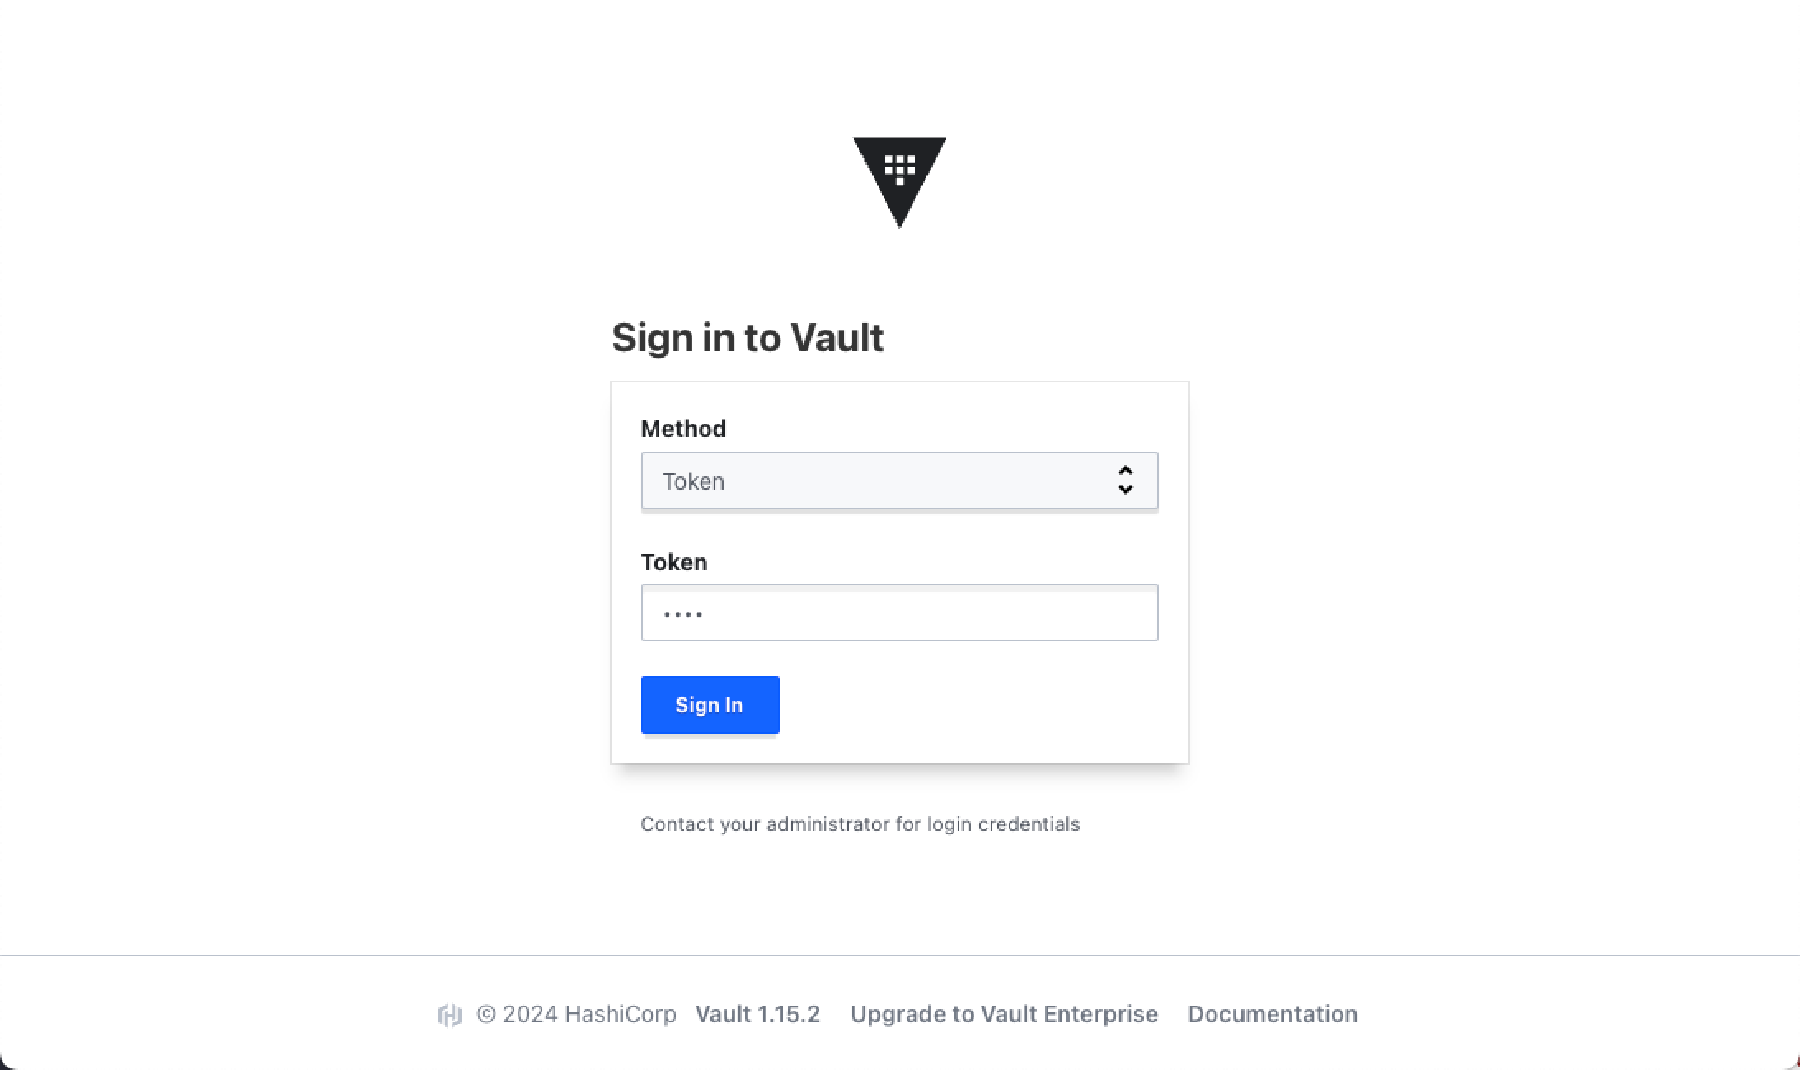
Vault Web User Interface Log in using the
roottoken. As an administrator, you must generate separate tokens and access control lists (ACLs) for the users that need access to the Vault. See Vault Documentation. -
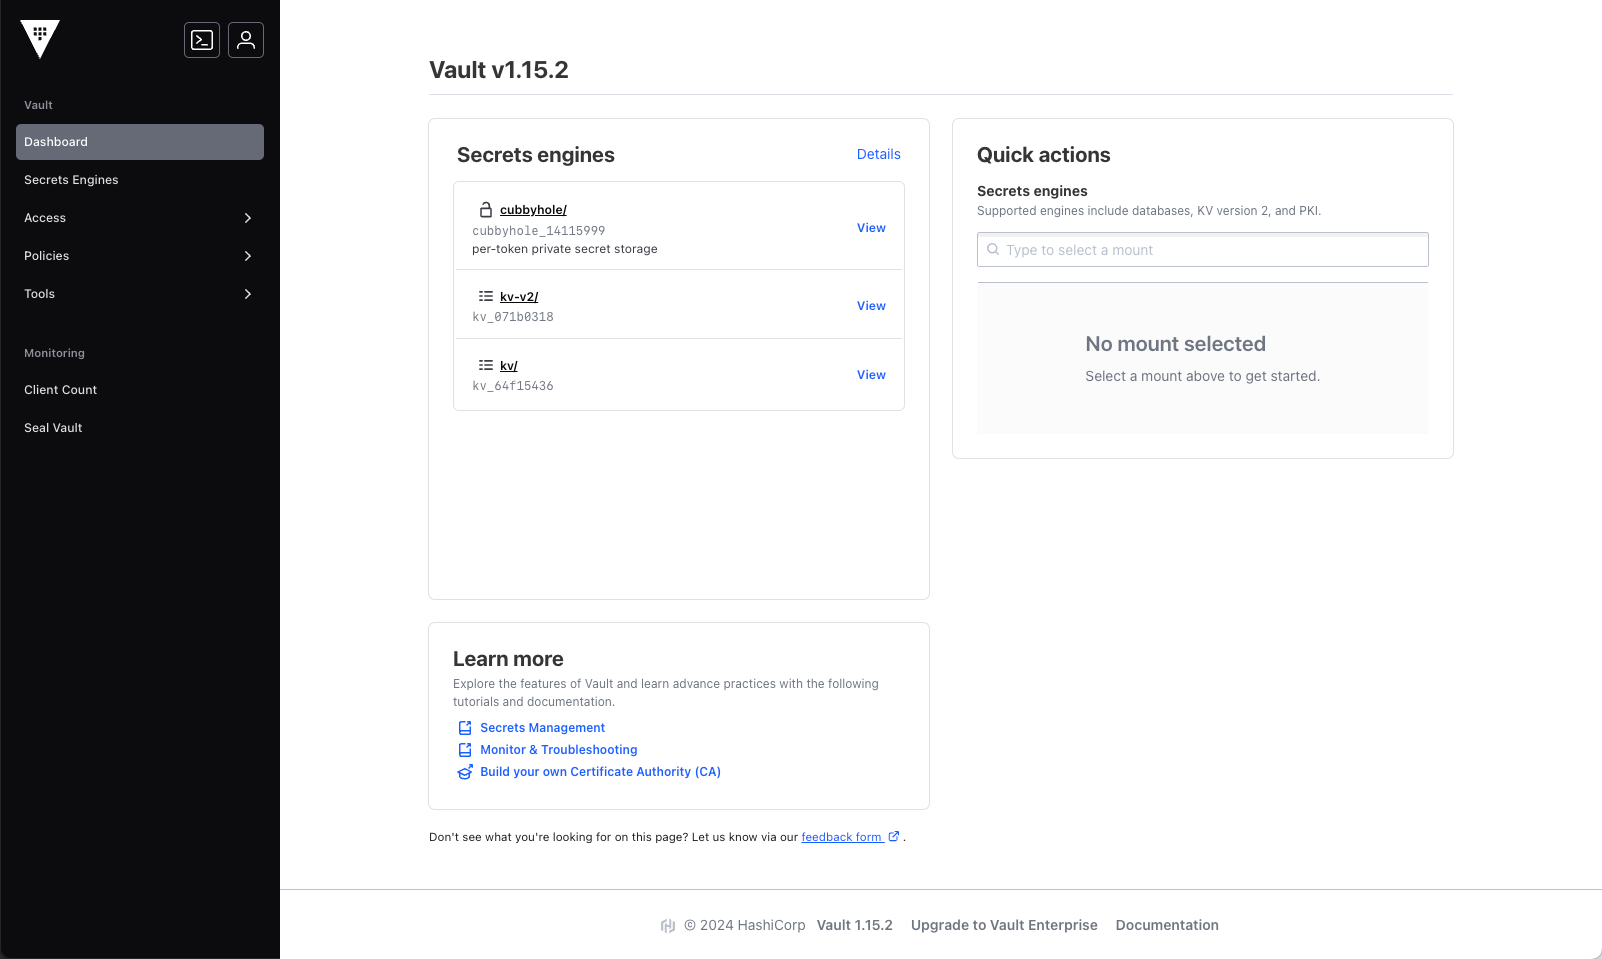
You are presented with the Home screen:

Vault Home Page
ImportantAudit logging is blocking, if the file is bigger than allowed space HashiCorp Vault will stop taking requests.
If you deployed Oracle Backend for Microservices and AI using STANDARD edition, HashiCorp Vault will be deployed in production mode and you have the option of turing on audit logs. Note, you must be authenticated to turn on audit logs.
To turn on audit logs execute the following command:
kubectl exec pod/vault-0 -n vault -it -- vault audit enable file file_path=/vault/audit/vault-audit.log
You can to list enabled audit devices using the following command. The file_path is pointing to a directory on the pods where Vault is running.
kubectl exec pod/vault-0 -n vault -it -- vault audit list -detailed
If audit is enabled the output should look like this:
Path     Type    Description    Replication    Options
----     ----    -----------    -----------    -------
file/    file    n/a            replicated     file_path=/vault/audit/vault-audit.log
To disable audit execute the following command:
kubectl exec pod/vault-0 -n vault -it -- vault audit disable file
Learn how to query audit logs here.
Oracle Backend for Microservices and AI includes a Grafana dashboard for HashiCorp Vault.