Setup
Oracle Backend for Microservices and AI is available in the OCI Marketplace.
- Prerequisites
- OCI policies
- Summary of Components
- Overview of the Setup Process
- Set Up the OCI Environment
- Set Up the Local Machine
- Access information and passwords from the OCI Console
You must meet the following prerequisites to use Oracle Backend for Microservices and AI. You need:
-
An Oracle Cloud Infrastructure (OCI) account in a tenancy with sufficient quota to create the following:
-
An OCI Container Engine for Kubernetes cluster (OKE cluster), plus a node pool with three worker nodes.
- Each node should have 2 OCPUs and 32 GB of RAM.
- 750GB of block volume storage with a
Balancedperformance level.
-
A virtual cloud network (VCN) with at least two public IP’s available.
-
A public load balancer.
-
An Oracle Autonomous Database Serverless instance.
- The instance should have 2 ECPUs and 20GB storage and 20GB backup storage.
-
-
At least one free OCI auth token (note that the maximum is two per user).
-
On a local machine, you need:
- The Kubernetes command-line interface (kubectl). Installing kubectl documentation
- Oracle Cloud Infrastructure command-line interface (CLI). Quickstart - Installing the CLI.
- Oracle Backend for Microservices and AI command-line interface (oractl). Download oractl.
- [OPTIONAL]Oracle Backend for Microservices and AI VS Code Extension. Download VS Code Extension.
- [OPTIONAL]Oracle Backend for Microservices and AI IntelliJ plugin. Download VS Code Extension.
You can use the cost estimator for pricing.
The following policies needs to be in place to be able to install Oracle Backend for Microservices and AI. Top level and their dependencies listed.
Allow group `<group-name>` to manage cluster-family in `<location>`
├── Allow group `<group-name>` to inspect compartments in `<location>`
├── Allow group `<group-name>` to read virtual-network-family in `<location>`
├── Allow group `<group-name>` to use network-security-groups in `<location>`
├── Allow group `<group-name>` to use private-ips in `<location>`
├── Allow group `<group-name>` to use subnets in `<location>`
├── Allow group `<group-name>` to use vnics in `<location>`
├── Allow group `<group-name>` to manage cluster-node-pools in `<location>`
├── Allow group `<group-name>` to manage instance-family in `<location>`
└── Allow group `<group-name>` to manage public-ips in `<location>`
Allow group `<group-name>` to manage vcns in `<location>`
├── Allow group `<group-name>` to manage route-tables in `<location>`
├── Allow group `<group-name>` to manage-security-lists in `<location>`
├── Allow group `<group-name>` to manage-dhcp-options in `<location>`


Allow group `<group-name>` to manage vcns in `<location>`
Allow group `<group-name>` to manage route-tables in `<location>`
Allow group `<group-name>` to manage security-lists in `<location>`
Allow group `<group-name>` to manage dhcp-options in `<location>`
Allow group `<group-name>` to manage nat-gateways in `<location>`
Allow group `<group-name>` to manage service-gateways in `<location>`
Allow group `<group-name>` to manage network-security-groups in `<location>`
Allow group `<group-name>` to manage subnets in `<location>`
Allow group `<group-name>` to manage repos in `<location>`
Allow group `<group-name>` to read objectstorage-namespaces in `<location>`
Allow group `<group-name>` to manage objects in `<location>`
└── Allow group `<group-name>` to manage buckets in `<location>`
Allow group `<group-name>` to manage autonomous-database-family in `<location>`
If you deploy Oracle Backend for Microservices and AI STANDARD edition you need the following policies.
Allow group `<group-name>` to manage vaults in `<location>`
Allow group `<group-name>` to manage keys in `<location>`
To allow Container Engine for Kubernetes to access Vault via Groups:
Allow group `<group-name>` to manage policies in `<location>`
Allow group `<group-name>` to manage tag-namespaces in `<location>`
Allow group `<group-name>` to manage dynamic-groups in `<location>`
Allow group `<group-name>` to manage secret-family in `<location>`
Allow group `<group-name>` to read orm-template in `<location>`
Allow group `<group-name>` to use orm-stacks in `<location>`
└── Allow group `<group-name>` to manage orm-jobs in `<location>`
Allow group `<group-name>` to manage orm-private-endpoints in `<location>`
Oracle Backend for Microservices and AI setup installs the following components.
| Component | Version | Description |
|---|---|---|
| Apache APISIX | 3.9.1 | Provides full lifecycle API management. |
| Apache Kafka | 3.8.0 | Provides distributed event streaming. |
| cert-manager | 1.12.3 | Automates the management of certificates. |
| Coherence Operator | 3.3.5 | Provides in-memory data grid. |
| Conductor Server | 3.13.8 | Provides a Microservice orchestration platform. |
| Kube State Metrics | 2.10.1 | Collects metrics for the Kubernetes cluster |
| Metrics server | 0.7.0 | Source of container resource metrics for Kubernetes built-in autoscaling pipeline |
| NGINX Ingress Controller | 1.10.1 | Provides traffic management solution for cloud‑native applications in Kubernetes. |
| OpenTelemetry Collector | 0.107.0 | Collects process and export telemetry data. |
| Oracle Database Observability Exporter | 1.3.1 | Exposes Oracle Database metrics in standard Prometheus format. |
| Oracle Database Operator | 1.1.0 | Helps reduce the time and complexity of deploying and managing Oracle databases. |
| Oracle Transaction Manager for Microservices | 24.2.1 | Manages distributed transactions to ensure consistency across Microservices. |
| SigNoz | 0.75.0 | Observability stack and Dashboards for logs, metrics and tracing. |
| Spring Authorization Server | 3.3.3 | Provides authentication and authorization for applications. |
| Spring Boot Admin server | 3.3.3 | Manages and monitors Spring Cloud applications. |
| Spring Cloud Config server | 4.1.3 | Provides server-side support for an externalized configuration. |
| Spring Eureka service registry | 4.1.3 | Provides service discovery capabilities. |
| Strimzi-Apache Kafka operator | 0.43.0 | Manages Apache Kafka clusters. |
This video provides a quick overview of the setup process.
Installing Oracle Backend for Microservices and AI and Microservice takes approximately one hour to complete. The following steps are involved:
- Setup the OCI environment
- Setup of the Local Environment
- Access environment variables from the OCI Console
To set up the OCI environment, process these steps:
-
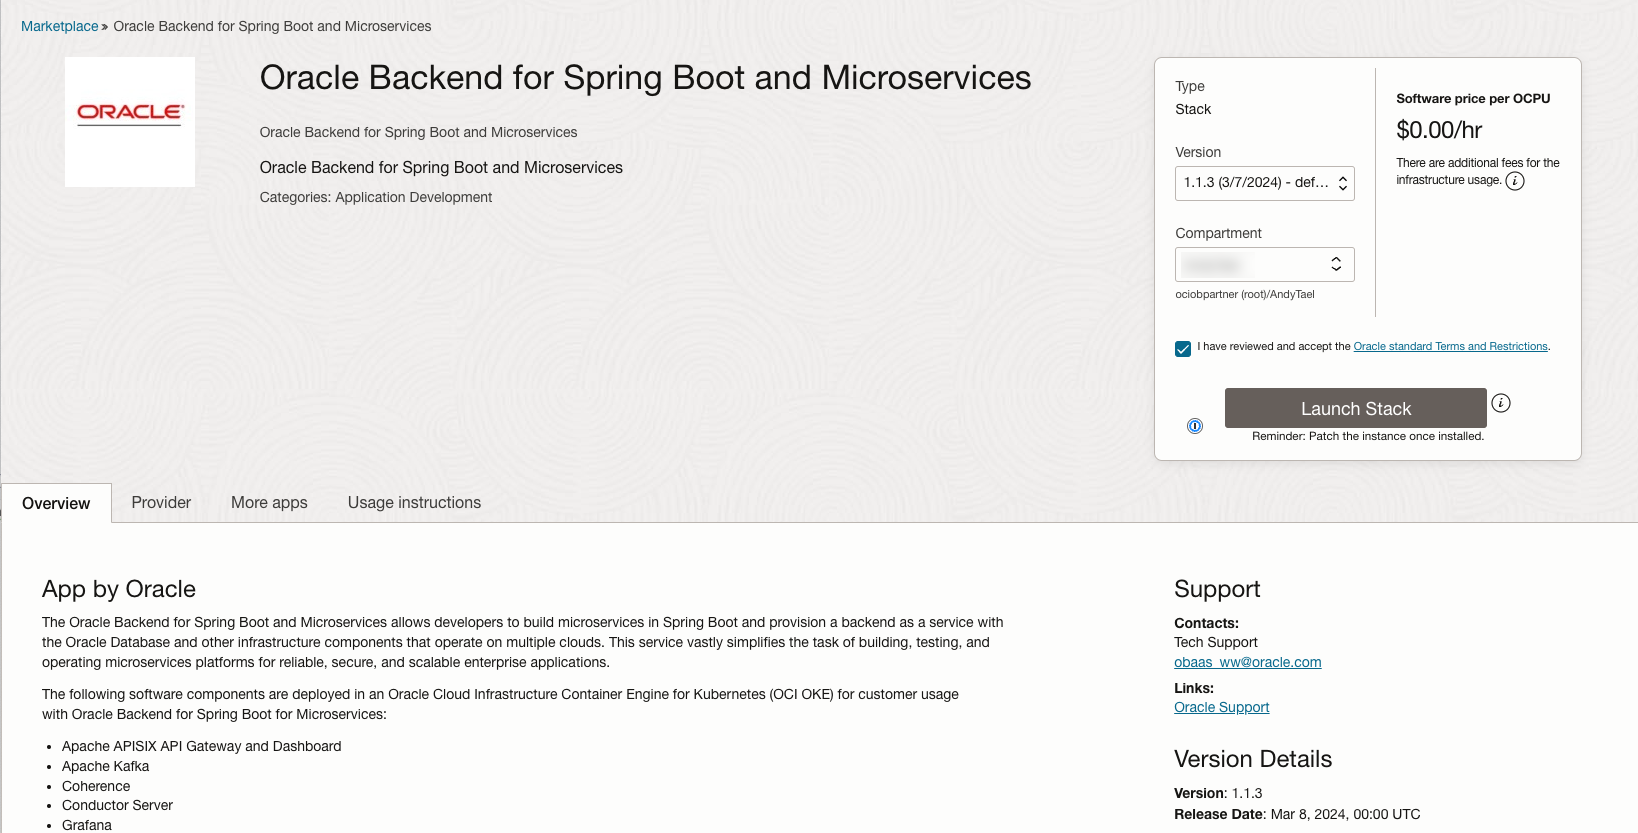
Go to the OCI Marketplace listing for Oracle Backend for Microservices and AI.

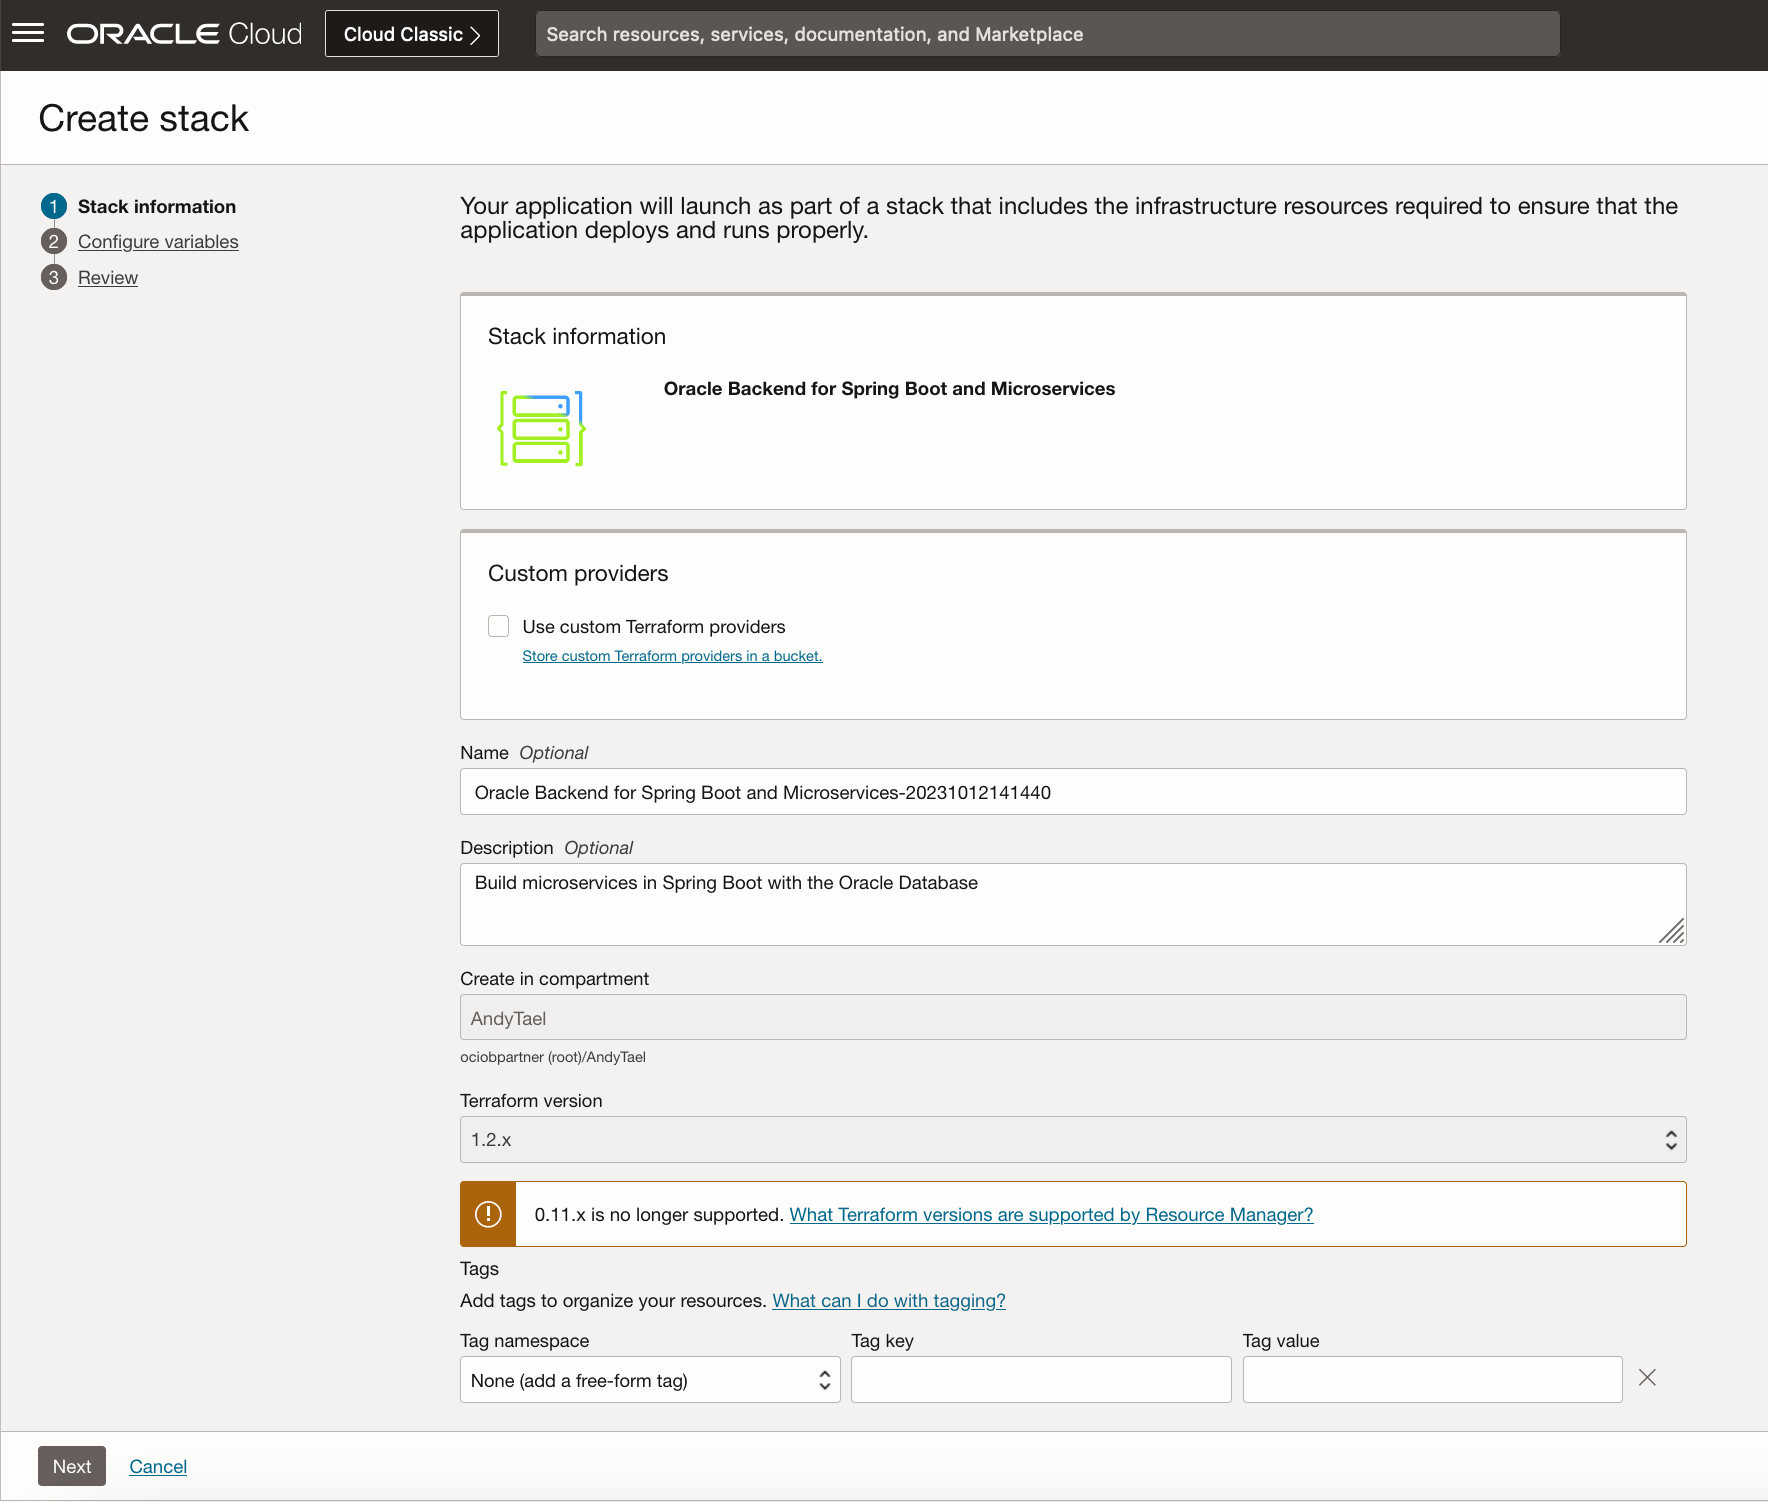
Marketplace Listing Choose the target compartment, agree to the terms, and click Launch Stack. This starts the wizard and creates the new stack. On the first page, choose a compartment to host your stack and select Next and Configure the variables for the infrastructure resources that this stack will create when you run the apply job for this execution plan.
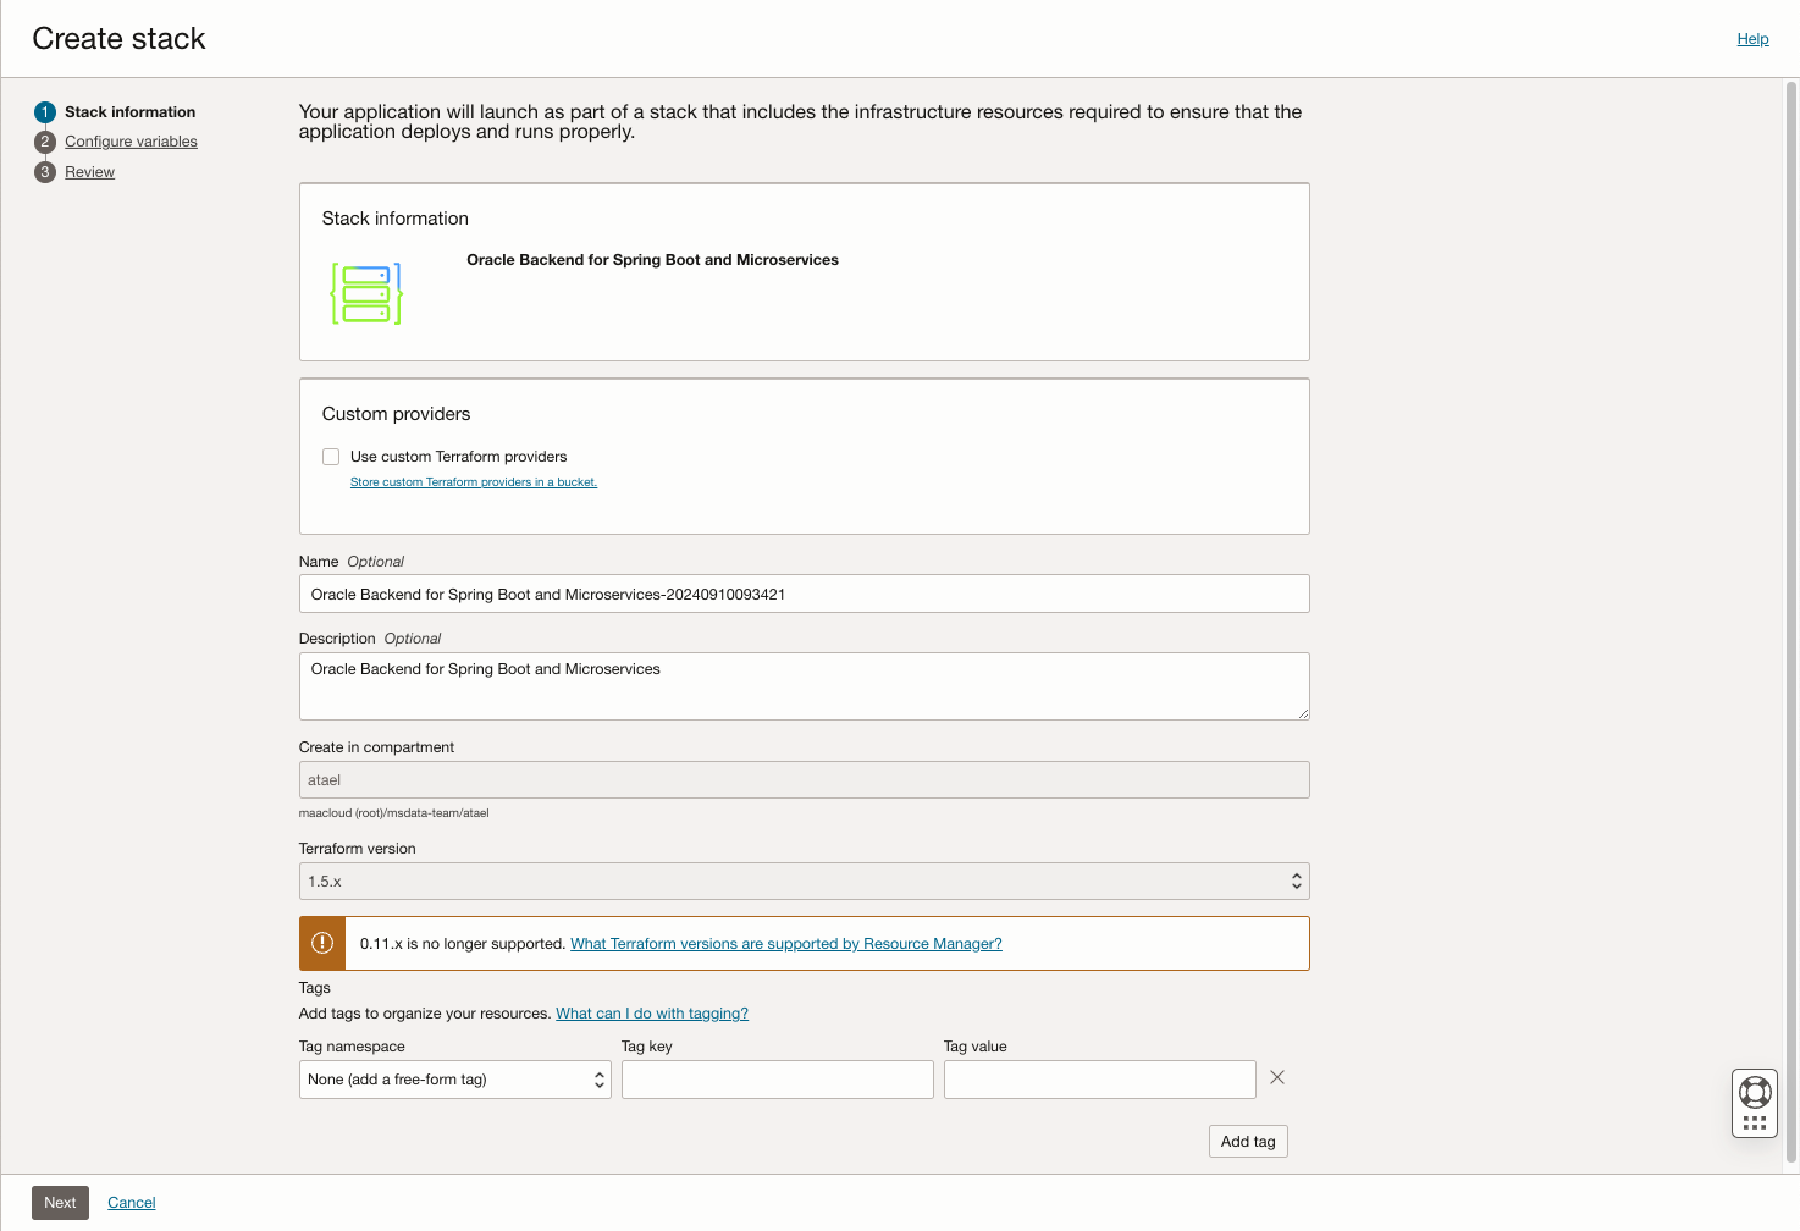
Create Stack -
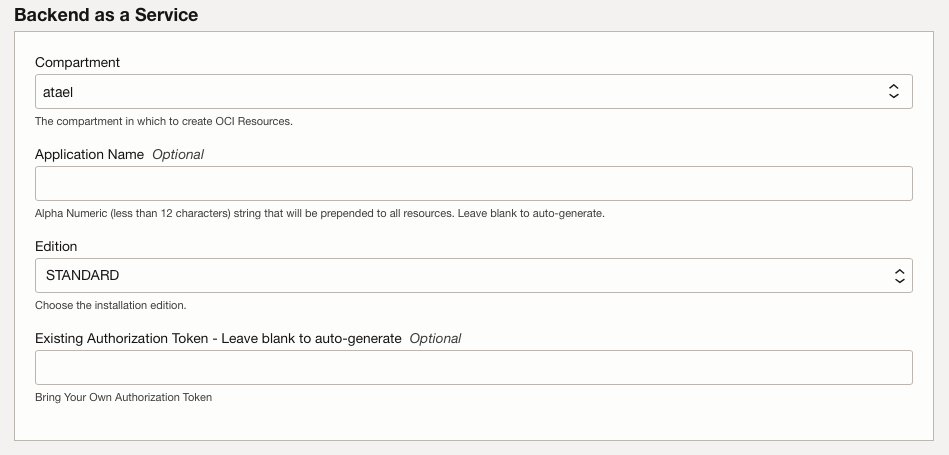
In the Backend as A Service Section, fill in the following configuration variables as needed and select Next:
-
Compartment: Select the compartment where you want to install Oracle Backend for Microservices and AI. -
Application Name(optional) : A random pet name that will be used as the application name if left empty. -
Edition: Select between COMMUNITY and STANDARD Edition.- COMMUNITY - for developers for quick start to testing Spring Boot Microservices with an integrated backend. Teams can start with the deployment and scale up as processing demand grows. Community support only.
- STANDARD - focused for pre-prod and production environments with an emphasis on deployment, scaling, and high availability. Oracle support is included with a Oracle Database support agreement. All features for developers are the same so start here if you’re porting an existing Spring Boot application stack and expect to get into production soon. This edition allows for additional Bring Your Own (BYO) capabilities.
-
Existing Authorization Token(optional) - Enter an existing Authorization token. The token is used by the cluster to pull images from the Oracle Container Registry. If left empty the token will be created.WARNING: Deletion or expiration of the token will result in the failure to pull images later. Also you must have one free OCI auth token (note that the maximum is two per user). You can NOT use someone elses token.
Edition BYO Network BYO Database Production Vault Registry Scanning Community Standard x x x x 
Compartment, Application and Edition -
-
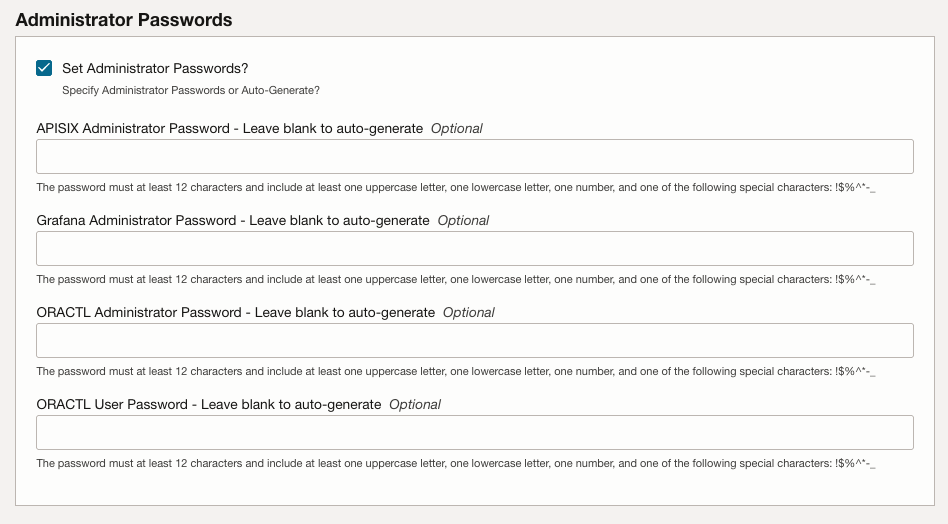
If you check the checkbox Set Administrator Passwords in the Administrator Passwords section you have the option to fill in the following passwords (if not they are autogenerated):
-
APISIX Administrator Password(optional) : Leave blank to auto-generate. -
SigNoz Administrator Password(optional) : Leave blank to auto-generate. -
ORACTL Administrator Passwordoptional) : Leave blank to auto-generate. This is the password for theobaas-adminuser. -
ORACTL User Password(optional) : Leave blank to auto-generate. This is the password for theobaas-useruser.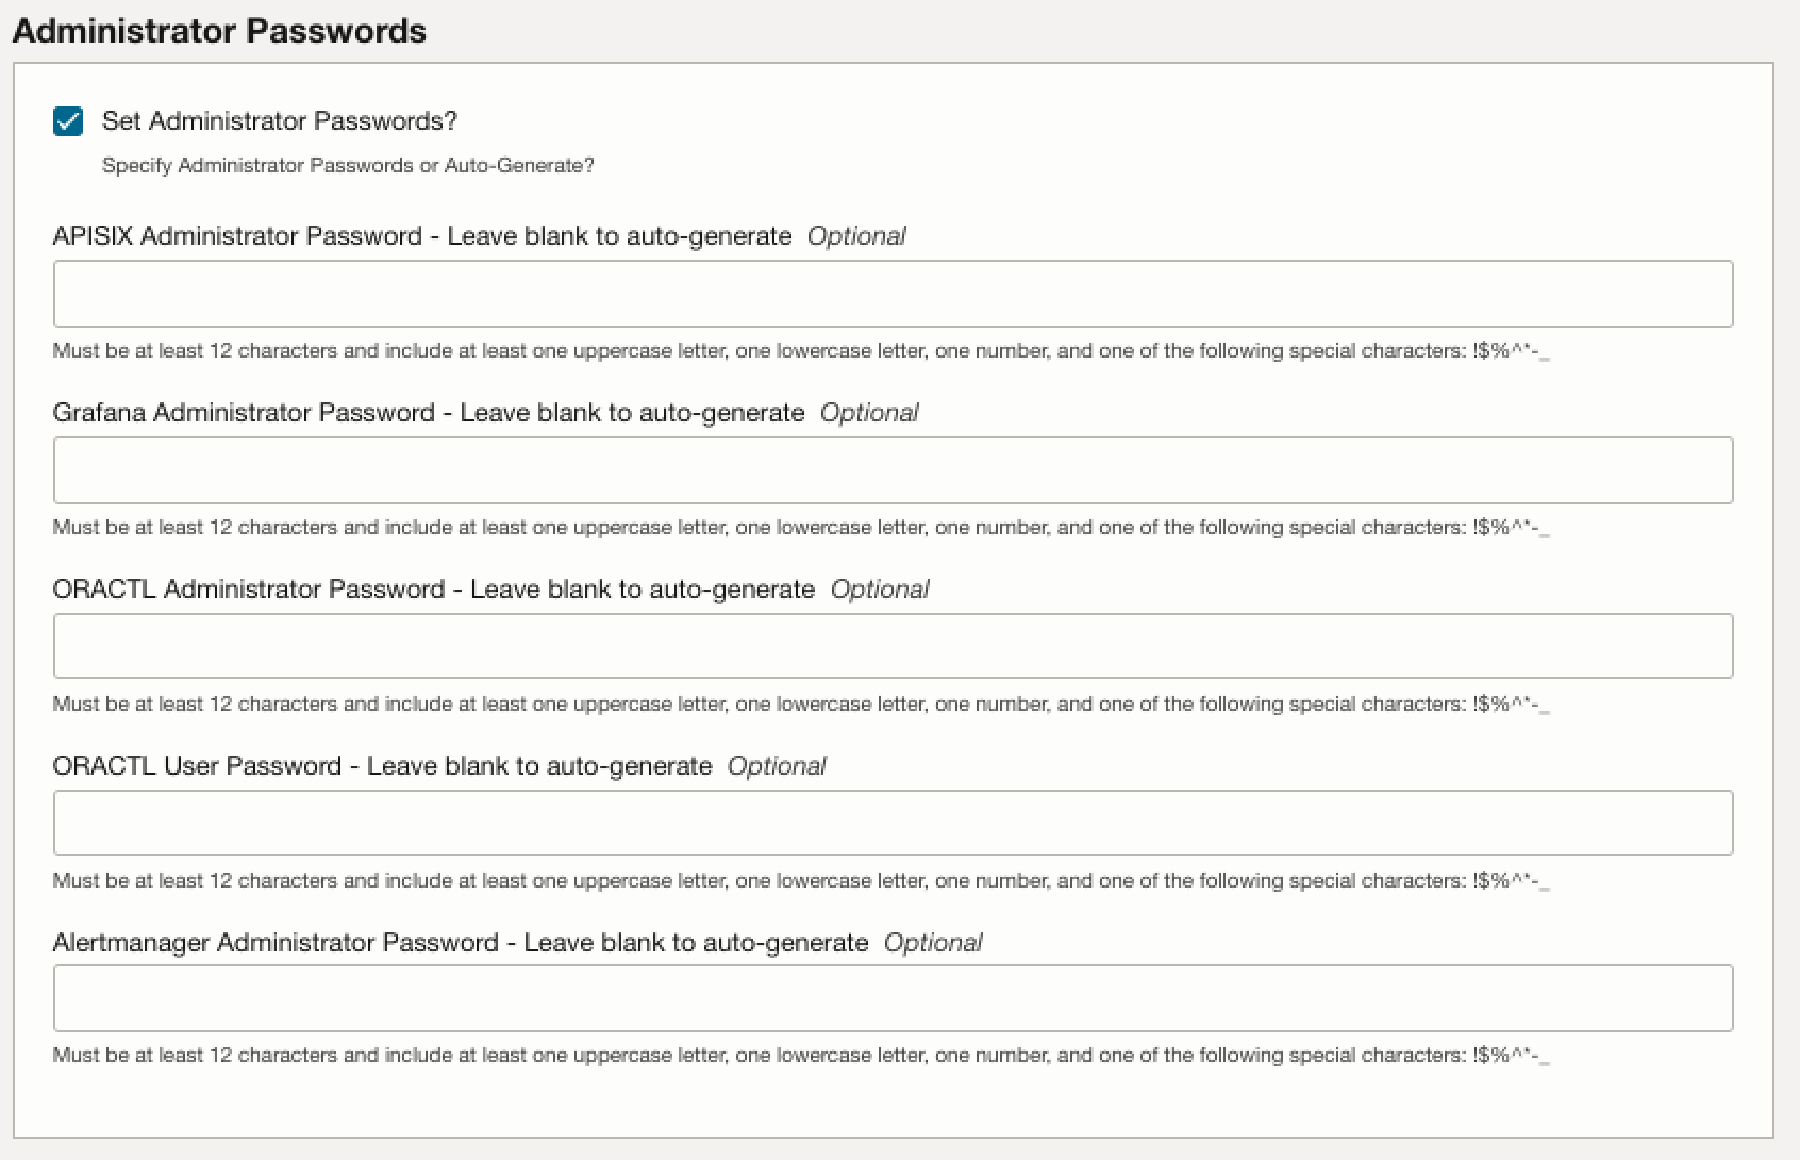
Administrator Passwords
-
-
(Standard Edition Only) If you check the checkbox Bring Your Own Virtual Cloud Network in the Network Options section you can use an existing Virtual Cloud Network. This is required to Bring Your Own Database (Standard Edition Only).

Network Options - Standard Edition For more information on the network requirements and topology of the Oracle Backend for Microservices and AI including the options for Bring Your Own Virtual Cloud Network, please see the Networking documentation.
-
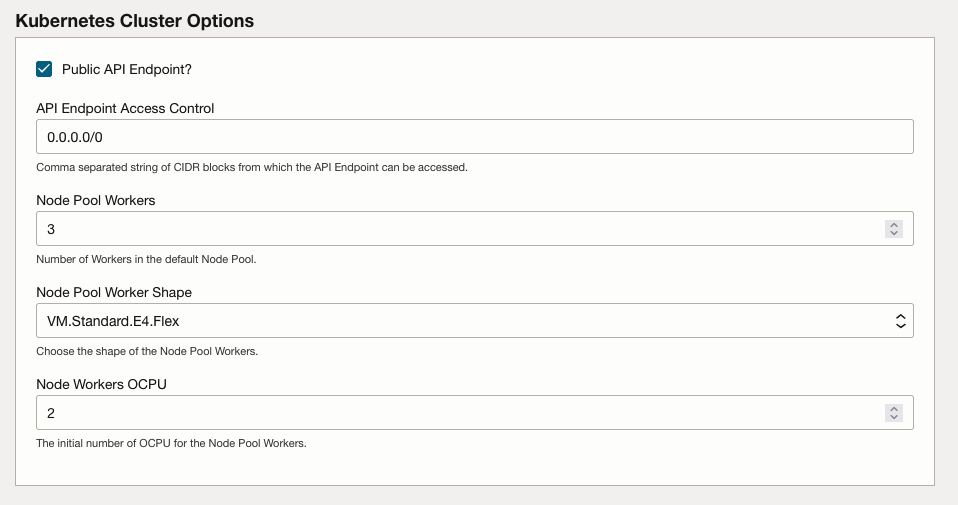
In the Kubernetes Cluster Options section, fill in the following for the OKE Cluster Options:
Public API Endpoint?: This option allows access to the OKE Control Plane API Endpoint from the internet (public IP). If not selected, access can only be from a private virtual cloud network (VCN).API Endpoint Access Control: Enter the CIDR block you want to give access to the Control Plane API. Default (and not recommended) is0.0.0.0/0.Node Pool Workers: The number of Kubernetes worker nodes (virtual machines) attached to the OKE cluster.Node Pool Worker Shape: The shape of the node pool workers.Node Workers OCPU: The initial number of Oracle Compute Units (OCPUs) for the node pool workers.
If you check the box
Deploy GPU Node Poola node pool with GPU will be created with the size ofGPU Node Pool Workers(default 1) and the shapeNode Pool Worker Shape(default VM.GPU.A10.1). NOTE: Make sure that the tenancy you are deploying to has resources to do so.NOTE: Oracle recommends that you set
API Endpoint Access Controlto be as restrictive as possible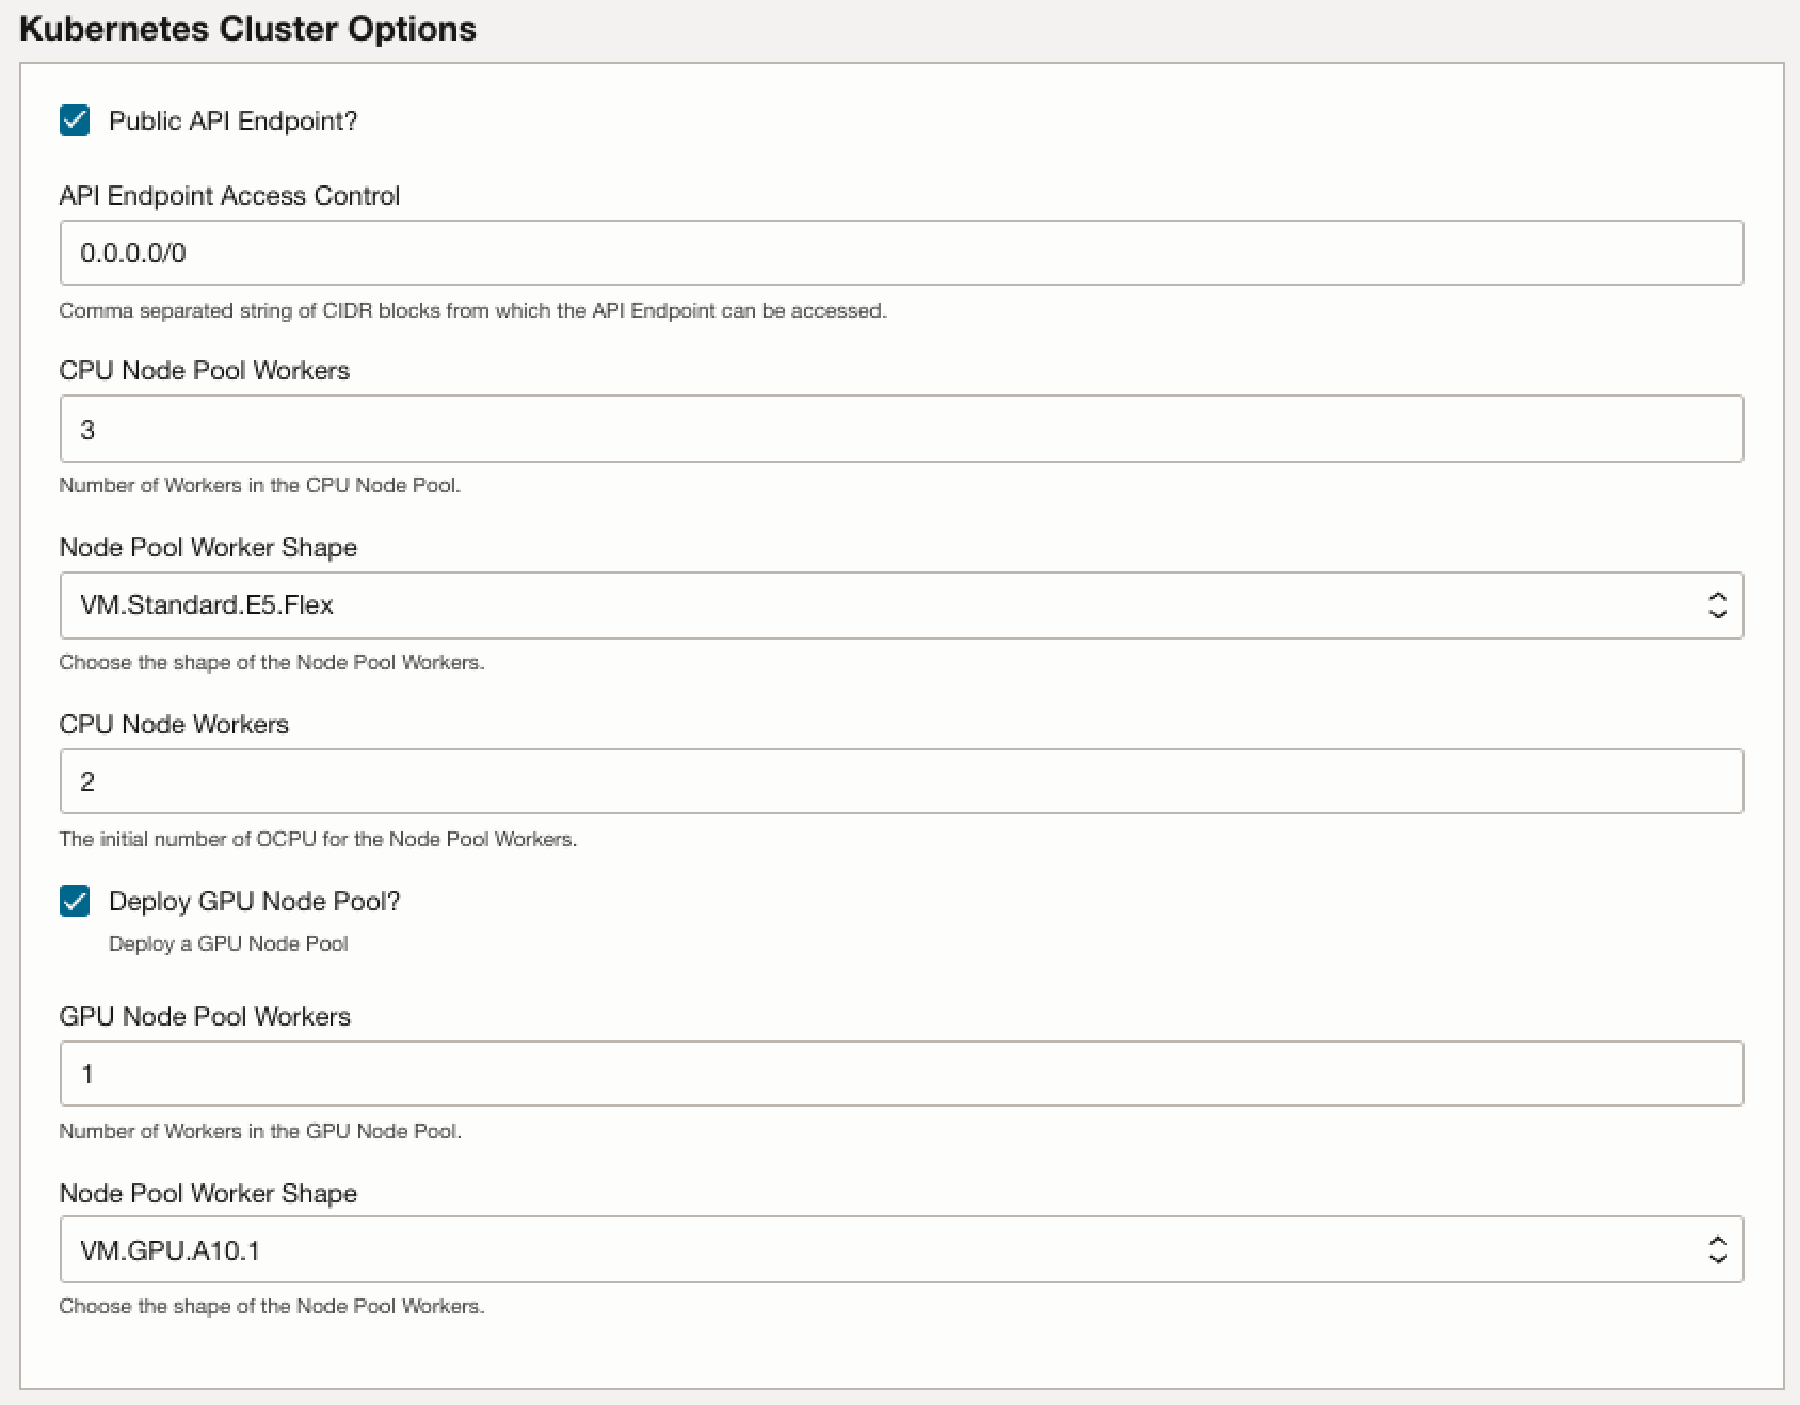
Create Stack OKE Options -
In the Load Balancers Options section, fill in the following for the Load Balancers options:
Enable Public Load Balancer: This option allows access to the load balancer from the internet (public IP). If not selected, access can only be from a private VCN.Public Load Balancer Access Control: Enter the CIDR block you want to give access to the Load Balancer. Default (and not recommended) is0.0.0.0/0.Public Load Balancer Ports Exposed: The ports exposed from the load balancer.Minimum bandwidth: The minimum bandwidth that the load balancer can achieve.Maximum bandwidth: The maximum bandwidth that the load balancer can achieve.
NOTE: Oracle recommends that you set
Public Load Balancer Access Controlto be as restrictive as possible.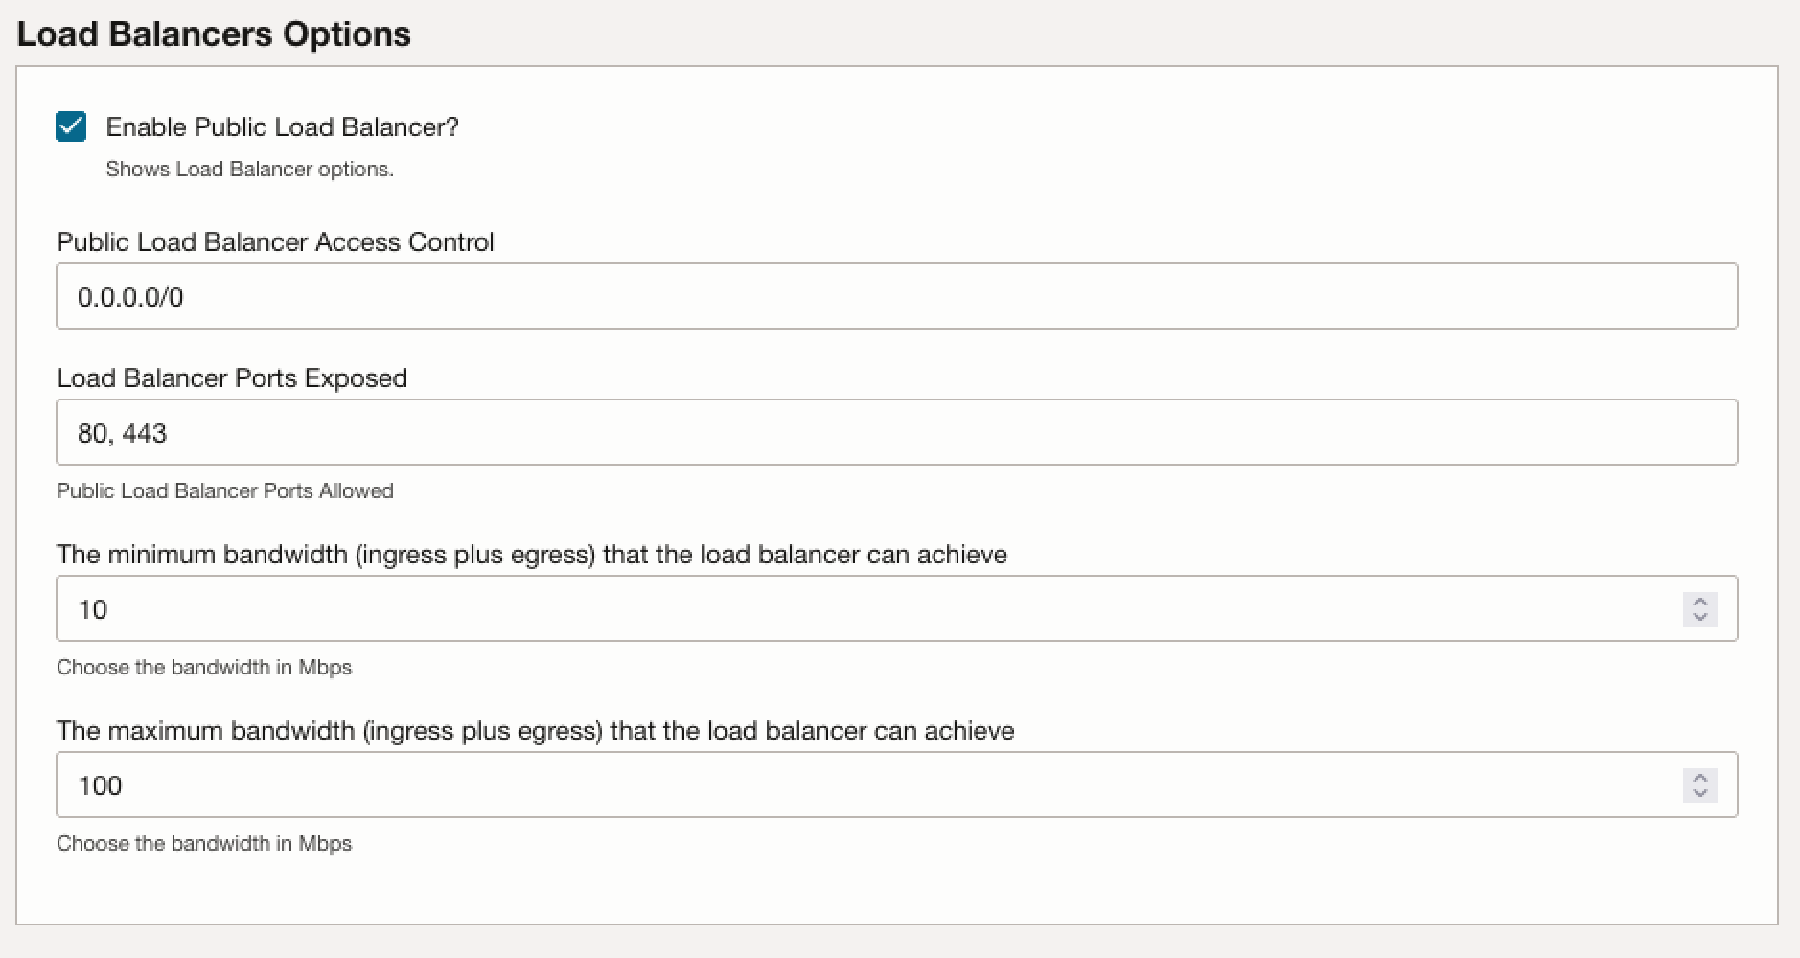
Load Balancer Options -
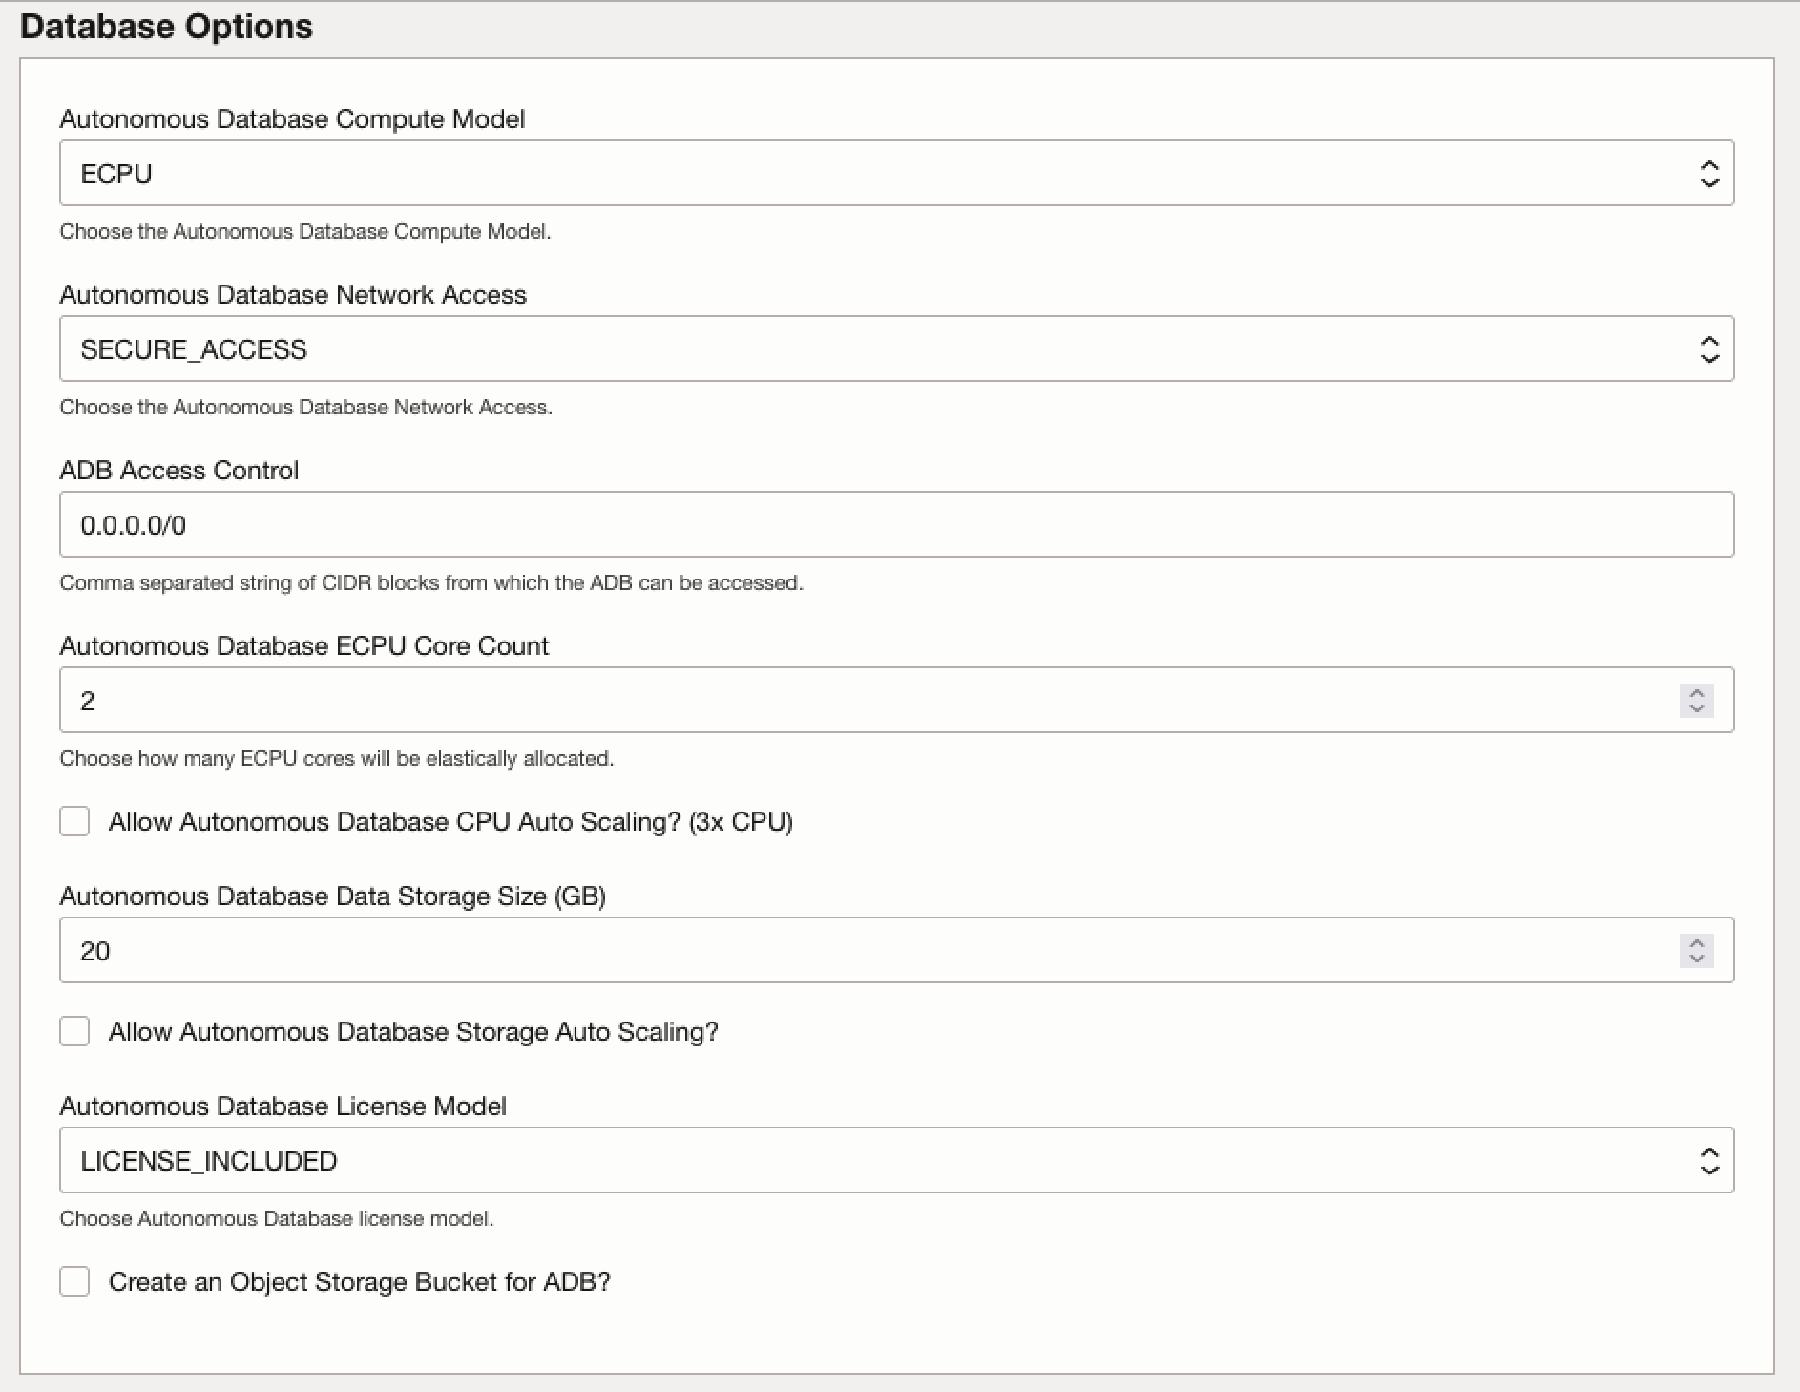
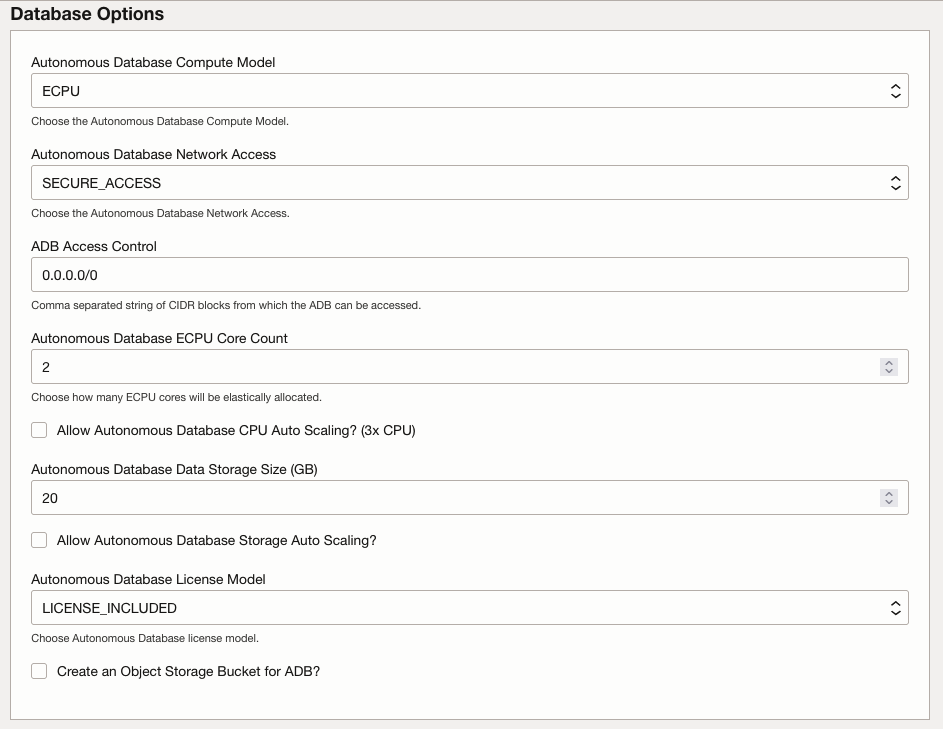
In the Database Options section, you can modify the following Database options.
Autonomous Database Compute Model: Choose either ECPU (default) or OCPU compute model for the ADB.Autonomous Database Network Access: Choose the Autonomous Database network access. Choose between SECURE_ACCESS and PRIVATE_ENDPOINT_ACCESS. NOTE: This option currently cannot be changed later.- SECURE_ACCESS - Accessible from outside the Kubernetes Cluster. Requires mTLS and can be restricted by IP or CIDR addresses.
- PRIVATE_ENDPOINT_ACCESS - Accessible only from inside the Kubernetes Cluster or via a Bastion service. Requires mTLS.
ADB Access Control: Comma separated list of CIDR blocks from which the ADB can be accessed. This only applies if SECURE_ACCESS was chosen. Default (and not recommended) is0.0.0.0/0.Autonomous Database CPU Core Count: Choose how many CPU cores will be elastically allocated.Allow Autonomous Database CPU Auto Scaling: Enable auto scaling for the ADB CPU core count (x3 ADB CPU).Autonomous Database Data Storage Size: Choose ADB Database Data Storage Size in gigabytes (ECPU) or terabytes (OCPU).Allow Autonomous Database Storage Auto Scaling: Allow the ADB storage to automatically scale.Autonomous Database License Model: The Autonomous Database license model.Create an Object Storage Bucket for ADB: Create a Object Storage bucket, with the appropriate access policies, for the ADB.
NOTE: Oracle recommends that you restrict by IP or CIDR addresses to be as restrictive as possible.
Database Options -
(Standard Edition Only) If Bring Your Own Virtual Cloud Network has been selected in the Network Options section, then you have the option to Bring Your Own Database in the section Database Options.

Bring your Own Database Options - Standard Edition For more information on the Bring Your Own Database option for the Oracle Backend for Microservices and AI including the required values, please review the Database documentation.
-
(Standard Edition Only) If you check the checkbox Enable Container Registry Vulnerability Scanning in the section Additional Options you will enable the automatic Vulnerability Scanning on images stored in the Oracle Container Registry.

Create Stack Additional Options - Standard Edition -
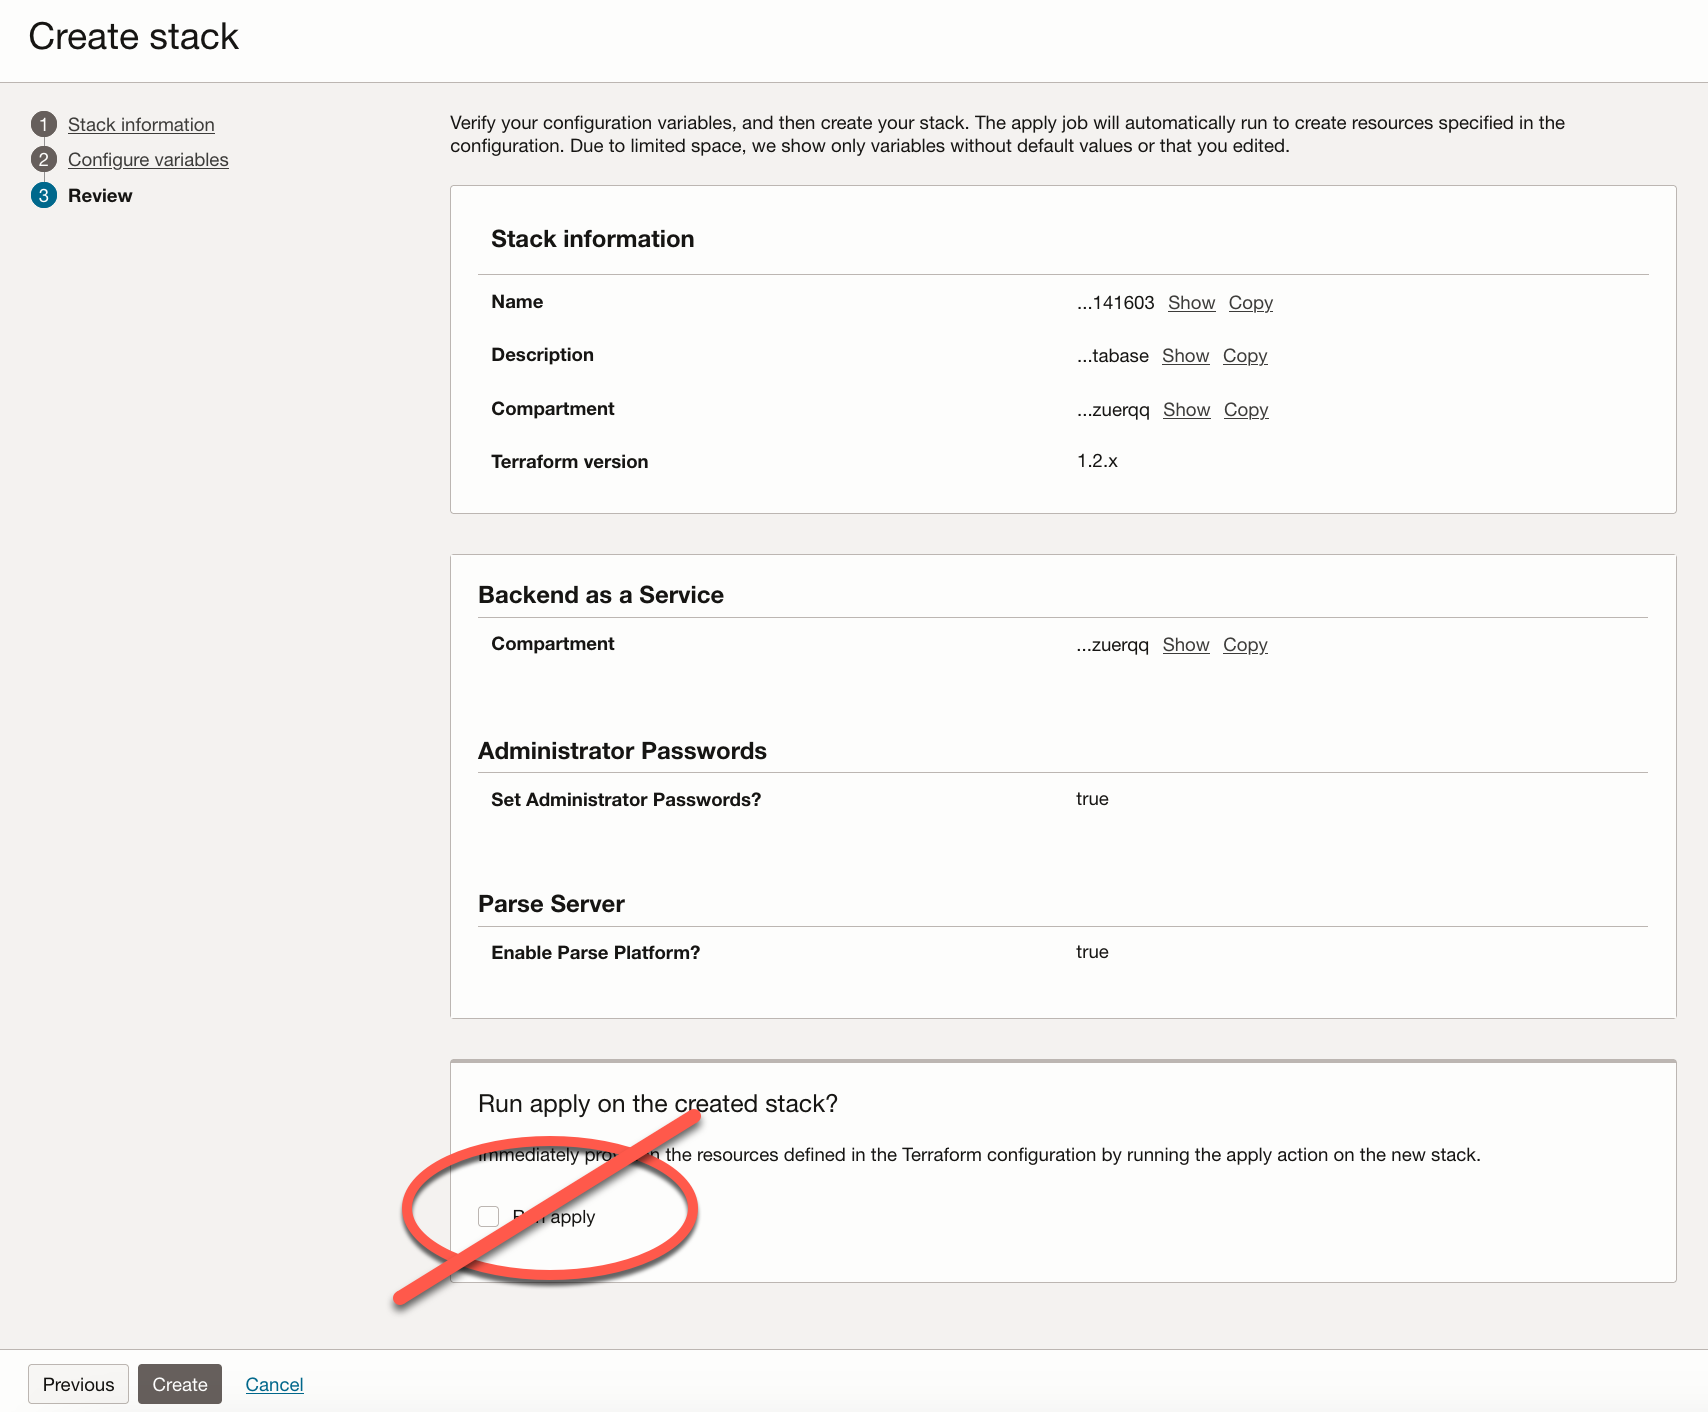
Now you can review the stack configuration and save the changes. Oracle recommends that you do not check the Run apply option. This gives you the opportunity to run the “plan” first and check for issues. Click Create
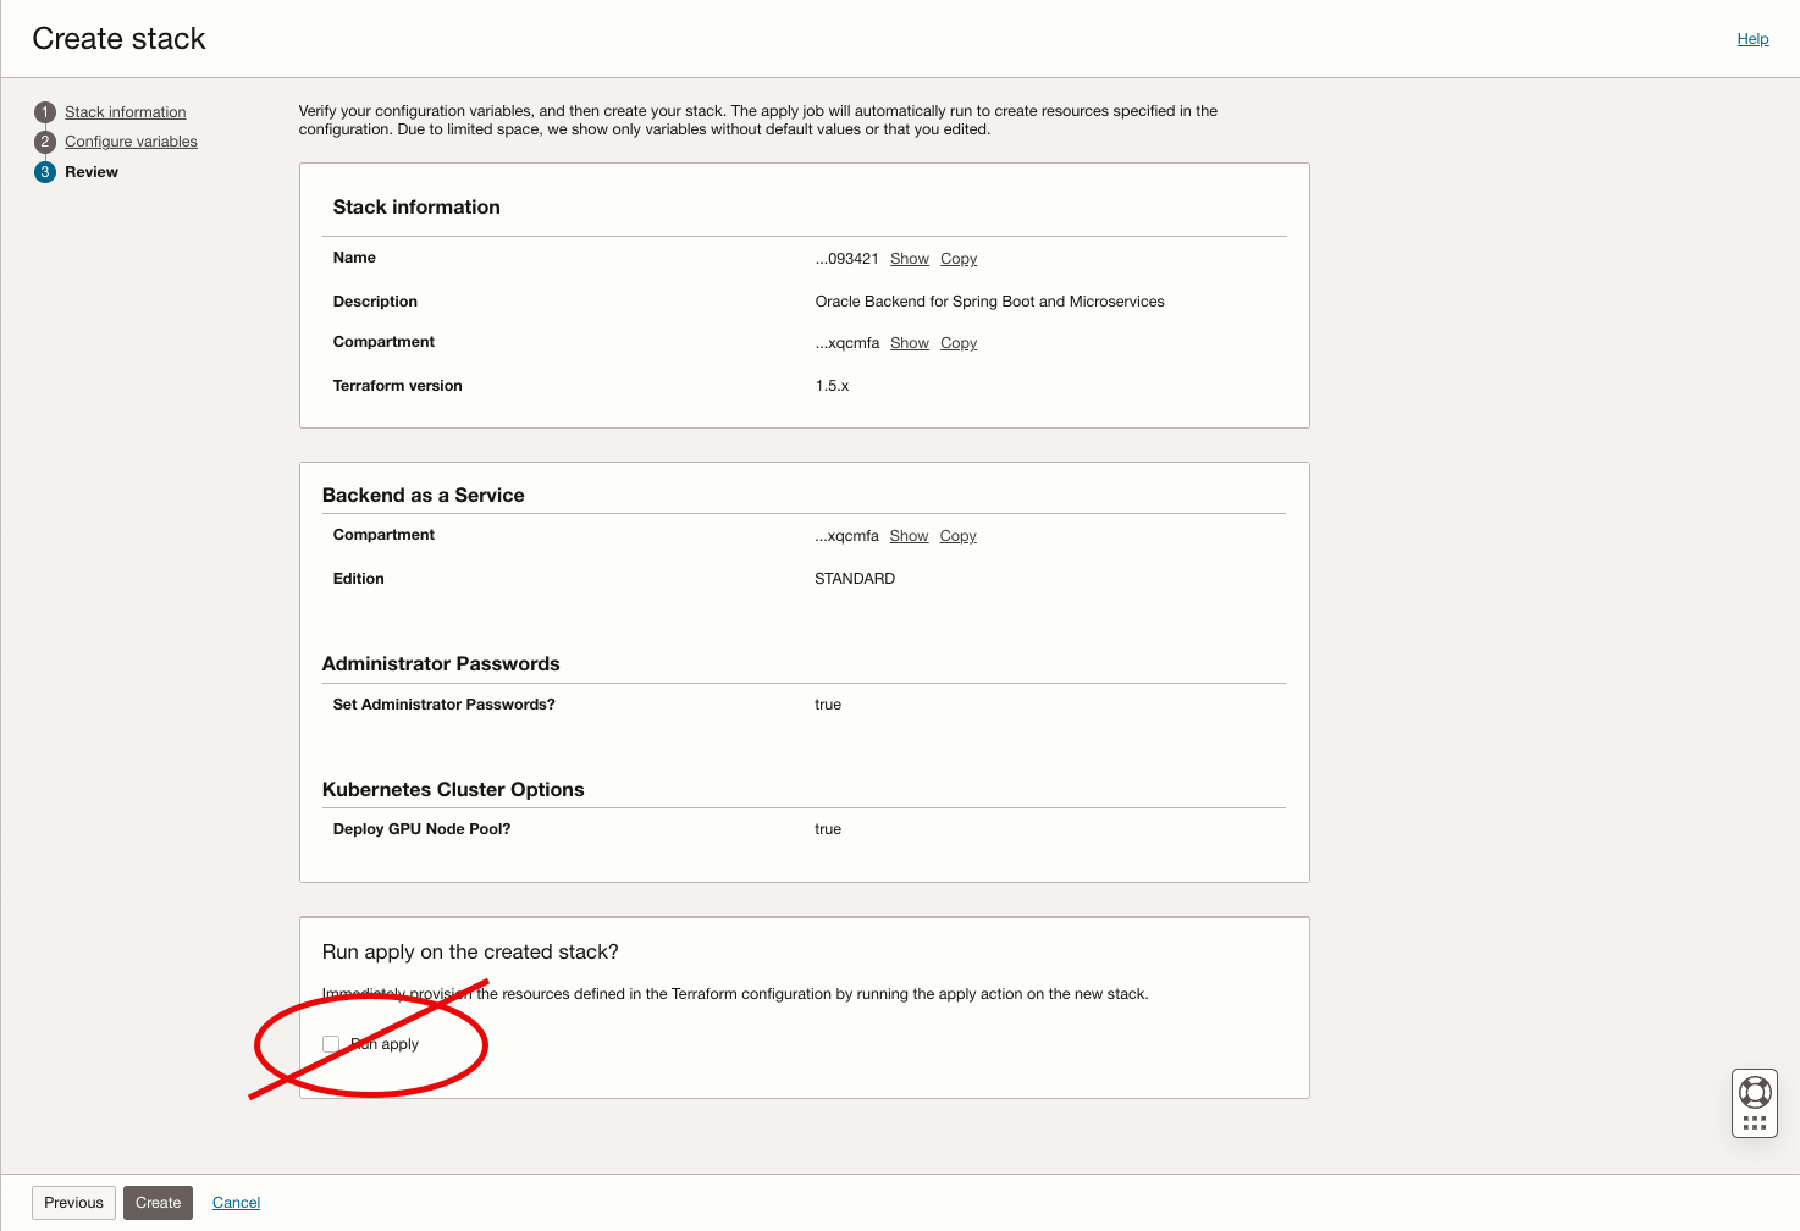
Create Stack Wizard Config Review -
Apply the stack.
After you create the stack, you can test the plan, edit the stack, and apply or destroy the stack.
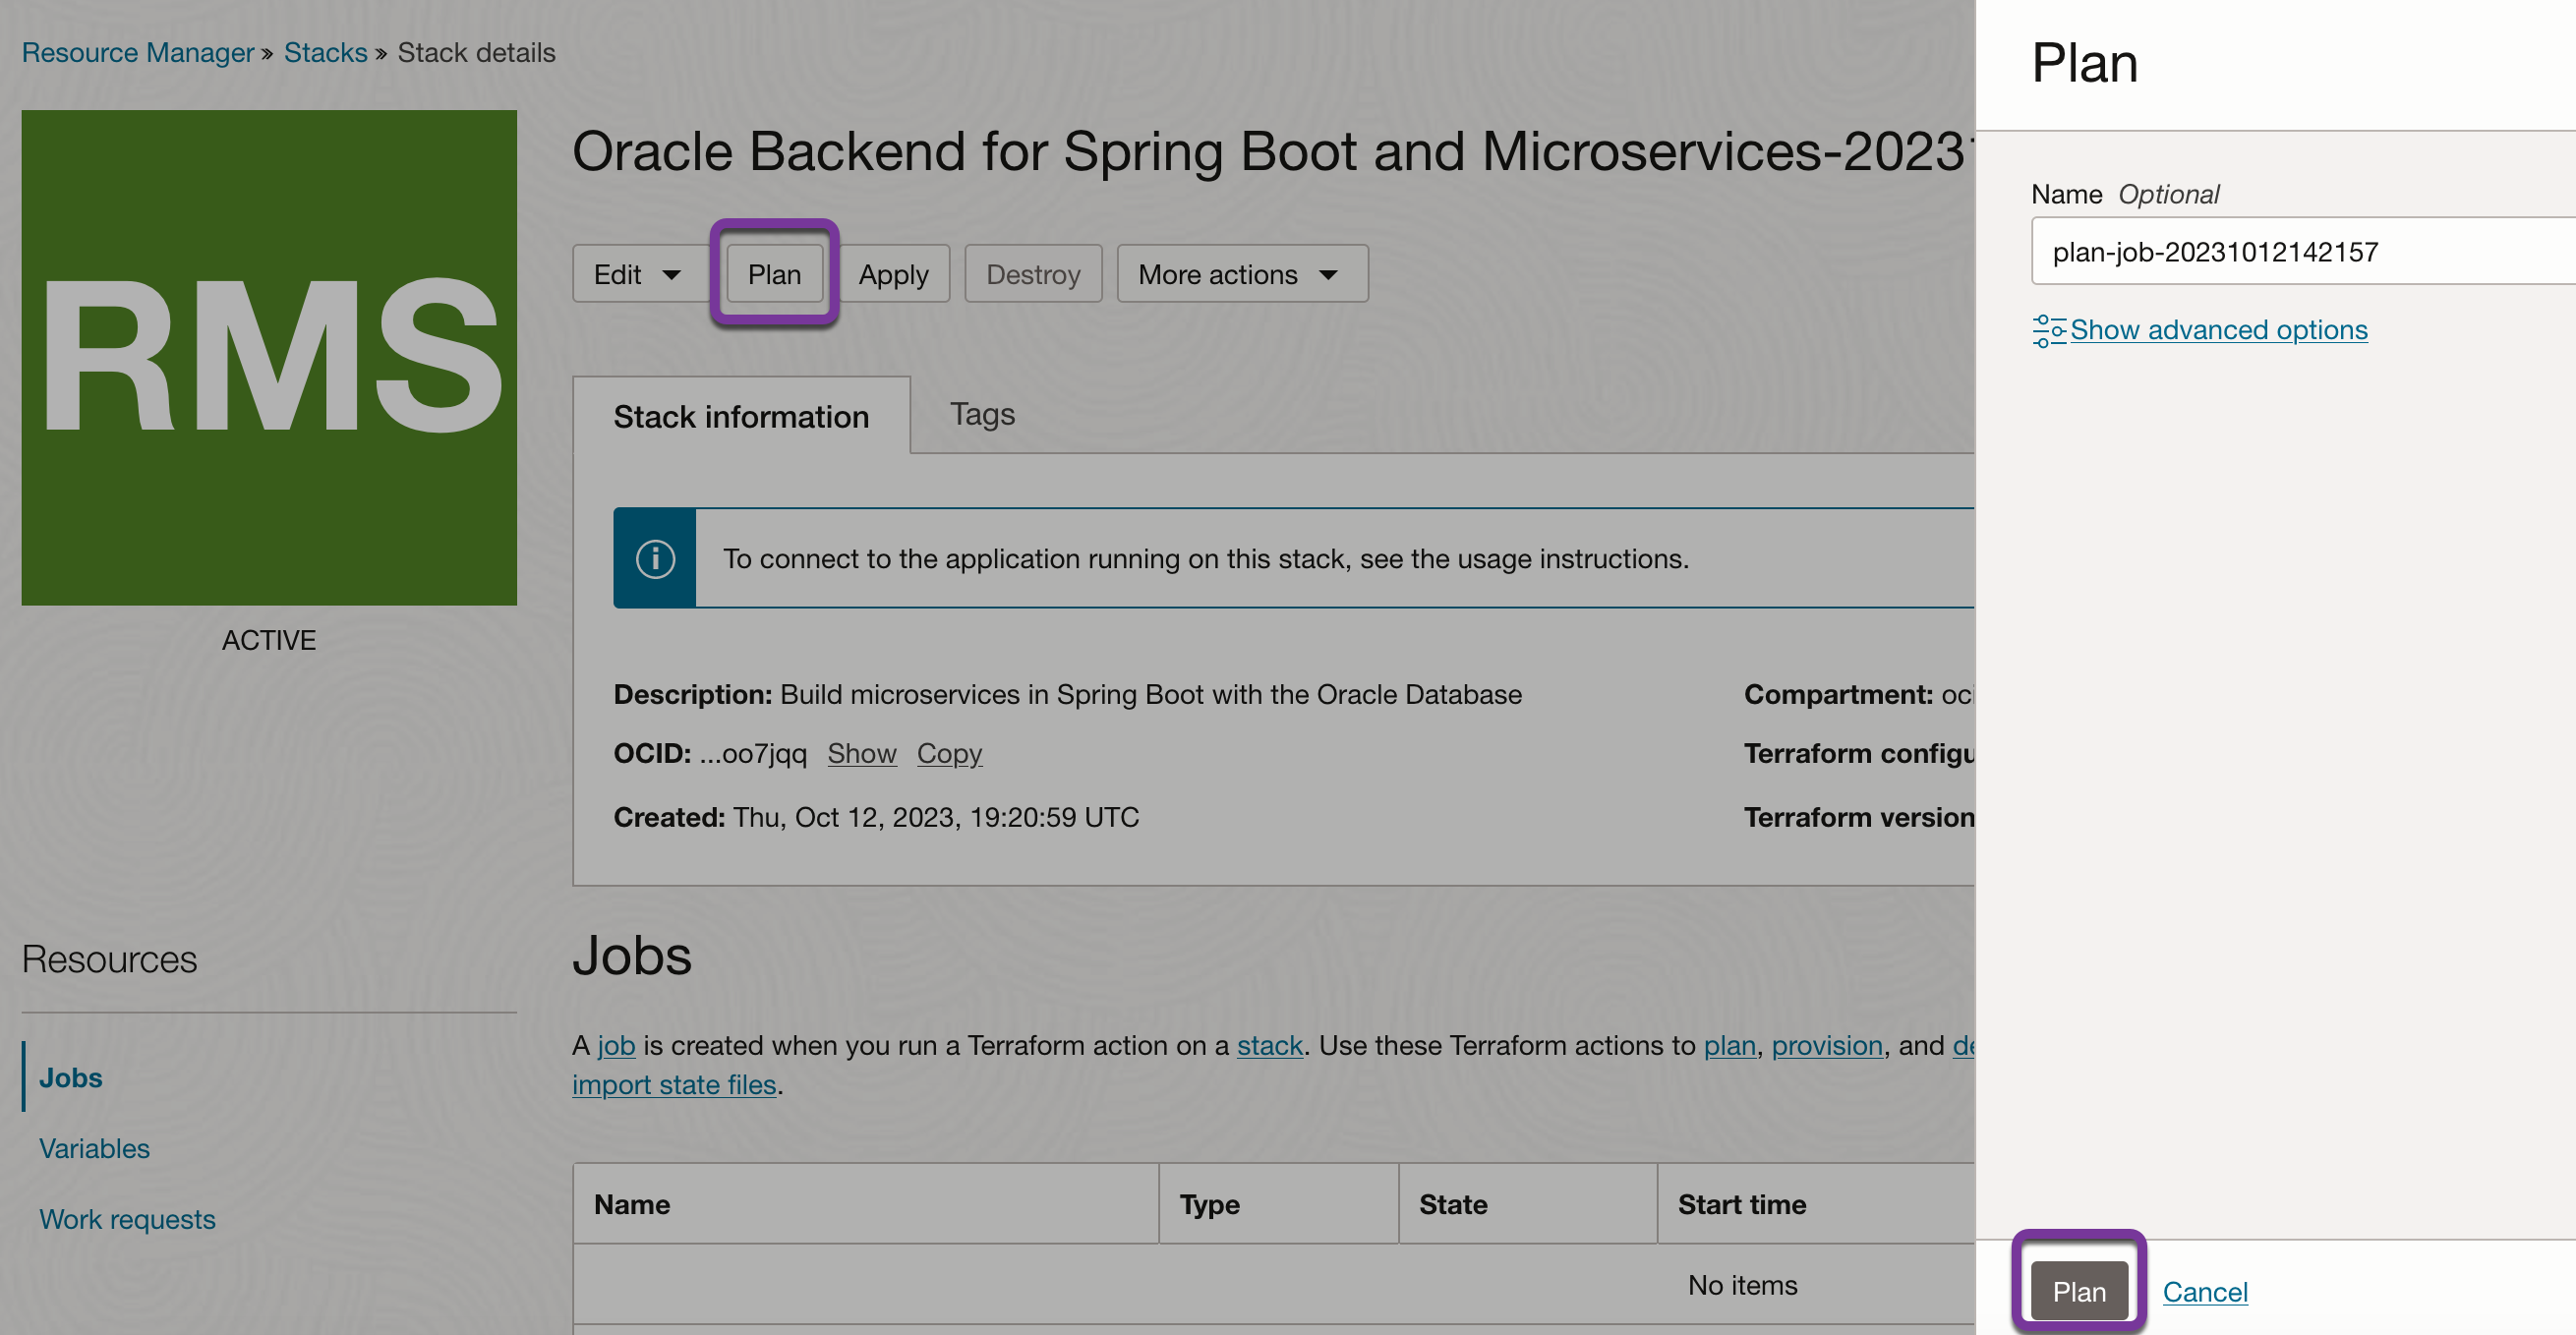
Oracle recommends that you test the plan before applying the stack in order to identify any issues before you start creating resources. Testing a plan does not create any actual resources. It is just an exercise to tell you what would happen if you did apply the stack.
You can test the plan by clicking on Plan and reviewing the output. You can fix any issues (for example, you may find that you do not have enough quota for some resources) before proceeding.
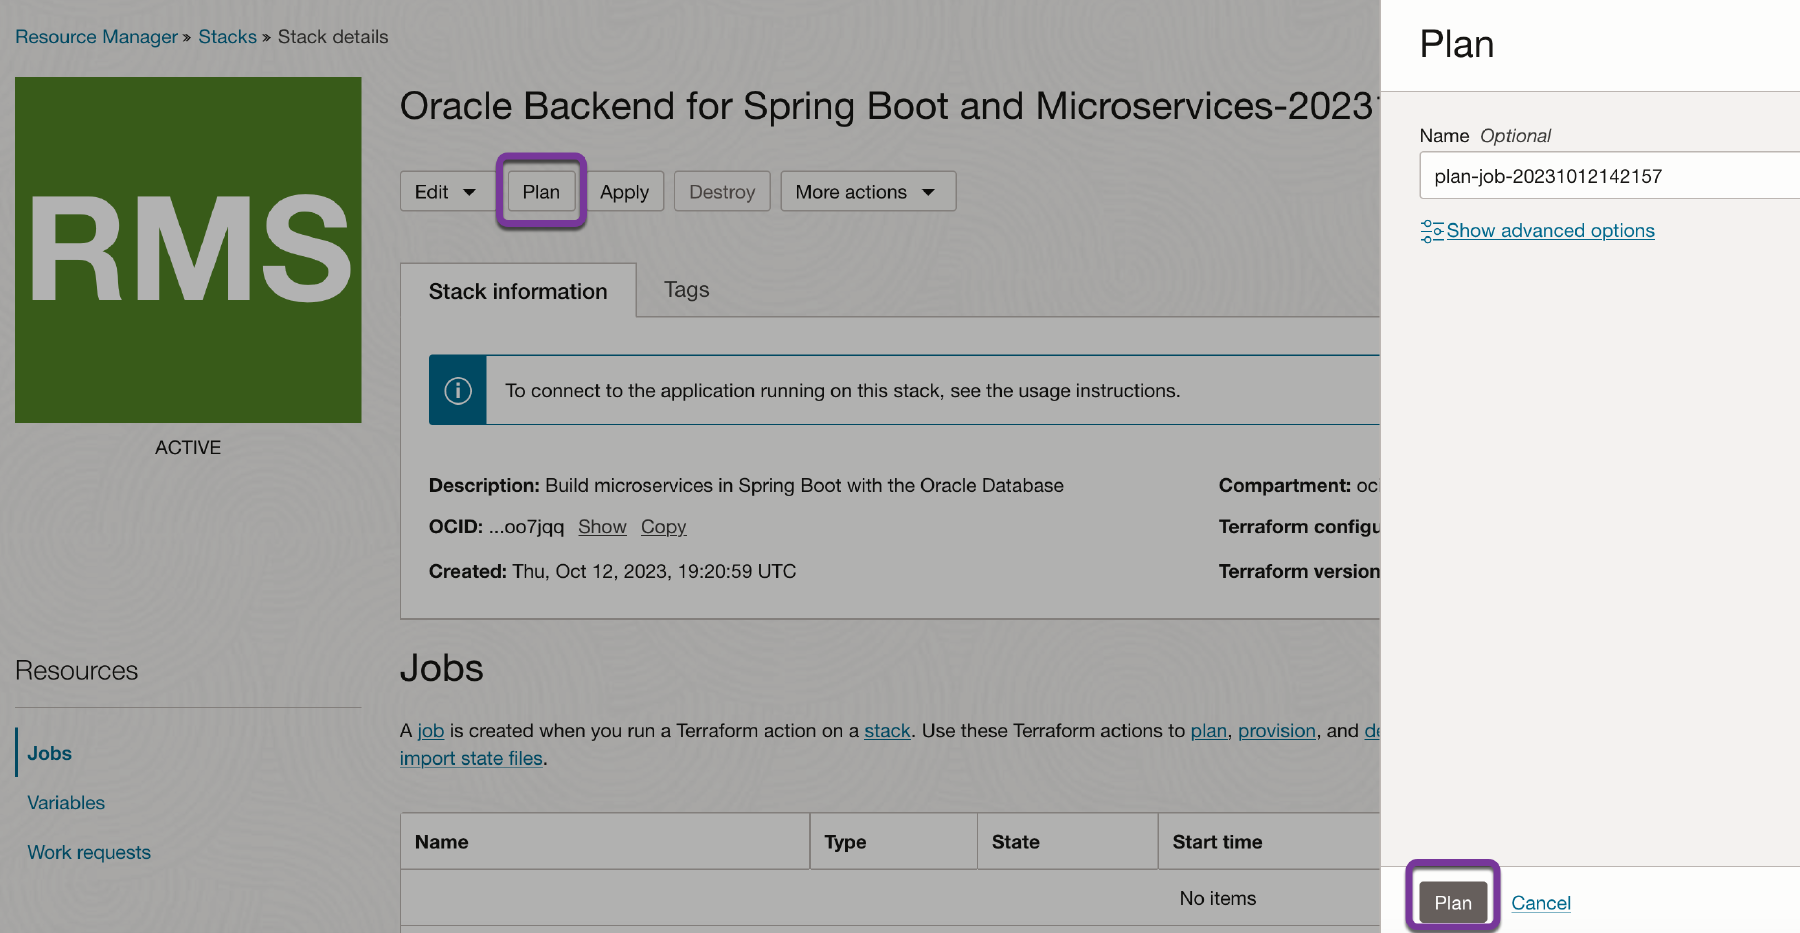
Create Stack Plan -
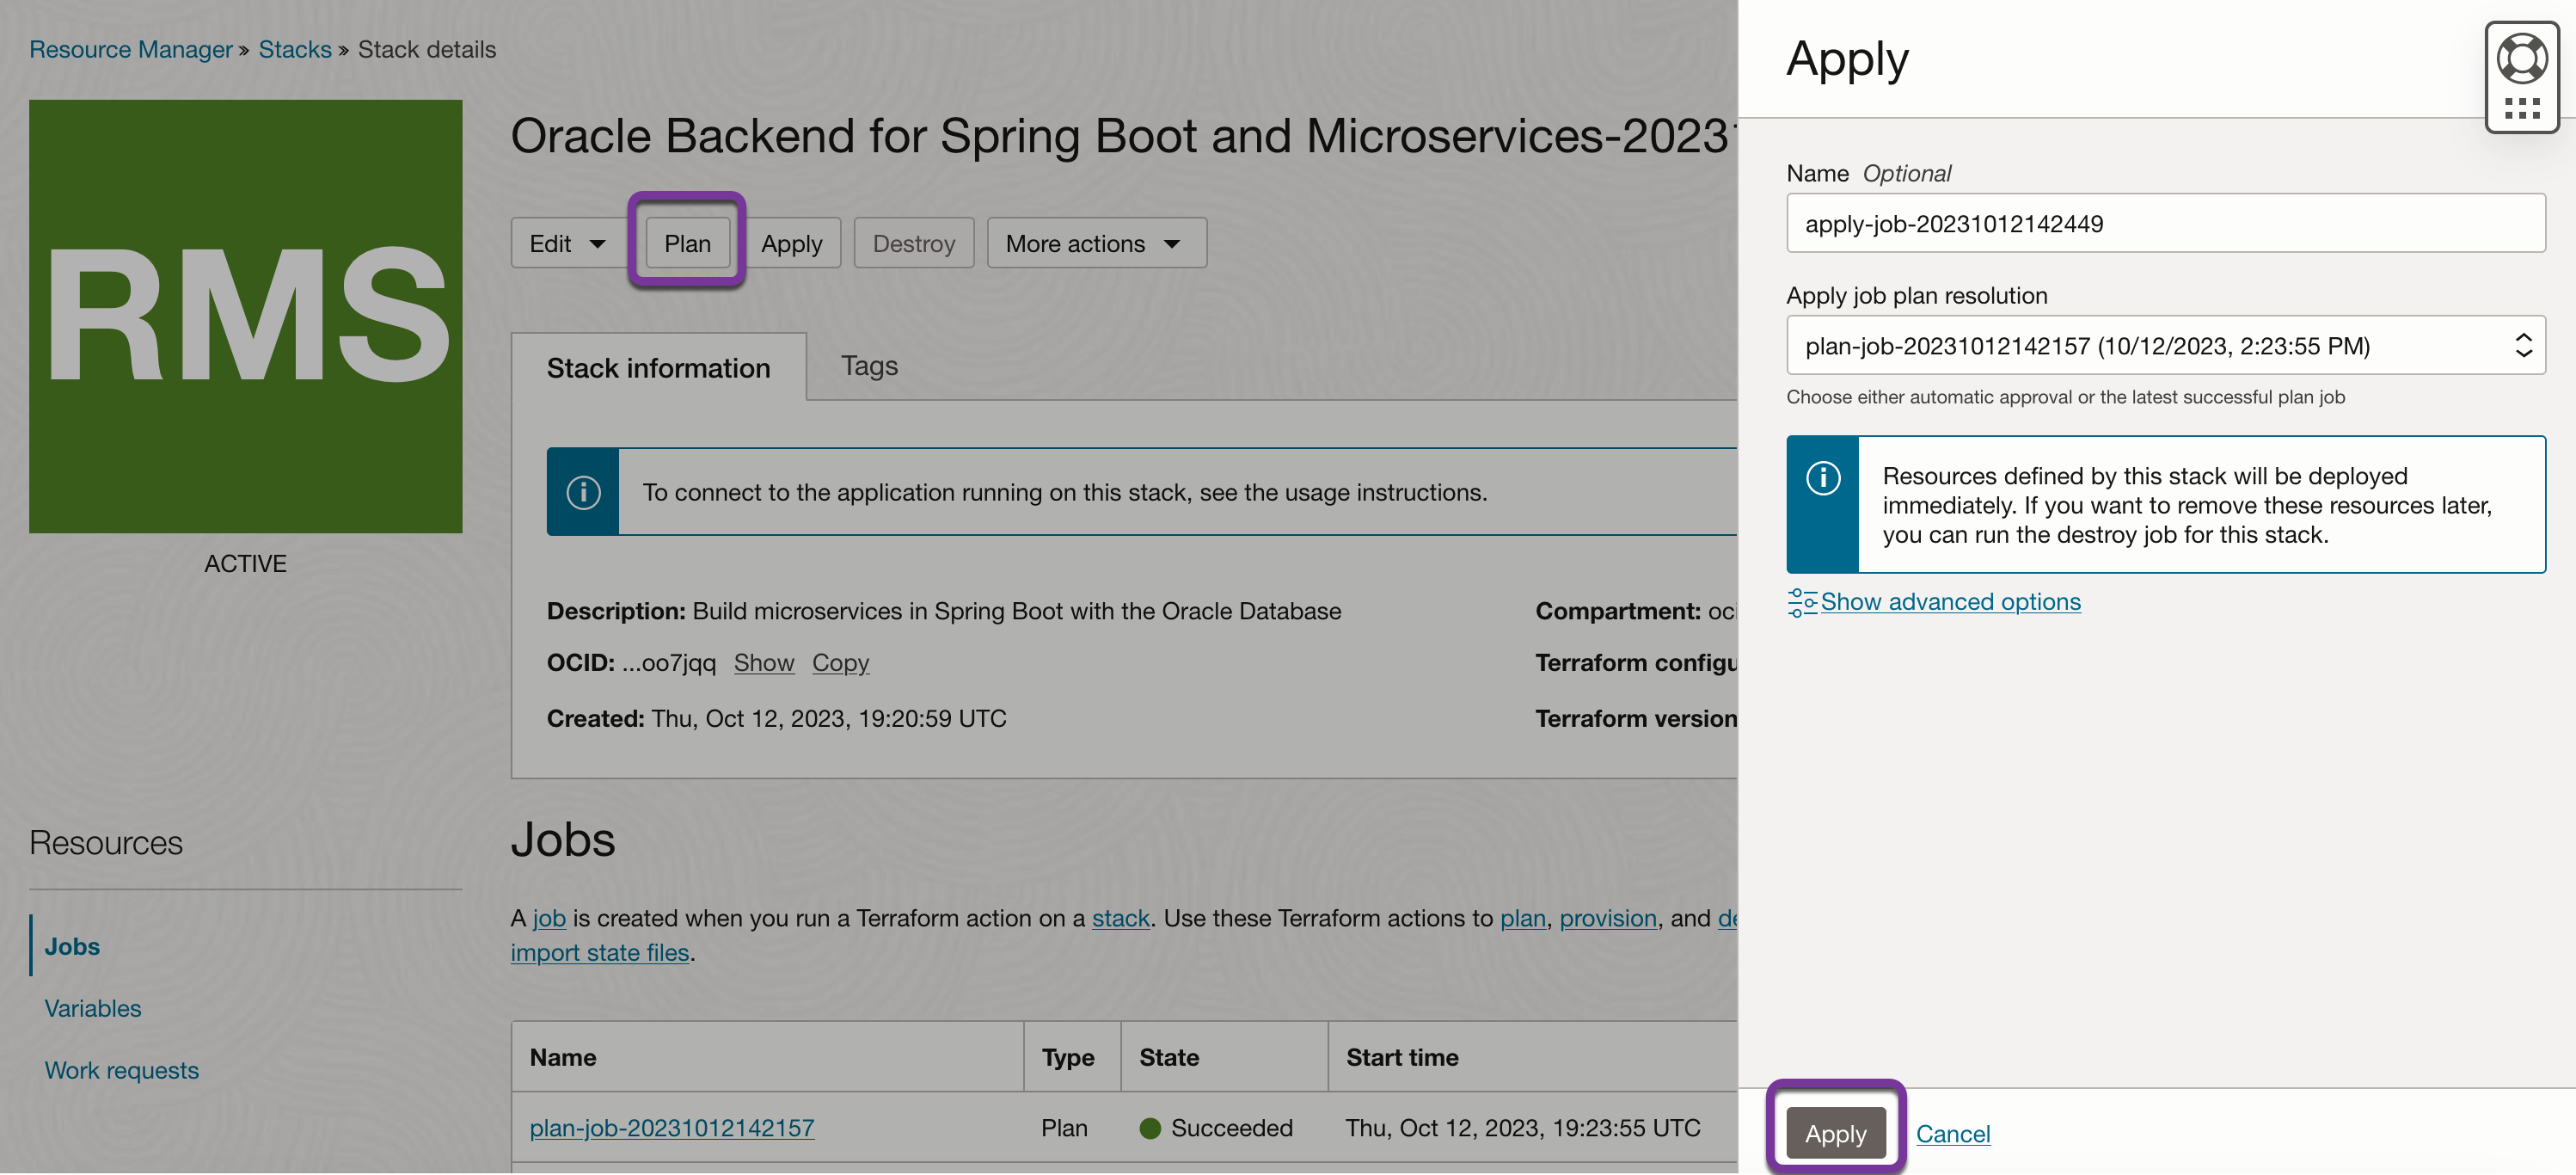
When you are happy with the results of the test, you can apply the stack by clicking on Apply. This creates your Oracle Backend as a Service and Microservices for a Spring Cloud environment. This takes about 20 minutes to complete. Much of this time is spent provisioning the Kubernetes cluster, worker nodes, database and all the included services. You can watch the logs to follow the progress of the operation.
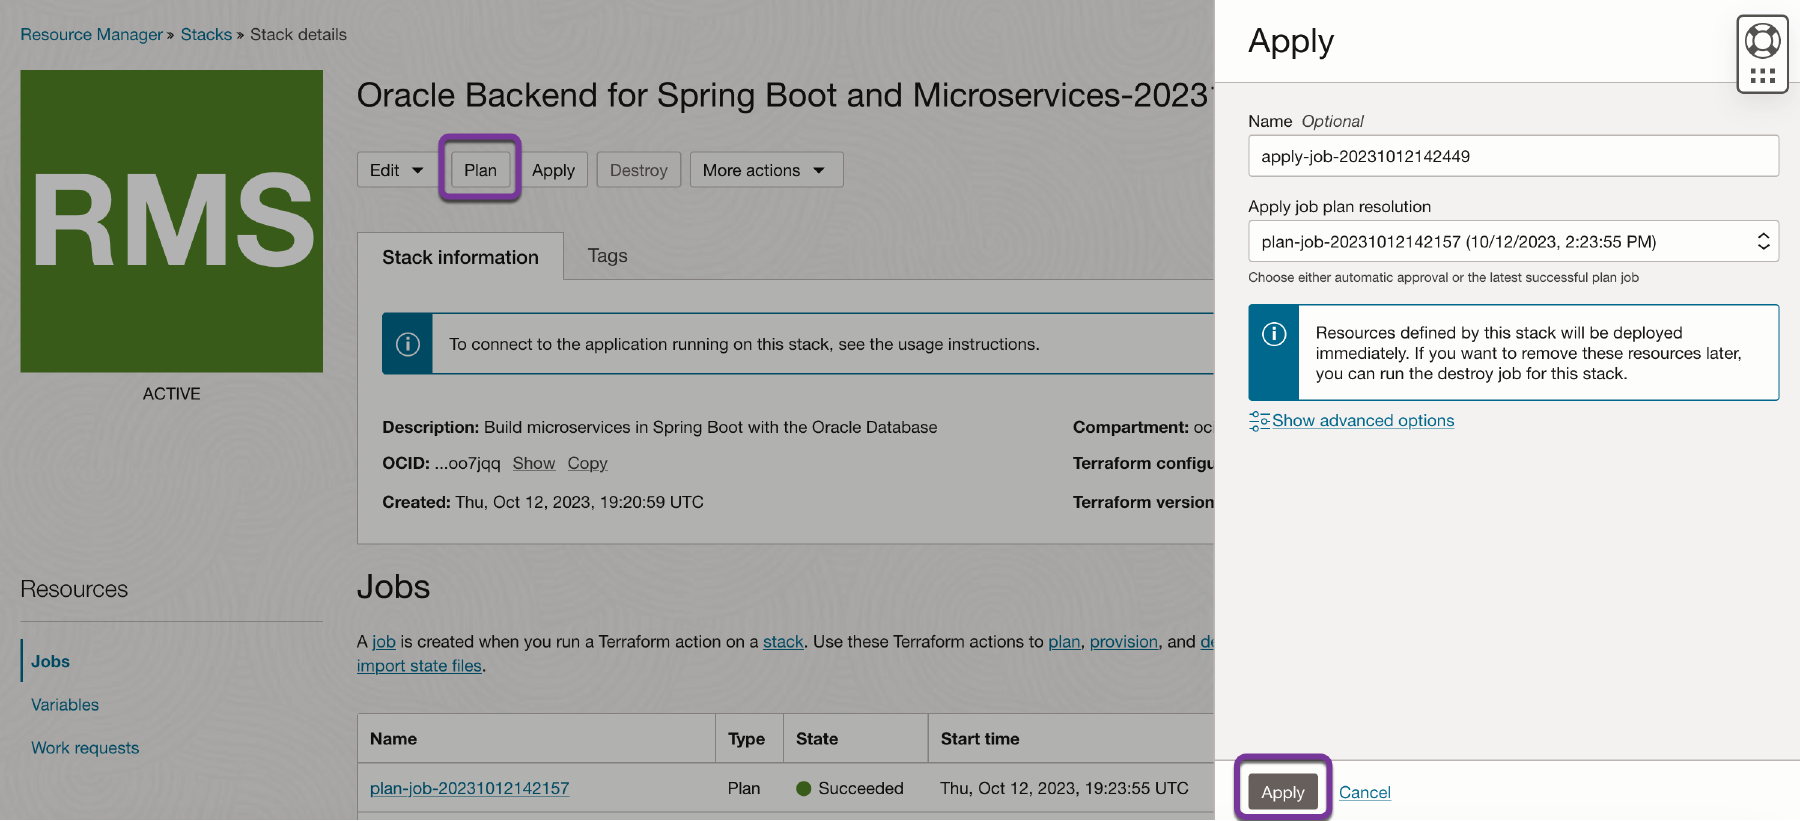
Create Stack Apply -
The OCI Resource Manager applies your stack and generates the execution logs. The apply job takes approximately 45 minutes.
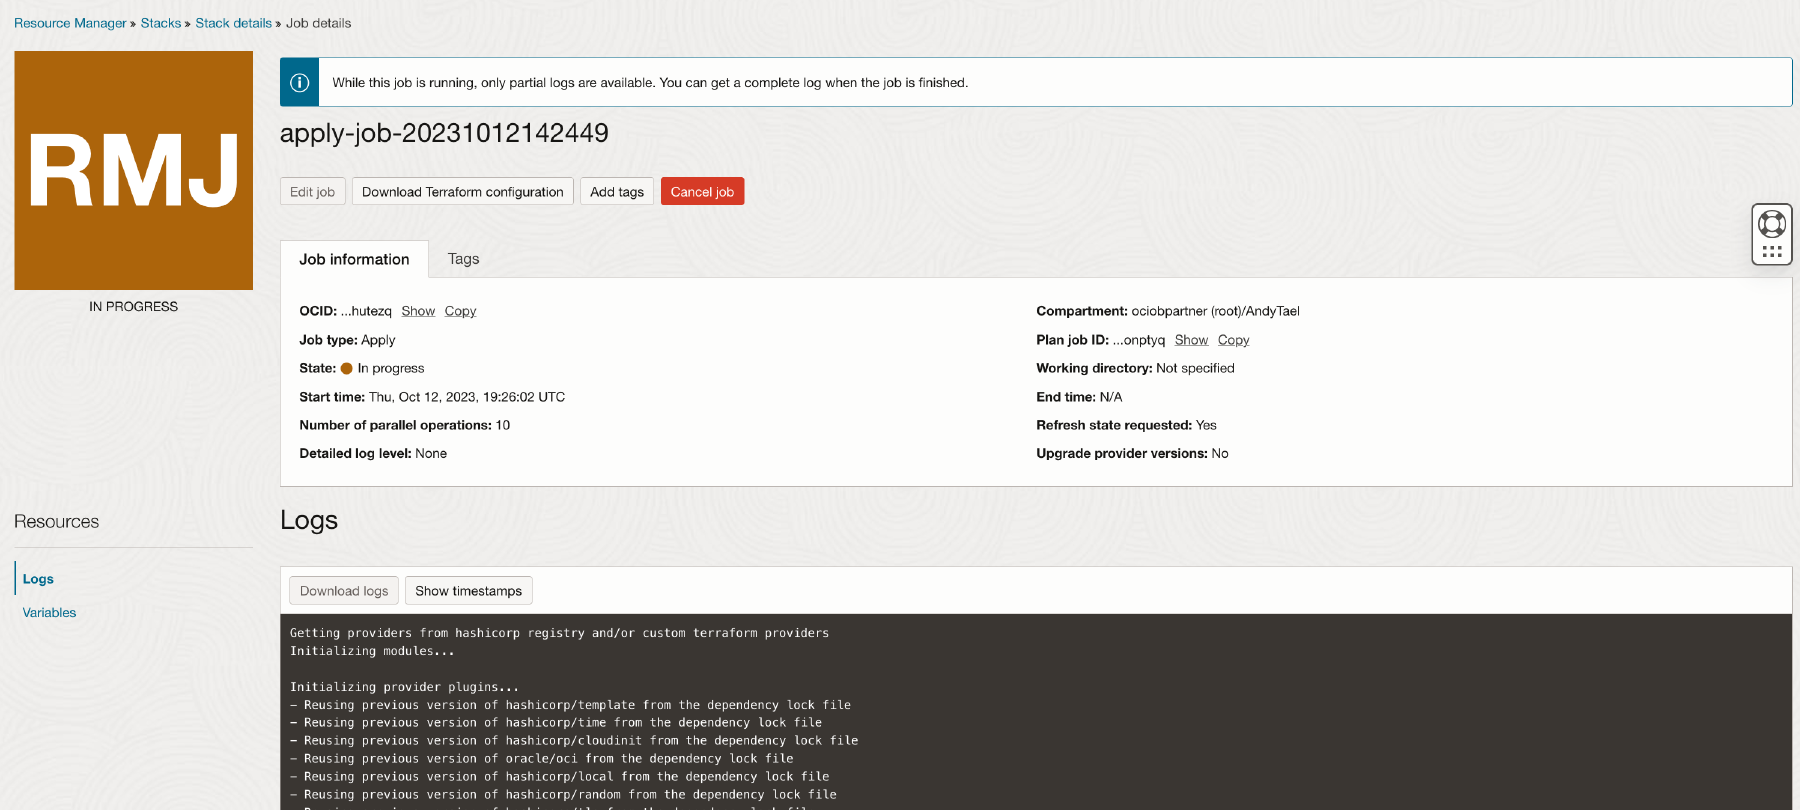
Create Stack Apply Logs -
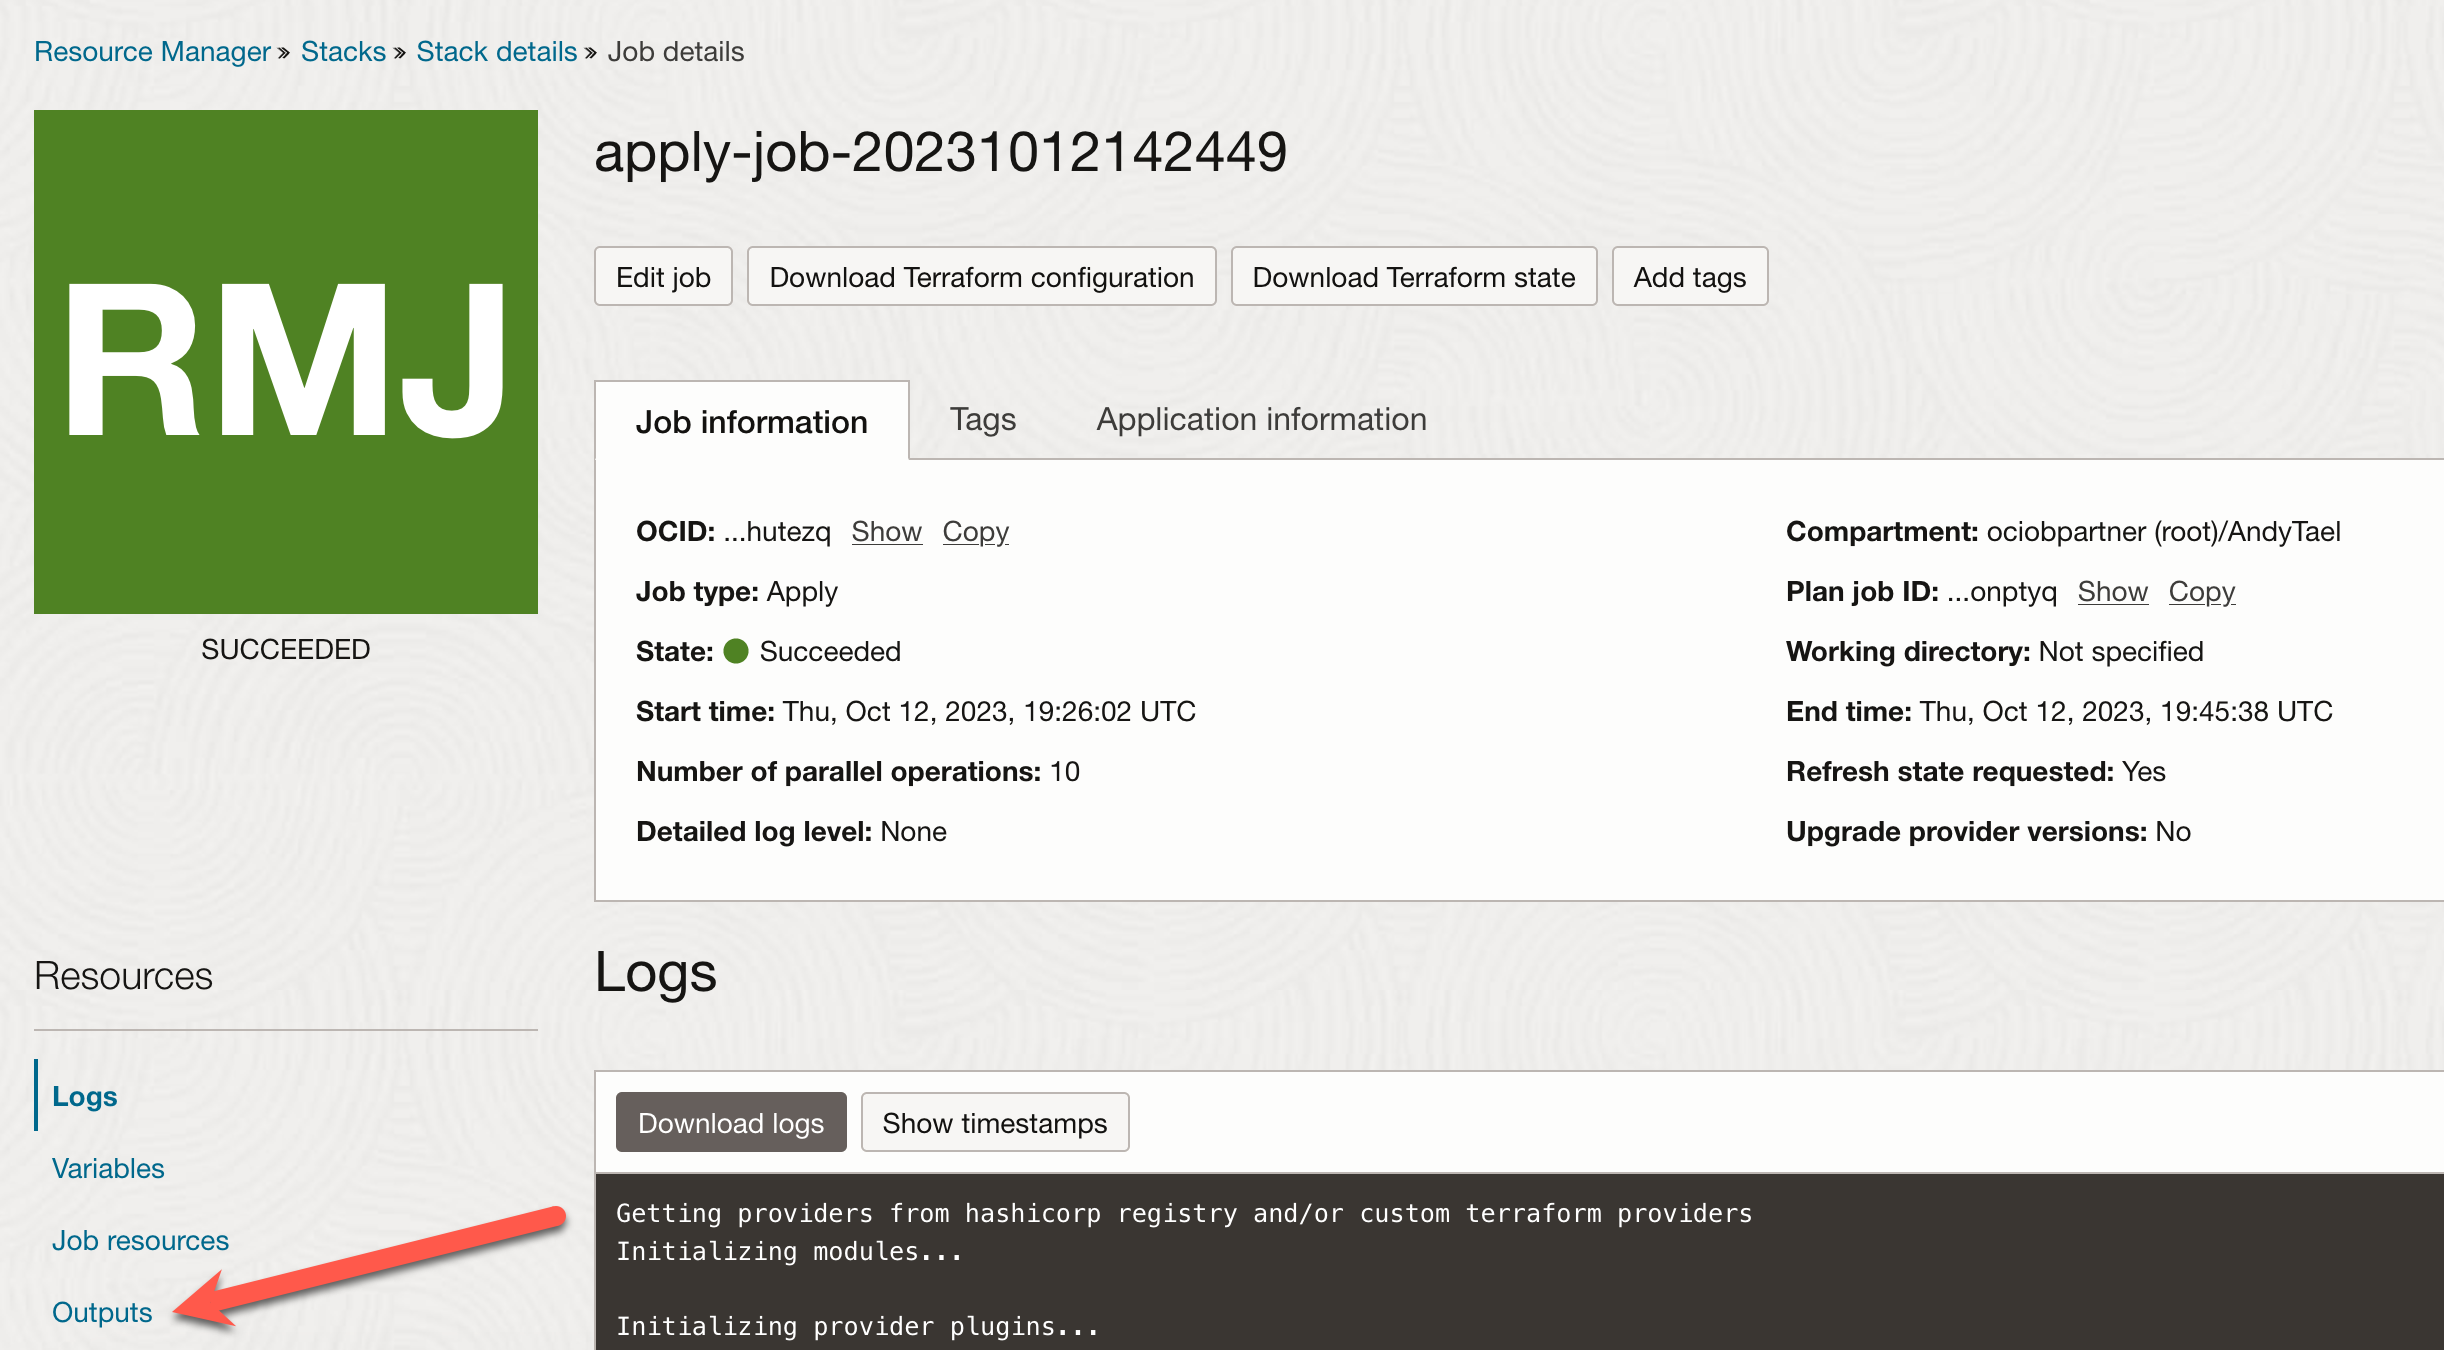
When the Apply job finishes you can collect the OKE access information by clicking on Outputs.
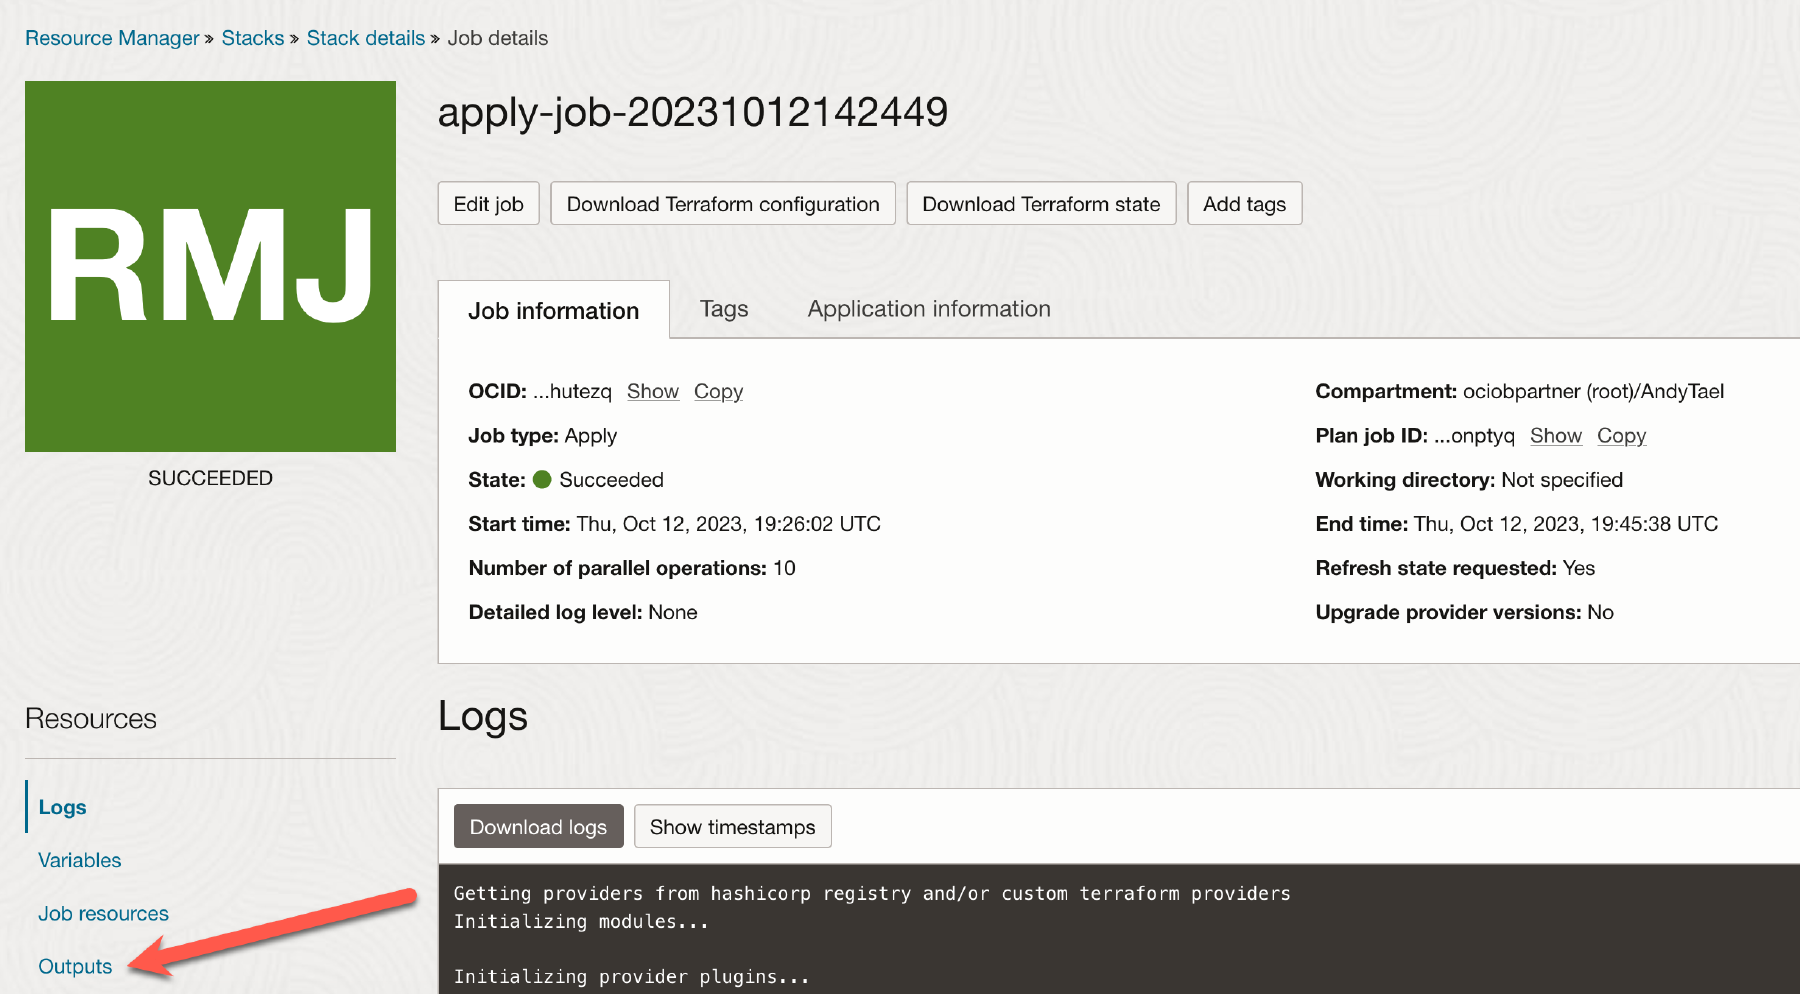
Create Stack Outputs -
Click on Copy for the variable named
kubeconfig_cmd. Save this information because it is needed to access the OKE cluster.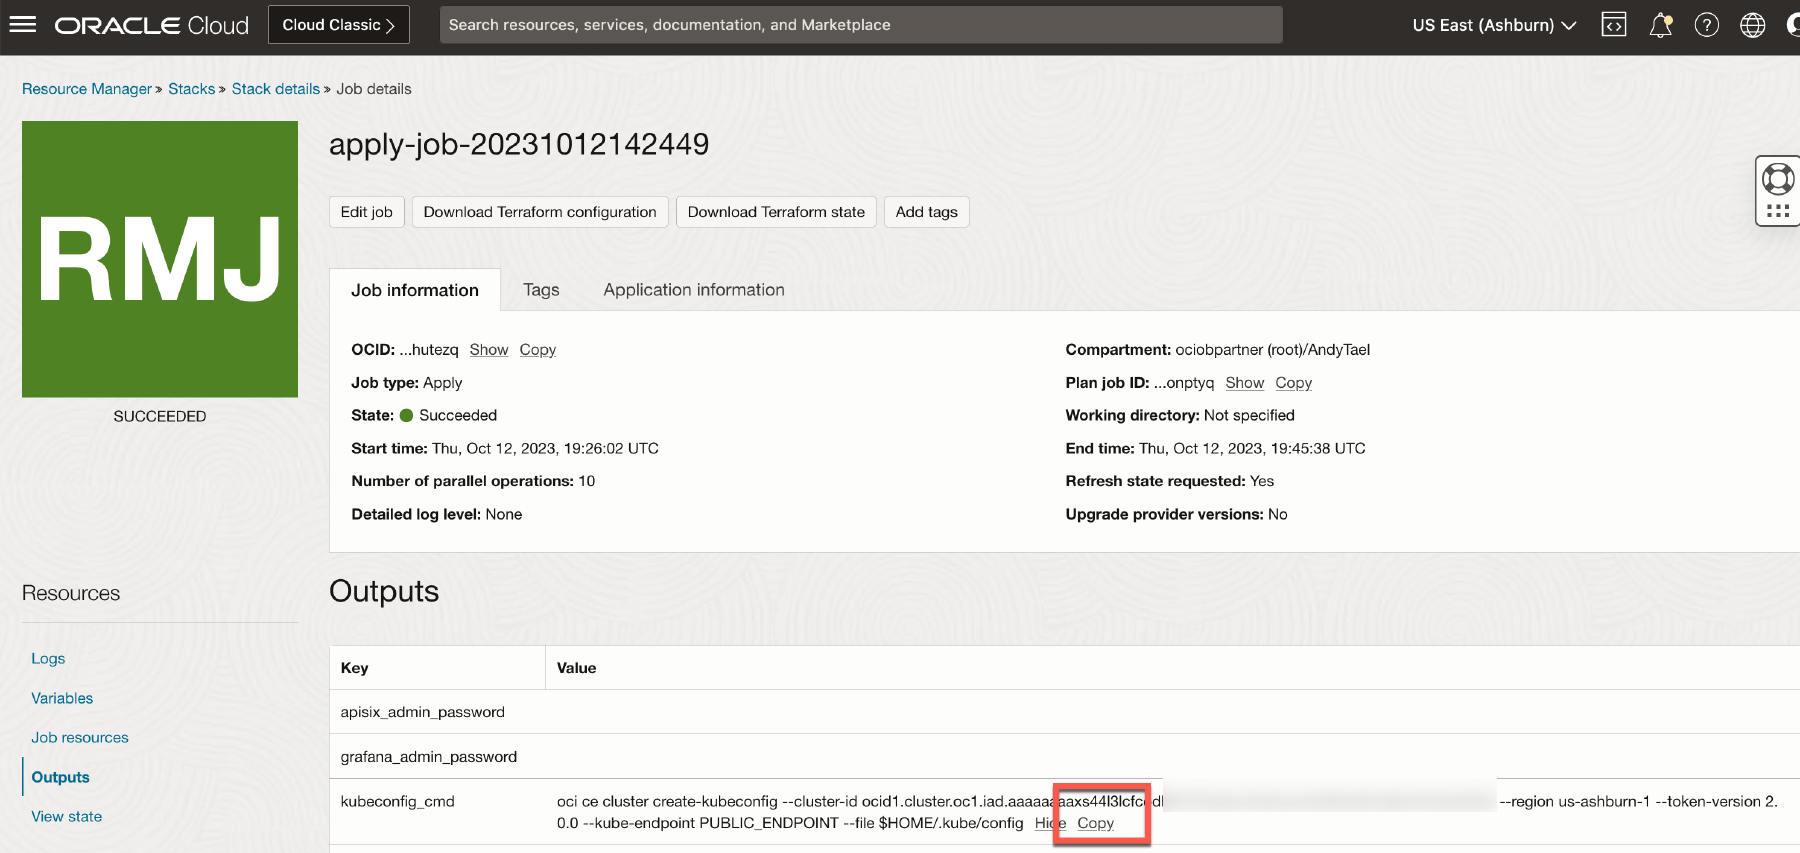
Get Kube Config Cmd


To set up the local machine, process these steps:
-
Set up cluster access.
To access a cluster, use the
kubectlcommand-line interface that is installed (see the Kubernetes access) locally. If you have not already done so, do the following: -
Install the
kubectlcommand-line interface (see the kubectl documentation). -
Generate an API signing key pair. If you already have an API signing key pair, go to the next step. If not:
a. Use OpenSSL commands to generate the key pair in the required P-Early-Media (PEM) format. If you are using Windows, you need to install Git Bash for Windows in order to run the commands. See How to Generate an API Signing Key.
b. Copy the contents of the public key to the clipboard to paste the value into the Console later.
-
Add the public key value of the API signing key pair to the User Settings for your user name. For example:
a. In the upper right corner of the OCI Console, open the Profile menu (User menu symbol) and click User Settings to view the details.
b. Click Add Public Key.
c. Paste the value of the public key into the window and click Add.
The key is uploaded and its fingerprint is displayed (for example, d1:b2:32:53:d3:5f:cf:68:2d:6f:8b:5f:77:8f:07:13).
-
Install and configure the Oracle Cloud Infrastructure CLI. For example:
a. Install the Oracle Cloud Infrastructure CLI version 2.6.4 (or later). See Quickstart.
b. Configure the Oracle Cloud Infrastructure CLI. See Configuring the CLI.
-
Install the Oracle Backend for Microservices and AI command-line.
The Oracle Backend for Microservices and AI command-line interface,
oractl, is available for Linux and Mac systems. Download the binary that you want from the Releases page and add it to your PATH environment variable. You can rename the binary to remove the suffix.If your environment is a Linux or Mac machine, run
chmod +xon the downloaded binary. Also, if your environment is a Mac, run the following command. Otherwise, you get a security warning and the CLI does not work:sudo xattr -r -d com.apple.quarantine <downloaded-file>
You can get the necessary access information from the OCI COnsole:
- OKE Cluster Access information e.g. how to generate the kubeconfig information.
- Oracle Backend for Microservices and AI Passwords.
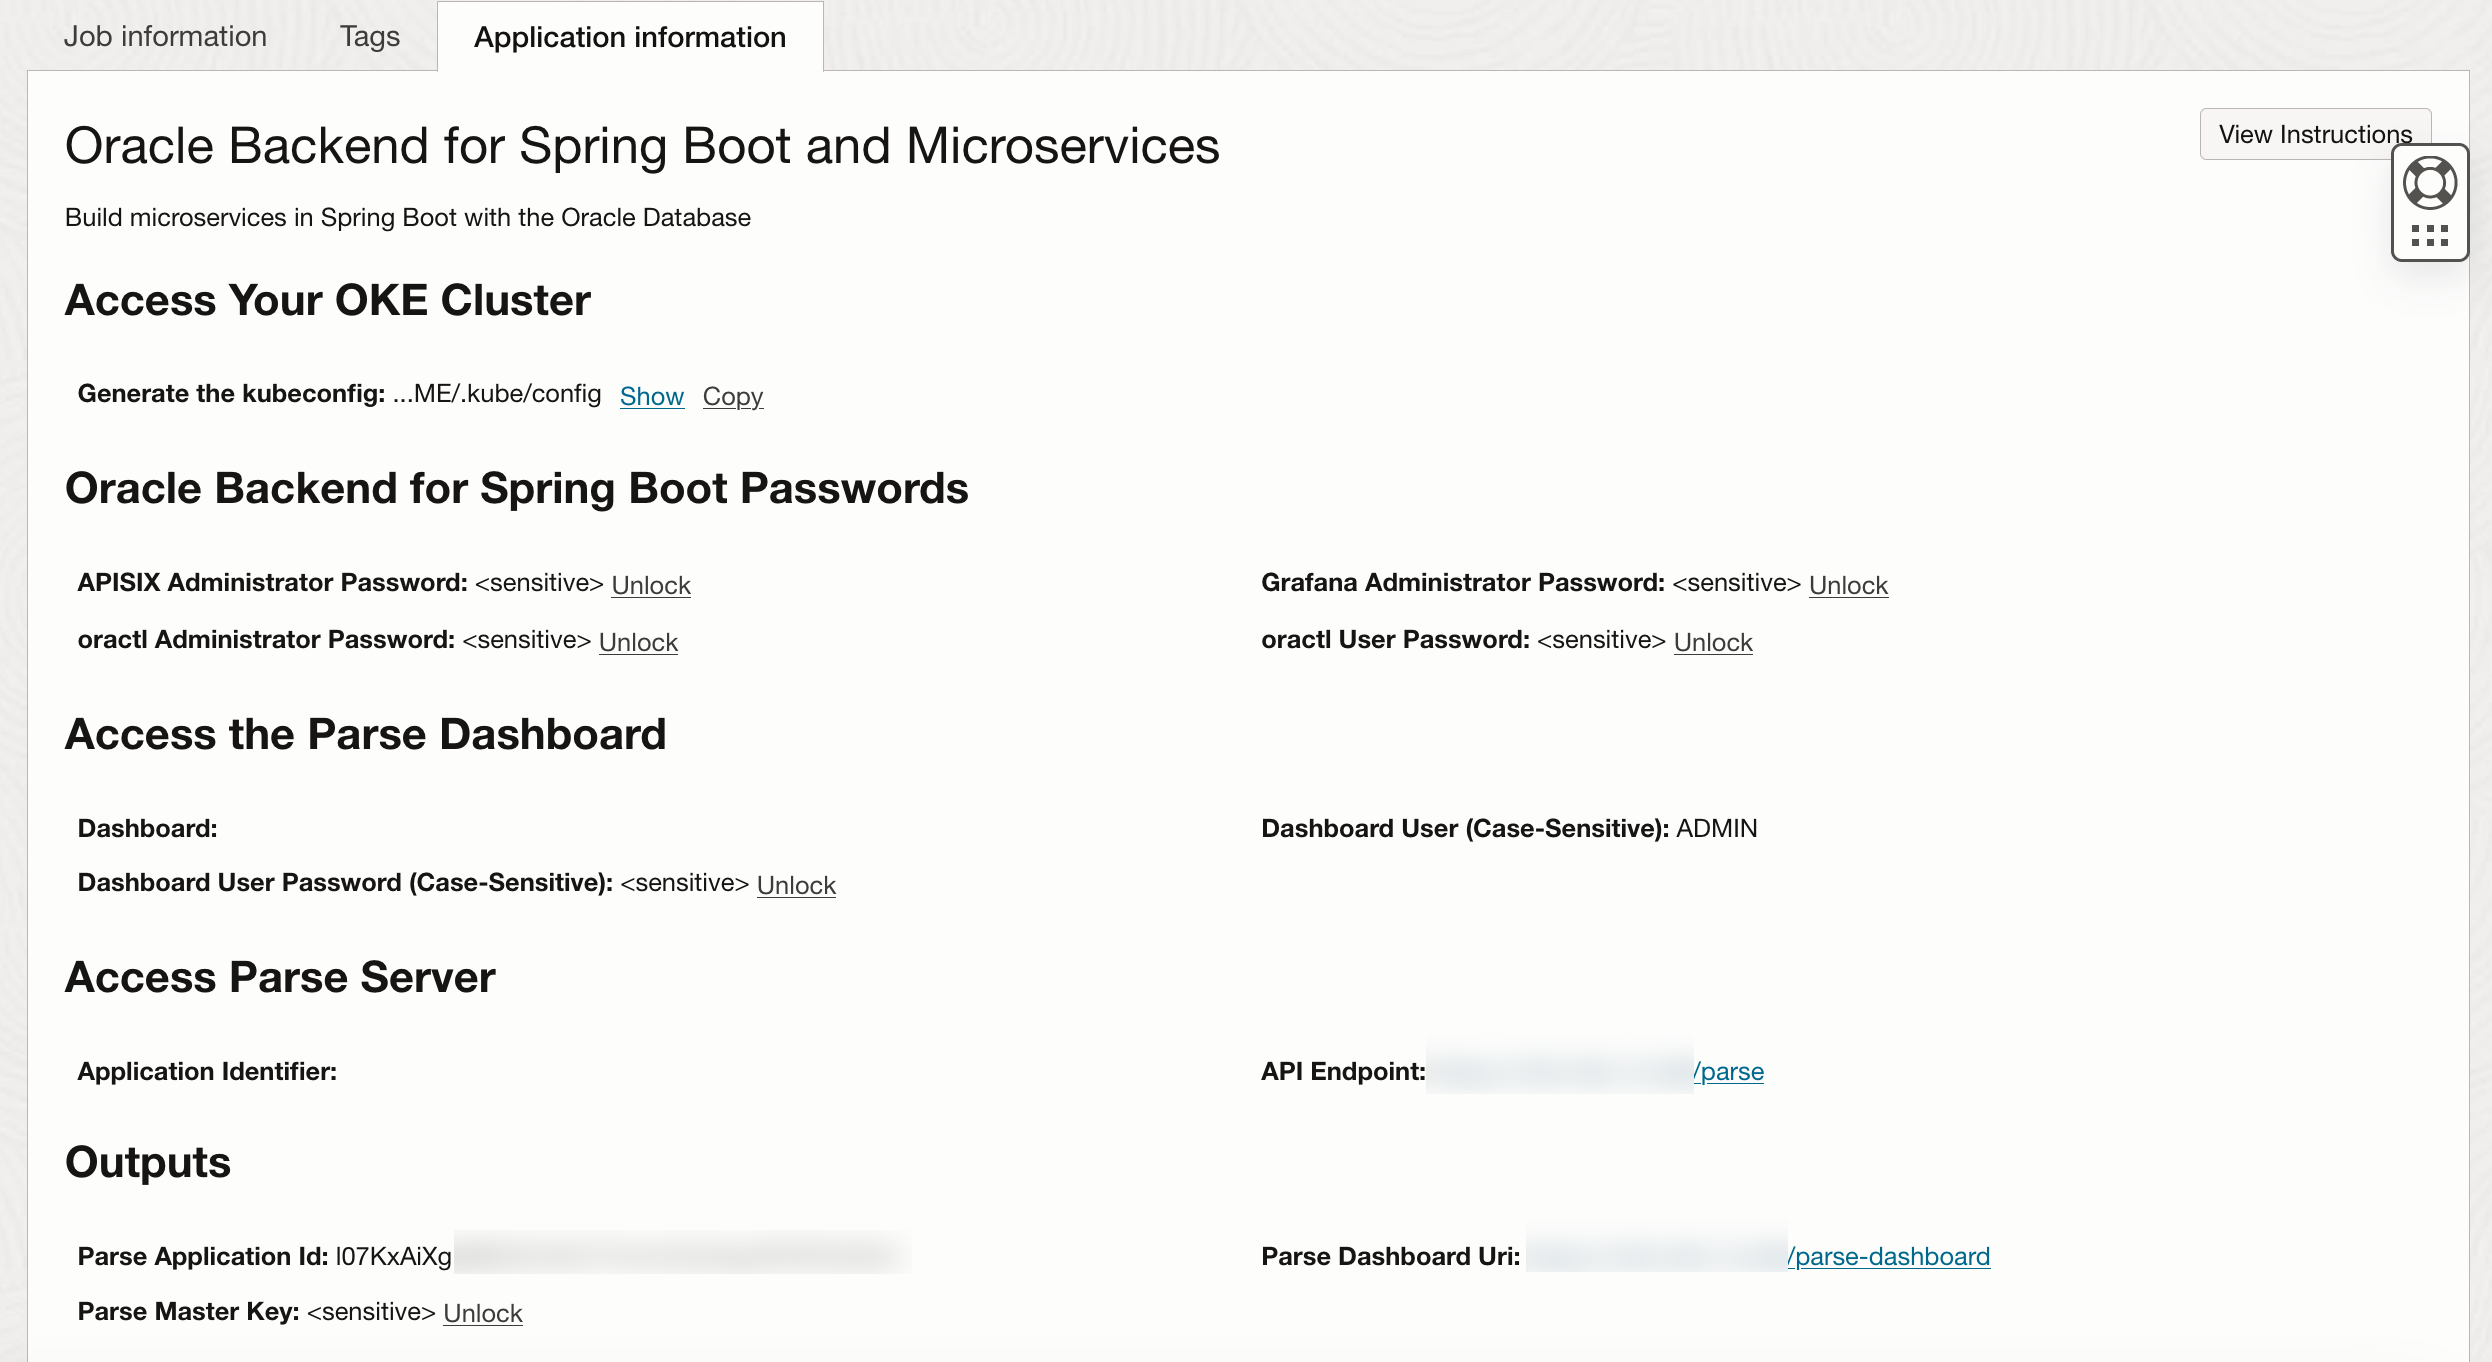
The assigned passwords (either auto generated or provided by the installer) can be viewed in the OCI Console (ORM homepage). Click on Application Information in the OCI ORM Stack.
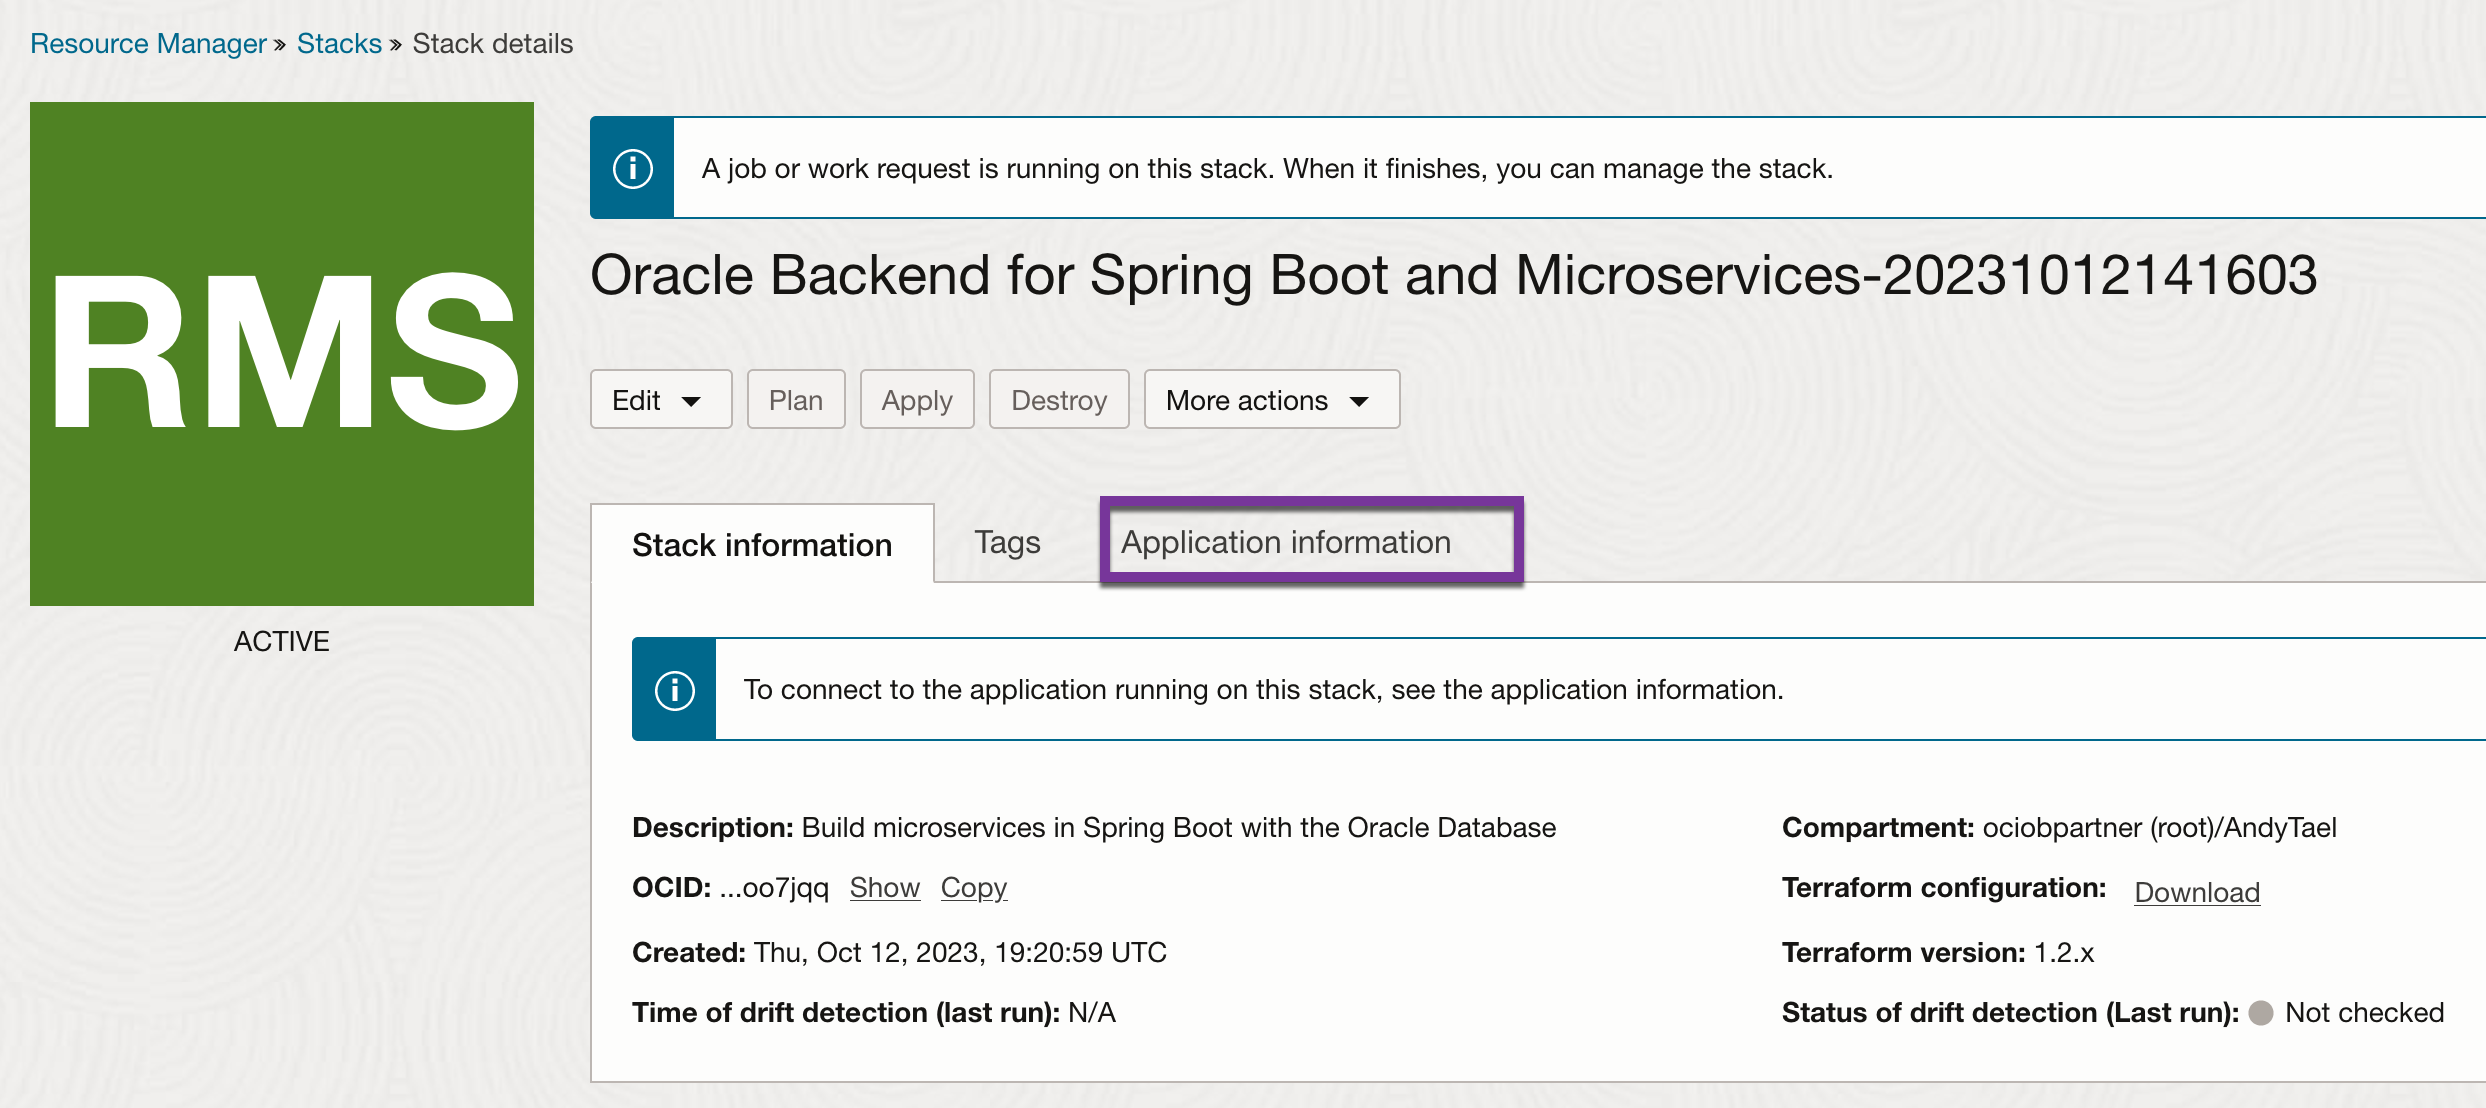
You will presented with a screen with the access information and passwords. NOTE: The passwords can also be accessed from the k8s secrets.