Image
Contents
Image
The Image section helps you build container images for deploying WebLogic-based applications
in a Kubernetes environment using the
WebLogic Image Tool
.
Design View
Design View helps you specify the necessary data needed to run the WebLogic Image Tool to build an image for
running the WebLogic domain.
Use the Design View page to specify whether to create a new or use an existing (the default) Primary Image and
whether to create a new, or use an existing, Auxiliary Image.
Note that auxiliary images required for the “Model in Image” domain location only.
- Primary Image - The image containing the Oracle Fusion Middleware software. It is used as the basis of all containers that run WebLogic Servers for the domain.
- Auxiliary Image - The image that supplies the WebLogic Deploy Tooling software and the model files. At runtime, the auxiliary image’s content is merged with the primary image’s content.
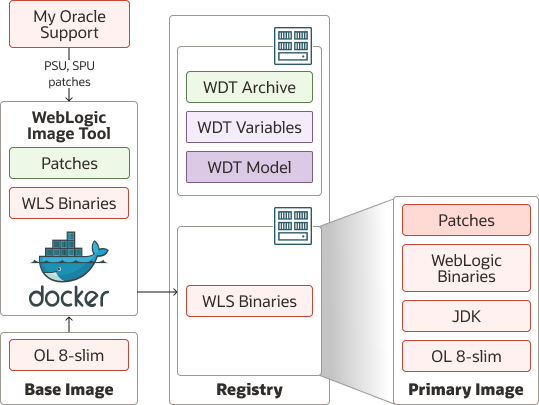
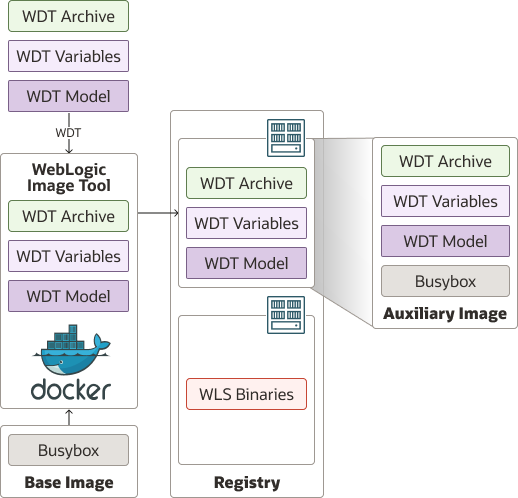
The primary image is the one used for running the domain and the auxiliary image contains the data that defines the domain. One primary image can be reused for hundreds of domains whereas an auxiliary image is domain-specific. The primary image contains the OS, JDK, and FMW software installations; the auxiliary image supplies the specifics for a single domain.
If you select to create a new primary image, you’ll see the following basic panes and a few advanced panes on the
Primary Image Design View page.
If you select to create a new auxiliary image, you must select the Auxiliary Image
Design View page, to configure it. Note that not all the fields described in the following sections for the
Primary Image, are relevant for an Auxiliary Image. The exceptions are noted.
- Target Image Name and Registry Credentials
- Base Image to Use
- Installers for Building the Image
- Patch Oracle Home
- WebLogic Deploy Tooling Configuration
- Image Build Configuration
Target Image Name and Registry Credentials
The most important field in this pane is the Image Tag field. This is the name to give to the newly created image,
which must conform to the
image naming standards
. Because most Kubernetes environments will need to pull the
image from a container image registry (for example, Docker Hub), the newly-created image typically will need to be
pushed to the appropriate container image registry. Most registries will require authentication as a user with the
necessary permissions to push images. As described in the image naming
standards, the Image Tag field typically must include the DNS name of the container image registry prior to the first
slash (/) character. Images not containing a container image registry DNS name are assumed to be using Docker Hub.
After the Image Tag field is populated, the application detects the presence of any prepended DNS name and displays
the value in the Image Registry Address field. This field is read-only so the only way to change the DNS name is to
change the value of the Image Tag field. The Image Registry Push Credentials field and the
Add Image Registry Credentials button let you provide the user credentials needed to log in to the container
image registry prior to pushing the newly-created image. If explicit authentication is not required, then disable the
Specify Image Push Credentials option. If Specify Image Push Credentials is enabled, then any attempts to push the
image will fail unless the Image Registry Push Credentials field is specified.
Base Image to Use
By default, the WebLogic Image Tool uses an Oracle Linux base image when building the new image. To specify a different
base image, enable Use Custom Base Image and provide the base image’s tag in the Custom Base Image to Use
field. Any container image registry address found in the base image tag will be displayed in the read-only
Base Image Registry Address field. If pulling the base image requires authentication, then enable
Custom Base Image Pull Requires Login and provide the necessary credentials in the
Custom Base Image Pull Credentials field.
When using a custom base image, the application requires the image to be inspected using the WebLogic Image Tool’s
Inspect Image
command. Note: This action is relevant for Primary Images only. To invoke this inspection,
click Inspect Custom Base Image. This inspection tells the application if Java or the Oracle Fusion Middleware
software is already installed in the image. If it finds either of these software packages
installed, then fields in the Installers for Building the Image pane will disappear because they are unneeded.
In the current release, the Patch Oracle Home pane will disappear if the base image contains an Oracle Fusion
Middleware installation. The rationale being that the act of patching a base image installation will bloat the size of
the image. As such, it is better to either create the base image with the latest patches already installed or allow
the WebLogic Image Tool’s multistage build to install and patch the Oracle Fusion Middleware installation while
minimizing the resulting image size.
Installers for Building the Image
This pane will contain form fields for up to three installers (depending on the base image being used); they are:
- JDK Installer (
Primary Imagesonly) - Oracle Fusion Middleware Installer (
Primary Imagesonly) - WebLogic Deploy Tooling Installer (
Auxiliary Imagesonly)
When specifying the JDK Installer, it is important to remember that this installer will be used to install the JDK
inside the Linux image being created. Therefore, the Linux JDK Installer to Use field should always point to the
correct Linux compressed archive installer (for example, jdk-8u291-linux-x64.tar.gz) that matches your target
Kubernetes cluster architecture specified on the Project Settings page. While the value of the JDK Version field
is just a tag associated with the installer used to specify which version of the JDK installer that the WebLogic Image
Tool should use, the best practice is to set the value to the real version number (for example, 8u291 or 1.8.0_291).
The Oracle Fusion Middleware Installer to Use field must point to an installer that includes a modern version of
WebLogic Server (12.2.1.3 or later). Use the Oracle Fusion Middleware Installer Type field to tell the WebLogic Image
Tool which installer you are providing. It is important to make sure the type and installer match because installers of
different types require different fields to be specified during installation. As with the JDK Version field mentioned
previously, the Oracle Fusion Middleware Version field is just a tag to associate with the installer but the best
practice is to set the value to the actual Oracle Fusion Middleware version number (for example, 12.2.1.4.0).
By default, Download and Use Latest WebLogic Deploy Tooling Installer is enabled so that the application will
automatically download and use the latest, generally-available release in the WebLogic Deploy Tooling
GitHub repository
. To specify a different installer,
disable Download and Use Latest WebLogic Deploy Tooling Installer and fill out the
WebLogic Deploy Tooling Installer to Use and WebLogic Deploy Tooling Version fields appropriately. As with the
other installers’ version number fields, the best practice it to use the actual WebLogic Deploy Tooling version number
(for example, 4.3.9). Note that new WDT versions often contain bug fixes or enhancements required to work with the
latest capabilities, many of which are exposed by this application. As such, using the latest version is strongly
recommended.
Note
For “Model in Image” or “Domain on PV” domain locations , when building your auxiliary (or domain initialization) image, Oracle strongly recommends using WDT 4.4.0 or newer .
Patch Oracle Home
NOTE: This pane is relevant for Primary Images only. Oracle strongly recommends patching all Oracle Fusion
Middleware installations with the latest Patch Set Updates (PSUs) and other recommended patches to ensure that the
latest security fixes are applied. This pane configures the WebLogic Image Tool to apply the specified patches to the
Oracle Home during the image creation process. There are two mechanisms for specifying that patches should be applied:
- Radio buttons to specify what patch bundles should be applied.
- The list of patch numbers to apply.
The patch bundle radio buttons provide three choices:
None- Applies no bundle patches.Apply Latest PSU Only- Applies the latest PSU patch but no other recommended patches.Apply All Recommended Patches- Applies all recommended patches, which always includes the latest PSU, in addition to other important fixes.
Use the Individual Patches to Apply field to specify individual patch numbers to apply. These patches will be applied
after any patch bundles specified.
The WKT UI application requires that valid Oracle Support credentials be specified using the Oracle Support Username
andOracle Support Password fields. This allows the WebLogic Image Tool to automatically discover the latest PSU and
recommended patches and download any patches specified as part of the image creation process.
As a last resort, if no valid Oracle Support credentials are available, the patching process can be skipped by disabling
the Apply Patches option. To make sure your WebLogic-based applications are as secure as possible, this really
should be a last resort.
WebLogic Deploy Tooling Configuration
This pane applies only to auxiliary (or domain creation) images using either the “Model in Image” or “Domain on PV” domain locations .
For “Model in Image” and “Domain on PV”, the Model Home Directory field specifies the directory where the WDT model
files are stored in the image and WDT Home Directory specifies the WDT home directory inside the image. Typically,
there is no need to override these directory locations because the application defaults follow the recommended best practices.
Image Build Configuration
This Advanced pane supports altering the default behavior of the WebLogic Image Tool, as well as extending the image
build process to include custom build steps that might be required by particular applications or environments.
The JDK/FMW Installation Owner and JDK/FMW Installation Group fields specify the Linux user and group that should
own the JDK and Oracle Fusion Middleware installation directories. The default values are generally fine for most
environments.
For any images intended to run in an OpenShift environment, where the configured Security Context Constraints cause the
containers to run as a random user in the root group, select Make Image Compatible with OpenShift.
This option changes the default group name to root and gives the group file system write access, as required by OpenShift.
For more information, see
Managing security context constraints
in the OpenShift documentation.
If the base image is expected to change without the image tag changing, then enable Always Pull Base Image. With
this option enabled, the image build process will always pull a new version of the base image to ensure that the latest
version is being used. Otherwise, the base image will be pulled only if it doesn’t already exist in the local machine’s
image cache.
The Image Build Network Name field allows an image build to run when the build process needs access to another
container, such as a database that might be running in a container that is needed while WDT is creating the domain.
Because the current release doesn’t support creating JRF domains during the image build process (that is, for the
“Domain in Image” domain location), it is unlikely that this field will be needed. However, it is surfaced
for completeness.
To add custom steps to the image build process, enable Extend Image Build and provide the Dockerfile
containing the additional commands in the Additional Build Commands File field. If the specified Dockerfile needs
additional files to be present in the build context directory, then provide the list of those required files in the
Additional Build Files field.
Code View
For the Primary Image, the Code View displays a shell script that you can use as a starting point for automating the
image creation process. For the “Model in Image”
domain location
, there is a similar
Code View page for the Auxiliary Image. Each page shows the script for creating and pushing its image.
If it is not already selected, then use the Script Language drop-down menu to choose the desired scripting language.
Note that the application is providing a working sample script simply to show how the process might be automated.
Before using the script, review the script and make any changes necessary for your environment. One typical change that would be considered a best practice would be to change the script to accept either command-line arguments or externally set environment variables to specify any credentials required by the script to eliminate hard-coding the credentials in the script itself. This change is left as an exercise for you because different environments typically will have existing standards for securely handling such credentials.
Create Images
Create Primary Image and Create Auxiliary Image invoke the
WebLogic Image Tool
to
create a new container image for running a WebLogic domain in a Kubernetes environment. You access these actions using
the Create Primary Image or Create Auxiliary Image button on the Image page or from the Go menu.
At a high level, the action performs the following steps:
- Validates the input values necessary for running the action based on your selections.
- Saves the WKT Project, if needed.
- Adds the installers to the WebLogic Image Tool (WIT) cache on the local machine using the WIT Cache command.
- Builds the image on the local machine using the WebLogic Image Tool Create or Create Auxiliary Image command.
Push Images
Push Primary Image and Push Auxiliary Image use the specified Image Builder program to upload (that is, push) the
newly-built image to the image registry specified by its image tag. You access these actions by using the
Push Primary Image or Push Auxiliary Image button on the Image page or from the Go menu.
At a high level, the action performs the following steps:
- Validates the input values necessary for running the action based on your selections. This includes making
sure that an image with the specified
Image Tagvalue exists in the local machine’s image cache. - Saves the WKT Project, if needed.
- Logs in to the container image registry, if specified.
- Pushes the image to the container image registry.