Deploy the Verrazzano Component for the WebLogic Domain
Verrazzano installation includes the WebLogic Kubernetes Operator. To inform the operator about a new WebLogic or FMW domain, you need to create a Verrazzano component that includes an operator Domain resource object in Kubernetes. Starting in Verrazzano 1.5.0, the Verrazzano component also needs an operator Cluster resource object for every cluster in the domain. This separation is required to work with the Kubernetes Horizontal Pod Autoscaler (HPA) to allow it to automatically scale the clusters based on load (but only up to the maximum size of the WebLogic cluster). For more information, see this WebLogic Kubernetes Operator Scaling documentation.
WKTUI generates the required Verrazzano Component objects for your domain because of the project settings. Go to the Verrazzano > Component page. Fill in the form fields, as described in the following table. Don’t worry about the Image Pull Secret value ocr and the fact that it does not exist. You will create that secret before deploying the domain.
| Field Name | Value |
|---|---|
Verrazzano Version |
If not already populated, use the button inside the field to get the installed version from the Kubernetes cluster. |
WebLogic Admin Username |
Enter the username that you want to use. |
WebLogic Admin Password |
Enter the password that you want to use. |
WebLogic Kubernetes Operator Installed Version |
If this field is not already populated, press the icon in the text box. |
Primary Image Tag |
container-registry.oracle.com/middleware/weblogic:14.1.1.0-11-ol8 or container-registry.oracle.com/middleware/weblogic_cpu:14.1.1.0-generic-jdk11-ol8 |
Specify Image Pull Credentials |
ON |
Use Existing Image Pull Secret |
ON |
Image Pull Secret Name |
ocr |
Specify Auxiliary Image Pull Credentials |
ON |
Use Existing Auxiliary Image Pull Secret |
OFF |
Auxiliary Image Pull Secret Name |
ocir |
Auxiliary Image Registry Pull Username |
<tenancy-name>/<oracle-cloud-username> or user name for your image registry. |
Auxiliary Image Registry Pull Email Address |
Your email address. |
Auxiliary Image Registry Pull Password |
<oracle-cloud-auth-token> or password for your image registry. |
After you have filled out the fields in the preceding table, you need to look at some additional fields contained in tables, shown in the following image.
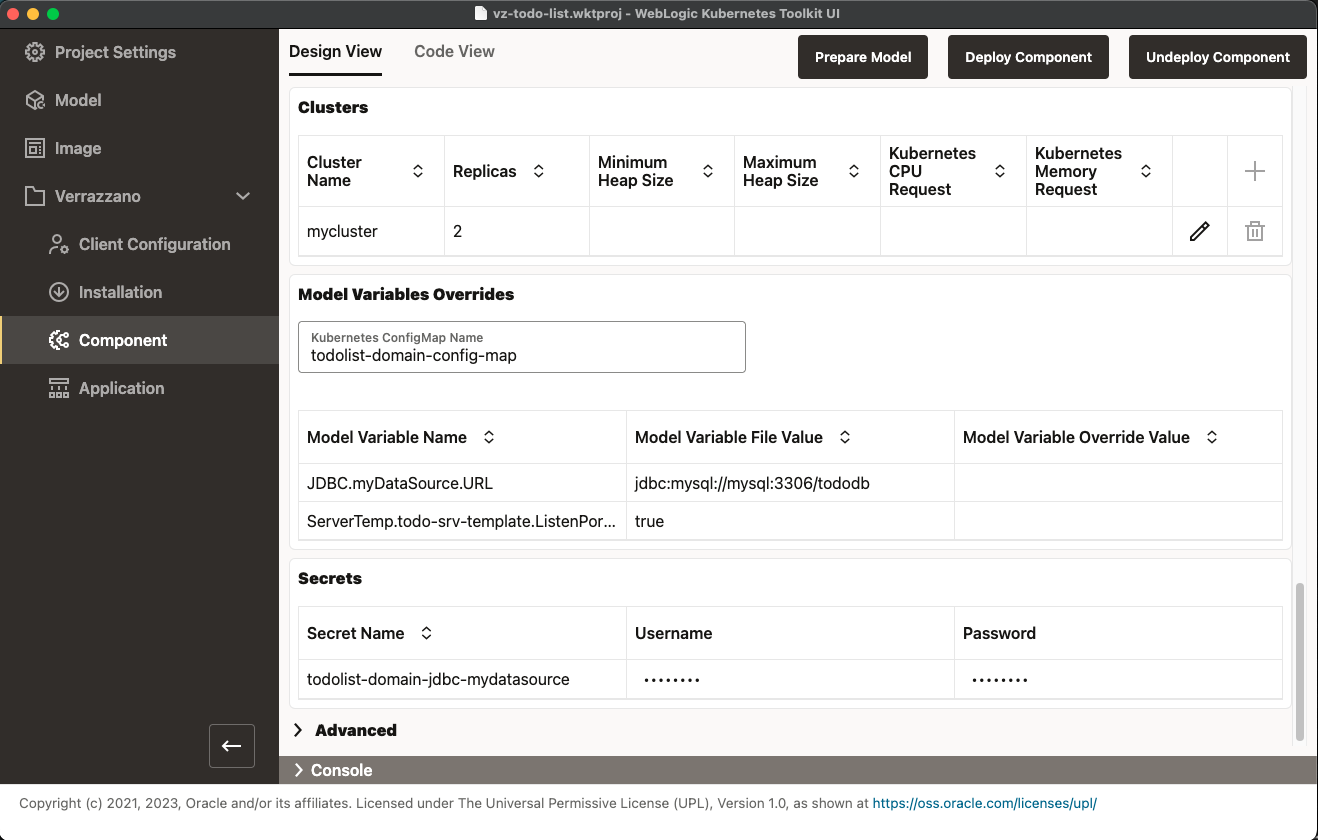
- First, look at the
Clusterstable. As you can see, the cluster from your model has been added to this table (by the earlier invocation of the Prepare Model action). If you do not see the cluster, run Prepare Model again to populate the table. - Notice that the
Replicasvalue for the cluster is set to the maximum size of the cluster, as specified in the model. Select the Pencil icon toward the right end of the row. Notice that you cannot set theReplicasvalue higher than 10. After you are done, change the value to2and click OK. - Next, look at the
Model Variables Overridessection. This section lets you override the values specified in the variables model file in the auxiliary image using a Kubernetes ConfigMap. Because you do not need to override these values, you can move on to theSecretssection.
The Secrets section contains all model-defined secrets and lets you specify the user name and password. In the preceding image,
notice that the secret associated with your MySQL database connection is already populated. This value was removed from the model
(or the variable reference) by the Prepare Model action and added here. If you run Prepare Model more than once, you will lose
this value and must enter it manually. WDT generally will not populate password values, so you need to enter your MySQL database
password that you plan to provide when you run Quick Start scripts/vzDeployMySQL script later in this section.
Before you deploy your component, switch to the Code View tab and select the Component Resource sub-tab. Notice that
your component contains a workload object, VerrazzanoWebLogicWorkload. This object contains the WebLogic Kubernetes
Operator Domain and Cluster custom resources for your domain. You also have a ConfigMap Resource sub-tab. This is the
Kubernetes ConfigMap where any Model Variable Override values are stored. Because we did not override any of the model
variables’ values, the todolist-domain-overrides.properties element is empty.
Click Deploy Component. Remember, deploying a Verrazzano component simply creates the component object in Kubernetes, which does not cause the WebLogic domain to be instantiated. That happens after a Verrazzano application (also known as the Application Configuration) object is deployed.
Before turning your attention to creating the Verrazzano application object, you need to create the Verrazzano component for your MySQL database. You will deploy the database to the same namespace as the domain, so you need to create the following Kubernetes objects to deploy the database:
todolist-domain-nsNamespace – The Kubernetes namespace where both the WebLogic or FMW domain and MySQL database will reside.ocrSecret – The Kubernetes image pull secret for pulling images from the Oracle Container Registry.mysqlSecret – The Kubernetes secret that holds the root password, user name, and password of the user the ToDo List application uses to connect to the database.todolist-mysql-cmConfigMap – The Kubernetes ConfigMap used to hold theinit-schema.sqlscript to initialize the MySQL database on startup.todolist-mysql-deploymentDeployment – The Kubernetes deployment that will start and manage the MySQL database.mysqlService – The Kubernetes service that exposes the MySQL database by themysqlDNS name to the WebLogic managed servers.
To make this easier, go to the QuickStart directory and do the following:
- Edit the demarcated section of the
setQuickstartEnvshell script to match your environment. - Source (macOS or Linux) or run the
setQuickstartEnvshell script. - Change to the
scriptssubdirectory and run thevzDeployMySQLscript, which creates the Kubernetes objects and Verrazzano components described previously.
Now that the MySQL database components are deployed, you are ready to create the Verrazzano application, which is covered in the next section.