Istio support
Contents
- Overview
- Limitations
- Determining the Istio version
- Setting up an operator with Istio support
- Creating a domain with Istio support
- Traffic management
- Distributed tracing
- Automatically added network channels
- Security
Overview
These instructions assume that you are using a Kubernetes cluster with Istio installed and configured already. The operator will not install Istio for you.
For Red Hat OpenShift Service Mesh, which has its own implementation of Istio, refer to the correct version of the documentation for installation. OpenShift Service Mesh installation 4.10
Istio support lets you run the operator, and WebLogic domains managed by the operator, when Istio sidecar injection is enabled. You can use Istio gateways and virtual services to access applications deployed in these domains. If your applications have suitable tracing code in them, then you will also be able to use distributed tracing, such as Jaeger, to trace requests across domains and to other components and services that have tracing enabled.
WebLogic Kubernetes Operator assumes that you are familiar with Istio or Red Hat OpenShift Service Mesh. If you are new to
them, we strongly recommend reading the respective documentation and working through the Bookinfo
sample application to familiarize yourself with the mesh and verify that it is working properly in your environment, before proceeding to work with the Operator.
To learn more about Istio, see What is Istio.
For Redhat OpenShift Service Mesh, see
Limitations
The current support for Istio has these limitations:
-
The operator supports Istio versions 1.7 and higher, and has been tested with single and multicluster Istio installations from 1.7.3 up to 1.11.x.
-
For Red Hat OpenShift Service Mesh, we have tested with Red Hat OpenShift Container Platform version 4.10.20, Service Mesh 2.2.1.
-
You cannot set up a NodePort using
domain.spec.adminServer.adminService.channelswith achannelNameofdefault,default-secure, anddefault-admin. Any attempt will result in an error when deploying a domain in combination with Istio. -
If the
istio-ingressgatewayservice in your environment does not have anEXTERNAL-IPdefined and you would like to externally run WLST commands, then see Use WLST.
Determining the Istio version
To see the Istio build version that is installed, use the istioctl version command. For example:
$ istioctl version
client version: 1.11.1
control plane version: 1.11.1
data plane version: 1.11.1 (1 proxies)
Setting up an operator with Istio support
Istio support requires labeling the operator namespace and your domain namespaces to enable Istio automatic sidecar injection, plus modifying your domain resource configuration. In this section, we describe the steps for the operator namespace; we will describe the steps for the domain in later sections.
Before installing the operator, create the namespace in which you want to run the operator and label it.
$ kubectl create namespace weblogic-operator
For non-OpenShift service mesh, label the namespace as follows:
$ kubectl label namespace weblogic-operator istio-injection=enabled
After the namespace is labeled, you can install the operator.
When using OpenShift service mesh, because it does not support namespace-wide Istio sidecar injection, you must set the
annotation for the operator pod-level sidecar injection when installing or updating the operator using Helm, with the --set option, as follows:
--set "annotations.sidecar\.istio\.io/inject=true"
When the operator pod starts, you will notice that Istio automatically injects an initContainer called istio-init
and the Envoy container istio-proxy.
You can validate this using the following commands:
$ kubectl --namespace weblogic-operator get pods
$ kubectl --namespace weblogic-operator get pod weblogic-operator-xxx-xxx -o yaml
In the second command, change weblogic-operator-xxx-xxx to the name of your pod.
Creating a domain with Istio support
Setting up Istio support for a domain requires labeling
its namespace and defining domain.spec.configuration.istio attributes.
Setting up the domain namespace
To allow your domains to run with Istio automatic sidecar injection enabled, create the namespace in which you want to run the domain and label it for automatic injection before deploying your domain.
$ kubectl create namespace domain1
$ kubectl label namespace domain1 istio-injection=enabled
Configuring the domain resource
To enable Istio support for a domain, you need to add a
domain.spec.configuration.istio section to your domain custom resource YAML file,
as shown in the following example:
apiVersion: "weblogic.oracle/v8"
kind: Domain
metadata:
  name: domain2
  namespace: domain1
  labels:
    weblogic.domainUID: domain2
spec:
  ... other content ...
  configuration:
    istio:
      enabled: true
      readinessPort: 8888
      replicationChannelPort: 4564
      localhostBindingsEnabled: false
See the following description of each spec.configuration.istio attribute:
-
enabled: To enable Istio support, you must include theistiosection and setenabled: trueas shown. -
readinessPort: This attribute is optional and defaults to8888if not provided; it is used for a readiness health check. -
replicationChannelPort: This attribute is optional and defaults to4564if not provided; the operator will create aT3protocol WebLogic network access point on each WebLogic Server that is part of a cluster with this port to handle EJB and servlet session state replication traffic between servers.This setting is ignored for clusters where the WebLogic cluster configuration already defines a
replication-channelattribute. -
localhostBindingsEnabled: This setting was added in operator version 3.3.3; it defaults to the Helm chart configuration valueistioLocalhostBindingsEnabled, which in turn defaults totrue. Whentrue, the operator creates a WebLogic network access point with alocalhostbinding for each existing channel and protocol. Usetruefor Istio versions prior to 1.10 and set tofalsefor versions 1.10 and later.|Istio version|localhostBindingsEnabled|Notes| |—-|—-|—-| |Pre-1.10|
true|Supported. Note thattrueis the default.| |Pre-1.10|false|Not supported.| |1.10 and later|true|Not supported.| |1.10 and later|false|Supported.||Red Hat OpenShift version|localhostBindingsEnabled|Notes| |—-|—-|—-| |Pre 4.11|
trueor not set|Supported.| |Pre 4.11|falseor not set|Not Supported.| |4.11 and later|true|Not Supported.| |4.11 and later|false|Supported.|
Note: If the localhostBindingsEnabled is set incorrectly for the Istio version running in a domain,
then:
-
The Managed WebLogic Servers that are running in the managed server pods may not be able to contact the WebLogic Administration Server. They will consequently log networking messages about failures communicating with the Administration Server and likely, also a
Boot identity not validerror. -
The
weblogic-servercontainer in the managed server pods will fail to reach areadystate due to readiness probe failures. For example, if thelocalhostBindingsEnabledis set totruewhen running Istio versions 1.10 and later, then akubectl get podswill have output like this:$ kubectl -n sample-domain1-ns get podsNAME READY STATUS RESTARTS AGE sample-domain1-admin-server 1/2 Running 0 2mThe
kubectl describe podcommand will show a readiness probe event failure:$ kubectl describe pod sample-domain1-admin-server -n sample-domain1-nsEvents: Type Reason Age From Message ---- ------ ---- ---- ------- Warning Unhealthy 60s (x10 over 105s) kubelet Readiness probe failed: HTTP probe failed with statuscode: 500Also, viewing the logging output of the
istio-proxycontainer in a managed server pod will show that the readiness probe was unable to successfully establish a connection to the endpoint of the managed server:$ kubectl logs sample-domain1-admin-server -n sample-domain1-ns -c istio-proxy2021-10-22T20:35:01.354031Z error Request to probe app failed: Get "http://192.168.0.93:8888/weblogic/ready": dial tcp 127.0.0.6:0->192.168.0.93:8888: connect: connection refused, original URL path = /app-health/weblogic-server/readyz app URL path = /weblogic/ready
Note: When using OpenShift service mesh, because it does not support namespace-wide Istio sidecar injection, you must set the annotation for pod-level sidecar injection in the domain resource, as follows:
-
apiVersion: "weblogic.oracle/v8"
kind: Domain
metadata:
 name: domain2
 namespace: domain1
 labels:
   weblogic.domainUID: domain2
spec:
 ... other content ...
 serverPod:
    ...
    annotations:
      sidecar.istio.io/inject: "true"
 configuration:
   istio:
     enabled: true
     readinessPort: 8888
     replicationChannelPort: 4564
     localhostBindingsEnabled: false
Applying a Domain YAML file
After a Domain YAML file is modified, apply it by:
$ kubectl apply -f domain.yaml
After all the servers are up, you will see output like this:
$ kubectl -n sample-domain1-ns get pods
NAME                             READY   STATUS    RESTARTS   AGE
sample-domain1-admin-server      2/2     Running   0          154m
sample-domain1-managed-server1   2/2     Running   0          153m
sample-domain1-managed-server2   2/2     Running   0          153m
If you use istioctl proxy-status, you will see the mesh status:
$ istioctl proxy-status
NAME                                                               CDS        LDS        EDS        RDS          PILOT                            VERSION
istio-ingressgateway-5c7d8d7b5d-tjgtd.istio-system                 SYNCED     SYNCED     SYNCED     NOT SENT     istio-pilot-6cfcdb75dd-87lqm     1.5.4
sample-domain1-admin-server.sample-domain1-ns                      SYNCED     SYNCED     SYNCED     SYNCED       istio-pilot-6cfcdb75dd-87lqm     1.5.4
sample-domain1-managed-server1.sample-domain1-ns                   SYNCED     SYNCED     SYNCED     SYNCED       istio-pilot-6cfcdb75dd-87lqm     1.5.4
sample-domain1-managed-server2.sample-domain1-ns                   SYNCED     SYNCED     SYNCED     SYNCED       istio-pilot-6cfcdb75dd-87lqm     1.5.4
weblogic-operator-7d86fffbdd-5dxzt.sample-weblogic-operator-ns     SYNCED     SYNCED     SYNCED     SYNCED       istio-pilot-6cfcdb75dd-87lqm     1.5.4
Exposing applications in Istio-enabled domains
When a domain is running with Istio support, you should use the Istio ingress gateway to provide external access to applications, instead of using an ingress controller like Traefik. Using the Istio ingress gateway, you can also view the traffic in Kiali and use distributed tracing from the entry point to the cluster.
To configure external access to your domain, you need to create an Istio Gateway and
VirtualService, as shown in the following example:
---
apiVersion: networking.istio.io/v1alpha3
kind: Gateway
metadata:
  name: domain1-gateway
  namespace: domain1
spec:
  selector:
    istio: ingressgateway
  servers:
    - hosts:
        - '*'
      port:
        name: http
        number: 80
        protocol: HTTP
---
apiVersion: networking.istio.io/v1alpha3
kind: VirtualService
metadata:
  name: domain1-virtualservice
  namespace: domain1
spec:
  gateways:
    - domain1-gateway
  hosts:
    - '*'
  http:
    - match:
        - uri:
            prefix: /console
        - port: 7001
      route:
        - destination:
            host: sample-domain1-admin-server.sample-domain1-ns.svc.cluster.local
            port:
              number: 7001
    - match:
        - uri:
            prefix: /testwebapp
        - port: 8001
      route:
        - destination:
            host: sample-domain1-cluster-cluster-1.domain1.svc.cluster.local
            port:
              number: 8001
This example creates a gateway that will accept requests with any host name
using HTTP on port 80, and a virtual service that will route all of
those requests to the cluster service for cluster-1 in domain1 in
the namespace domain1. Note: In a production environment, hosts should be limited to the proper DNS name.
After the gateway and virtual service has been set up, you can access it through your ingress host and port. Refer to Determining the ingress IP and ports.
For more information about providing ingress using Istio, see the Istio documentation.
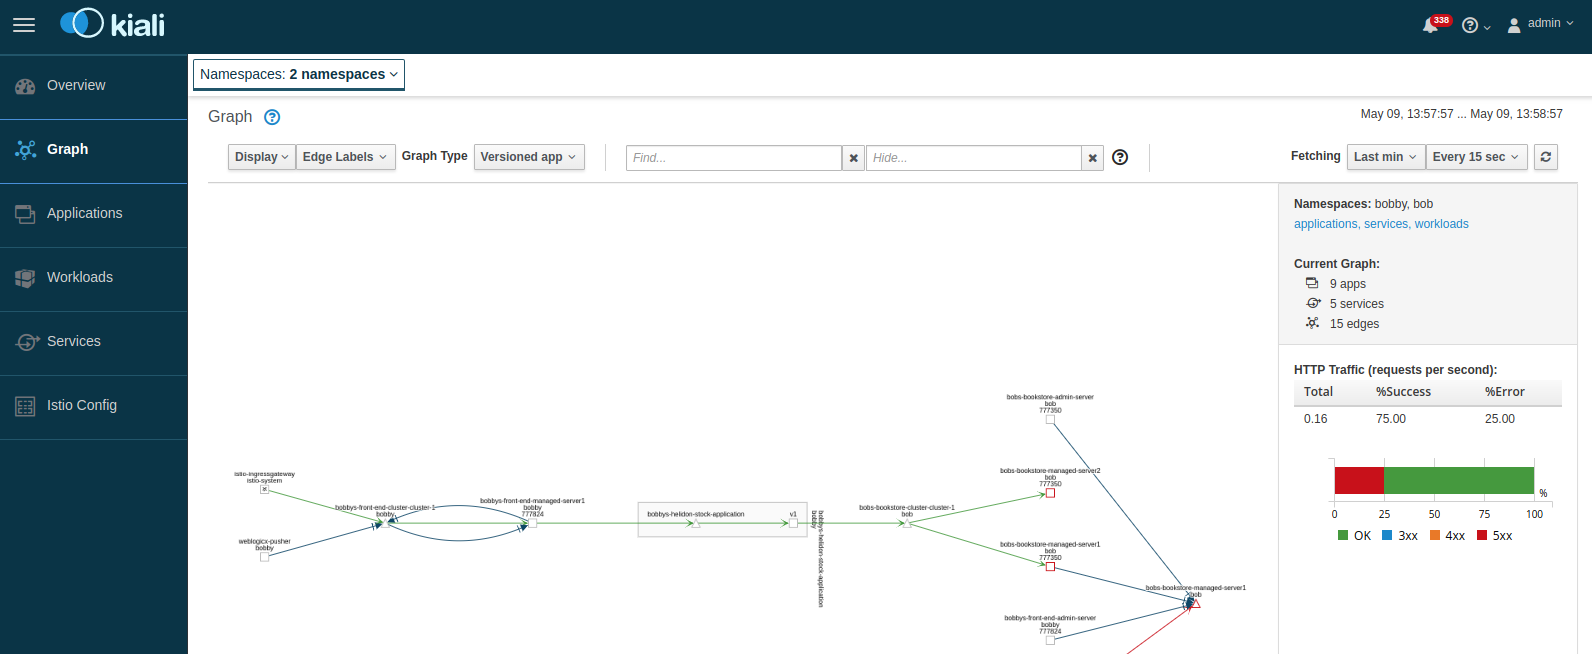
Traffic management
Istio provides traffic management capabilities, including the ability to
visualize traffic in Kiali. You do not need to change your applications to use
this feature. The Istio proxy (Envoy) sidecar that is injected into your pods
provides it. The following image shows an example with traffic
flowing: in from the Istio gateway on the left, to a domain called domain1.
In this example, you can see how the traffic flows to the cluster services and then to the individual Managed Servers.
To learn more, see Istio traffic management.
Distributed tracing
Istio provides distributed tracing capabilities, including the ability to view traces in Jaeger. To use distributed tracing though, first you will need to instrument your WebLogic application, for example, using the Jaeger Java client. The following image shows an example of a distributed trace that shows a transaction following the same path through the system as shown in the previous image.
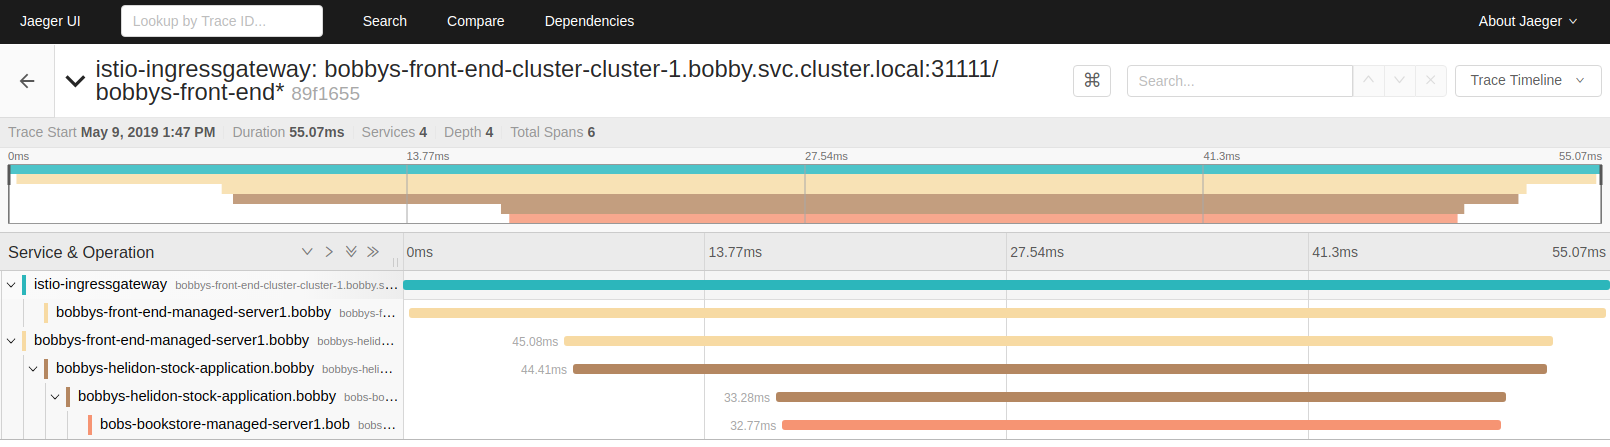
To learn more, see distrubting tracing in Istio.
Automatically added network channels
The operator will automatically add network channels to each WebLogic Server when Istio is enabled for a domain.
Added network channels for Istio versions prior to v1.10
When deploying a domain that is configured to support Istio versions prior to 1.10, the operator automatically adds the following network channels (also known as Network Access Points) to your WebLogic configuration so that Istio is able to route traffic:
For non-SSL traffic:
| Name | Port | Protocol | Exposed as a container port |
|---|---|---|---|
http-probe |
From configuration Istio readinessPort |
http |
No |
tcp-default |
Server listening port | t3 |
Yes |
http-default |
Server listening port | http |
Yes |
tcp-snmp |
Server listening port | snmp |
Yes |
tcp-cbt |
server listening port | CLUSTER-BROADCAST |
No |
tcp-iiop |
Server listening port | http |
No |
For SSL traffic, if SSL is enabled on the server:
| Name | Port | Protocol | Exposed as a container port |
|---|---|---|---|
tls-default |
Server SSL listening port | t3s |
Yes |
https-secure |
Server SSL listening port | https |
Yes |
tls-iiops |
Server SSL listening port | iiops |
No |
tls-ldaps |
Server SSL listening port | ldaps |
No |
tls-cbts |
Server listening port | CLUSTER-BROADCAST-SECURE |
No |
If the WebLogic administration port is enabled on the Administration Server:
| Name | Port | Protocol | Exposed in the container port |
|---|---|---|---|
https-admin |
WebLogic administration port | https |
Yes |
Added network channel for Istio versions v1.10 and later
Background:
Beginning with Istio version 1.10, Istio’s networking behavior was simplified. It changed so that the Istio network proxy that runs in each Istio sidecar (the Envoy proxy) no longer redirects network traffic to the current pod’s localhost interface, but instead directly forwards it to the network interface associated with the pod’s IP. This means that the operator does not need to create additional localhost network channels on each WebLogic pod except to enable readiness probe.
To learn more about changes to Istio networking beginning with Istio 1.10, see Upcoming networking changes in Istio 1.10.
Channel behavior:
When deploying a domain that is configured to support Istio versions 1.10 and later, the operator automatically adds an HTTP protocol network channel (also known as Network Access Points) to your WebLogic configuration for each server so that the pod’s readiness probe is bound to the server pod’s network interface:
| Channel Name | Port | Listen address | Protocol | Exposed as a container port |
|---|---|---|---|---|
http-probe-ext |
From configuration Istio readinessPort |
Server Pod’s IP address | http |
No |
Added network channel for WebLogic EJB and servlet session state replication traffic
To support WebLogic EJB and servlet session state replication traffic in an Istio service mesh,
operator versions 3.3.3 and later will automatically create a channel (network access point)
using the domain.spec.configuration.istio.replicationChannelPort
in the domain resource:
| Name | Port | Protocol | Exposed as a container port |
|---|---|---|---|
istiorepl |
From configuration Istio replicationChannelPort |
t3 |
No |
The operator will also set up the replication-channel attribute
in each WebLogic cluster configuration:
<cluster>
   <name>cluster-1</name>
   <replication-channel>istiorepl</replication-channel>
<cluster>
The operator will not create a replication channel or
alter a cluster’s replication-channel configuration
if such a channel is already configured for a WebLogic cluster.
(This is unnecessary when the channel already exists.)
Security
Istio provides rich sets of security features that you can use to secure the Istio service mesh environments. For details, see Istio Security. The following are some sample scenarios.
Mutual TLS
By default, all traffic between the Istio sidecar proxies use mutual TLS within the mesh. However, service within the mesh can still be accessed by other pods outside the mesh. For example, you have domain-1 deployed with sidecar injection, therefore within the mesh, and another domain, domain-2, deployed without sidecar injection, therefore outside of the mesh. Services within domain-2 can still access the services within domain-1, however the traffic will be Plain unencrypted traffic. This is because by default, Istio configures the traffic using the PERMISSIVE mode, which means it can accept both Plain and mutual TLS traffic. You can restrict this behavior by allowing only mutual TLS traffic by locking down the entire mesh or by namespace within the mesh.
For locking down the entire mesh, you can:
kubectl apply -n istio-system -f - <<EOF
apiVersion: security.istio.io/v1beta1
kind: PeerAuthentication
metadata:
  name: "default"
spec:
  mtls:
    mode: STRICT
EOF
For namespace only, you can:
kubectl apply -n <your namespace> -f - <<EOF
apiVersion: security.istio.io/v1beta1
kind: PeerAuthentication
metadata:
  name: "default"
spec:
  mtls:
    mode: STRICT
EOF
See Istio Mutual TLS Migration.
Authorization policy
Istio provides policy-based authorization using AuthorizationPolicy. You can set up policies to deny or allow access to services deployed in the mesh. For example, if you want to limit access to a particular service in the domain from another namespace only with a service account.
Create a service account for the client namespace.
kubectl -n domain2-ns create serviceaccount privaccess
Set up the service account in the client deployment pod. For example, if it is another WebLogic Domain in the Operator, specify the ServiceAccountName in the domain.spec.serverPod.
spec:
  serverPod:
     serviceAccountName:  privaccess
Create an AuthorizationPolicy for the target service.
apiVersion: security.istio.io/v1beta1
kind: AuthorizationPolicy
metadata:
  name: privaccess
  namespace: domain1-ns
spec:
  action: ALLOW
  rules:
  - from:
    - source:
        principals: ["cluster.local/ns/domain2-ns/sa/privaccess"]
    to:
    - operation:
        methods: ["GET"]
        paths: ["/domain1-priv-service"]
See Istio Authorization Policy.
Destination rule
Istio allows you to define traffic management polices applied to the service after the routing has occurred. You can use it to control load balancing, connection pool size from the sidecar, and outlier detection settings to detect and evict unhealthy hosts from the load balancing pool. You can also set up a service-level mutual TLS requirement instead of entire mesh or namespace-based.
For example, to configure service-level mutual TLS:
apiVersion: networking.istio.io/v1alpha3
kind: DestinationRule
metadata:
  name: sample-domain1-service
spec:
  host: sample-domain1-cluster-cluster-1.sample-domain1-ns.svc.cluster.local
  trafficPolicy:
    tls:
      mode: ISTIO_MUTUAL
For example, to configure a sticky session for a service using hashing-based hash key user_cookie:
apiVersion: networking.istio.io/v1alpha3
kind: DestinationRule
metadata:
  name: sample-domain1-service
spec:
  host: sample-domain1-cluster-cluster-1.sample-domain1-ns.svc.cluster.local
  trafficPolicy:
    loadBalancer:
      consistentHash:
        httpCookie:
          name: user_cookie
          ttl: 0s
See Istio Destination Rule.
Ingress gateway
Ingress gateway provides similar functions to Kubernetes Ingress but with more advanced functionality.
For example, to configure an Ingress gateway for SSL termination at the gateway:
- Create a TLS certificate and secret.
$ openssl req -x509 -nodes -days 365 -newkey rsa:2048 -keyout /tmp/tls1.key -out /tmp/tls1.crt -subj "/CN=secure-domain.org"
$ kubectl -n weblogic-domain1 create secret tls domain1-tls-cert --key /tmp/tls1.key --cert /tmp/tls1.crt
- Create the Ingress gateway.
apiVersion: networking.istio.io/v1alpha3
kind: Gateway
metadata:
  name: sample-domain1-gateway
  namespace: sample-domain1-ns
spec:
  selector:
    istio: ingressgateway
  servers:
    - port:
        number: 443
        name: https
        protocol: HTTPS
      tls:
        mode: SIMPLE
        credentialName: domain1-tls-cert
      hosts:
      - 'secure-domain.org'
    - port:
        number: 80
        name: http
        protocol: HTTP
      hosts:
      - 'regular-domain.org'
For example, to configure an Ingress gateway for SSL passthrough:
apiVersion: networking.istio.io/v1alpha3
kind: Gateway
metadata:
  name: sample-domain1-gateway
  namespace: sample-domain1-ns
spec:
  selector:
    istio: ingressgateway
  servers:
    - port:
        number: 443
        name: https
        protocol: HTTPS
      tls:
        mode: PASSTHROUGH
      hosts:
      - 'secure-domain.org'
    - port:
        number: 80
        name: http
        protocol: HTTP
      hosts:
      - 'regular-domain.org'
See Istio Ingress.