Deploy Account Service
-
Prepare the data source configuration for deployment
Update the data source configuration in your
src/main/resources/application.yamlas shown in the example below. This will cause the service to read the correct database details that will be injected into its pod by the Oracle Backend for Microservices and AI.datasource: url: ${spring.datasource.url} username: ${spring.datasource.username} password: ${spring.datasource.password} -
Add the client and configuration for the Spring Eureka Service Registry
When you deploy the application to the backend, you want it to register with the Eureka Service Registry so that it can be discovered by other services including the APISIX API Gateway, so that we can easily expose it outside the cluster.
Add the following line to the
<properties>to the Maven POM file:<spring-cloud.version>2023.0.3</spring-cloud.version>Add the dependency for the client to the Maven POM file:
<dependency>
    <groupId>org.springframework.cloud</groupId>
    <artifactId>spring-cloud-starter-netflix-eureka-client</artifactId>
</dependency>
Add the dependency management to the Maven POM file:
<dependencyManagement>
  <dependencies>
      <dependency>
          <groupId>org.springframework.cloud</groupId>
          <artifactId>spring-cloud-dependencies</artifactId>
          <version>${spring-cloud.version}</version>
          <type>pom</type>
          <scope>import</scope>
      </dependency>
  </dependencies>
</dependencyManagement>
Add the
@EnableDiscoveryClientannotation to theAccountsApplicationclass to enable the service registry.import org.springframework.cloud.client.discovery.EnableDiscoveryClient; // .. @SpringBootApplication @EnableDiscoveryClient public class AccountsApplication {Add the configuration to
src/main/resources/application.yamlfile.eureka: instance: hostname: ${spring.application.name} preferIpAddress: true client: service-url: defaultZone: ${eureka.service-url} fetch-registry: true register-with-eureka: true enabled: true -
Build a JAR file for deployment
Run the following command to build the JAR file (it will also remove any earlier builds). Note that you will need to skip tests now, since you updated the
application.yamland it no longer points to your local test database instance.$ mvn clean package -DskipTestsThe service is now ready to deploy to the backend.
-
Prepare the backend for deployment
The Oracle Backend for Microservices and AI admin service is not exposed outside the Kubernetes cluster by default. Oracle recommends using a kubectl port forwarding tunnel to establish a secure connection to the admin service.
Start a tunnel using this command in a new terminal window:
$ kubectl -n obaas-admin port-forward svc/obaas-admin 8080Get the password for the
obaas-adminuser. Theobaas-adminuser is the equivalent of the admin or root user in the Oracle Backend for Microservices and AI backend.$ kubectl get secret -n azn-server oractl-passwords -o jsonpath='{.data.admin}' | base64 -dStart the Oracle Backend for Microservices and AI CLI (oractl) in a new terminal window using this command:
$ oractl
 _   _           __    _    ___
/ \ |_)  _.  _. (_    /  |   |
\_/ |_) (_| (_| __)   \_ |_ _|_
========================================================================================
  Application Name: Oracle Backend Platform :: Command Line Interface
  Application Version: (1.3.0)
  :: Spring Boot (v3.3.3) ::

  Ask for help:
  - Slack: https://oracledevs.slack.com/archives/C03ALDSV272
  - email: obaas_ww@oracle.com

oractl:>
Connect to the Oracle Backend for Microservices and AI admin service using the
connectcommand. Enterobaas-adminand the username and use the password you collected earlier.oractl> connect username: obaas-admin password: ************** Credentials successfully authenticated! obaas-admin -> welcome to OBaaS CLI. oractl:>Create a database “binding” by tunning this command. Enter the password (
Welcome1234##) when prompted. This will create a Kubernetes secret in theapplicationnamespace calledaccount-db-secretswhich contains the username (account), password, and URL to connect to the Oracle Autonomous Database instance associated with the Oracle Backend for Microservices and AI.oractl:> bind --app-name application --service-name account Database/Service Password: ************* Schema {account} was successfully Not_Modified and Kubernetes Secret {application/account} was successfully Created. oractl:>This created a Kubernetes secret with the credentials to access the database using this Spring Boot microservice application’s username and password. When you deploy the application, its pods will have the keys in this secret injected as environment variables so the application can use them to authenticate to the database.
-
Deploy the account service
You will now deploy your account service to the Oracle Backend for Microservices and AI using the CLI. You will deploy into the
applicationnamespace, and the service name will beaccount. Run this command to deploy your service, make sure you provide the correct path to your JAR file. Note that this command may take 1-3 minutes to complete:oractl:> deploy --app-name application --service-name account --artifact-path /path/to/accounts-0.0.1-SNAPSHOT.jar --image-version 0.0.1 --java-version ghcr.io/oracle/graalvm-native-image-obaas:21 uploading: /Users/atael/tmp/cloudbank/accounts/target/accounts-0.0.1-SNAPSHOT.jar building and pushing image... creating deployment and service... obaas-cli [deploy]: Application was successfully deployed NOTICE: service not accessible outside K8S oractl:>What happens when you use the Oracle Backend for Microservices and AI CLI (oractl) deploy command? When you run the deploy command, the Oracle Backend for Microservices and AI CLI does several things for you:
- Uploads the JAR file to server side
- Builds a container image and push it to the OCI Registry
- Inspects the JAR file and looks for bind resources (JMS)
- Create the microservices deployment descriptor (k8s) with the resources supplied
- Applies the k8s deployment and create k8s object service to microservice
-
Verify account service
You can check if the account service is running properly by running the following command:
$ kubectl logs -n application svc/accountThe command will return the logfile content for the account service. If everything is running properly you should see something like this:
2023-06-01 20:44:24.882 INFO 1 --- [ main] o.s.b.w.embedded.tomcat.TomcatWebServer : Tomcat started on port(s): 8080 (http) with context path '' 2023-06-01 20:44:24.883 INFO 1 --- [ main] .s.c.n.e.s.EurekaAutoServiceRegistration : Updating port to 8080 2023-06-01 20:44:24.903 INFO 1 --- [ main] c.example.accounts.AccountsApplication : Started AccountsApplication in 14.6 seconds (JVM running for 15.713) 2023-06-01 20:44:31.971 INFO 1 --- [nio-8080-exec-1] o.a.c.c.C.[Tomcat].[localhost].[/] : Initializing Spring DispatcherServlet 'dispatcherServlet' 2023-06-01 20:44:31.971 INFO 1 --- [nio-8080-exec-1] o.s.web.servlet.DispatcherServlet : Initializing Servlet 'dispatcherServlet' 2023-06-01 20:44:31.975 INFO 1 --- [nio-8080-exec-1] o.s.web.servlet.DispatcherServlet : Completed initialization in 4 ms -
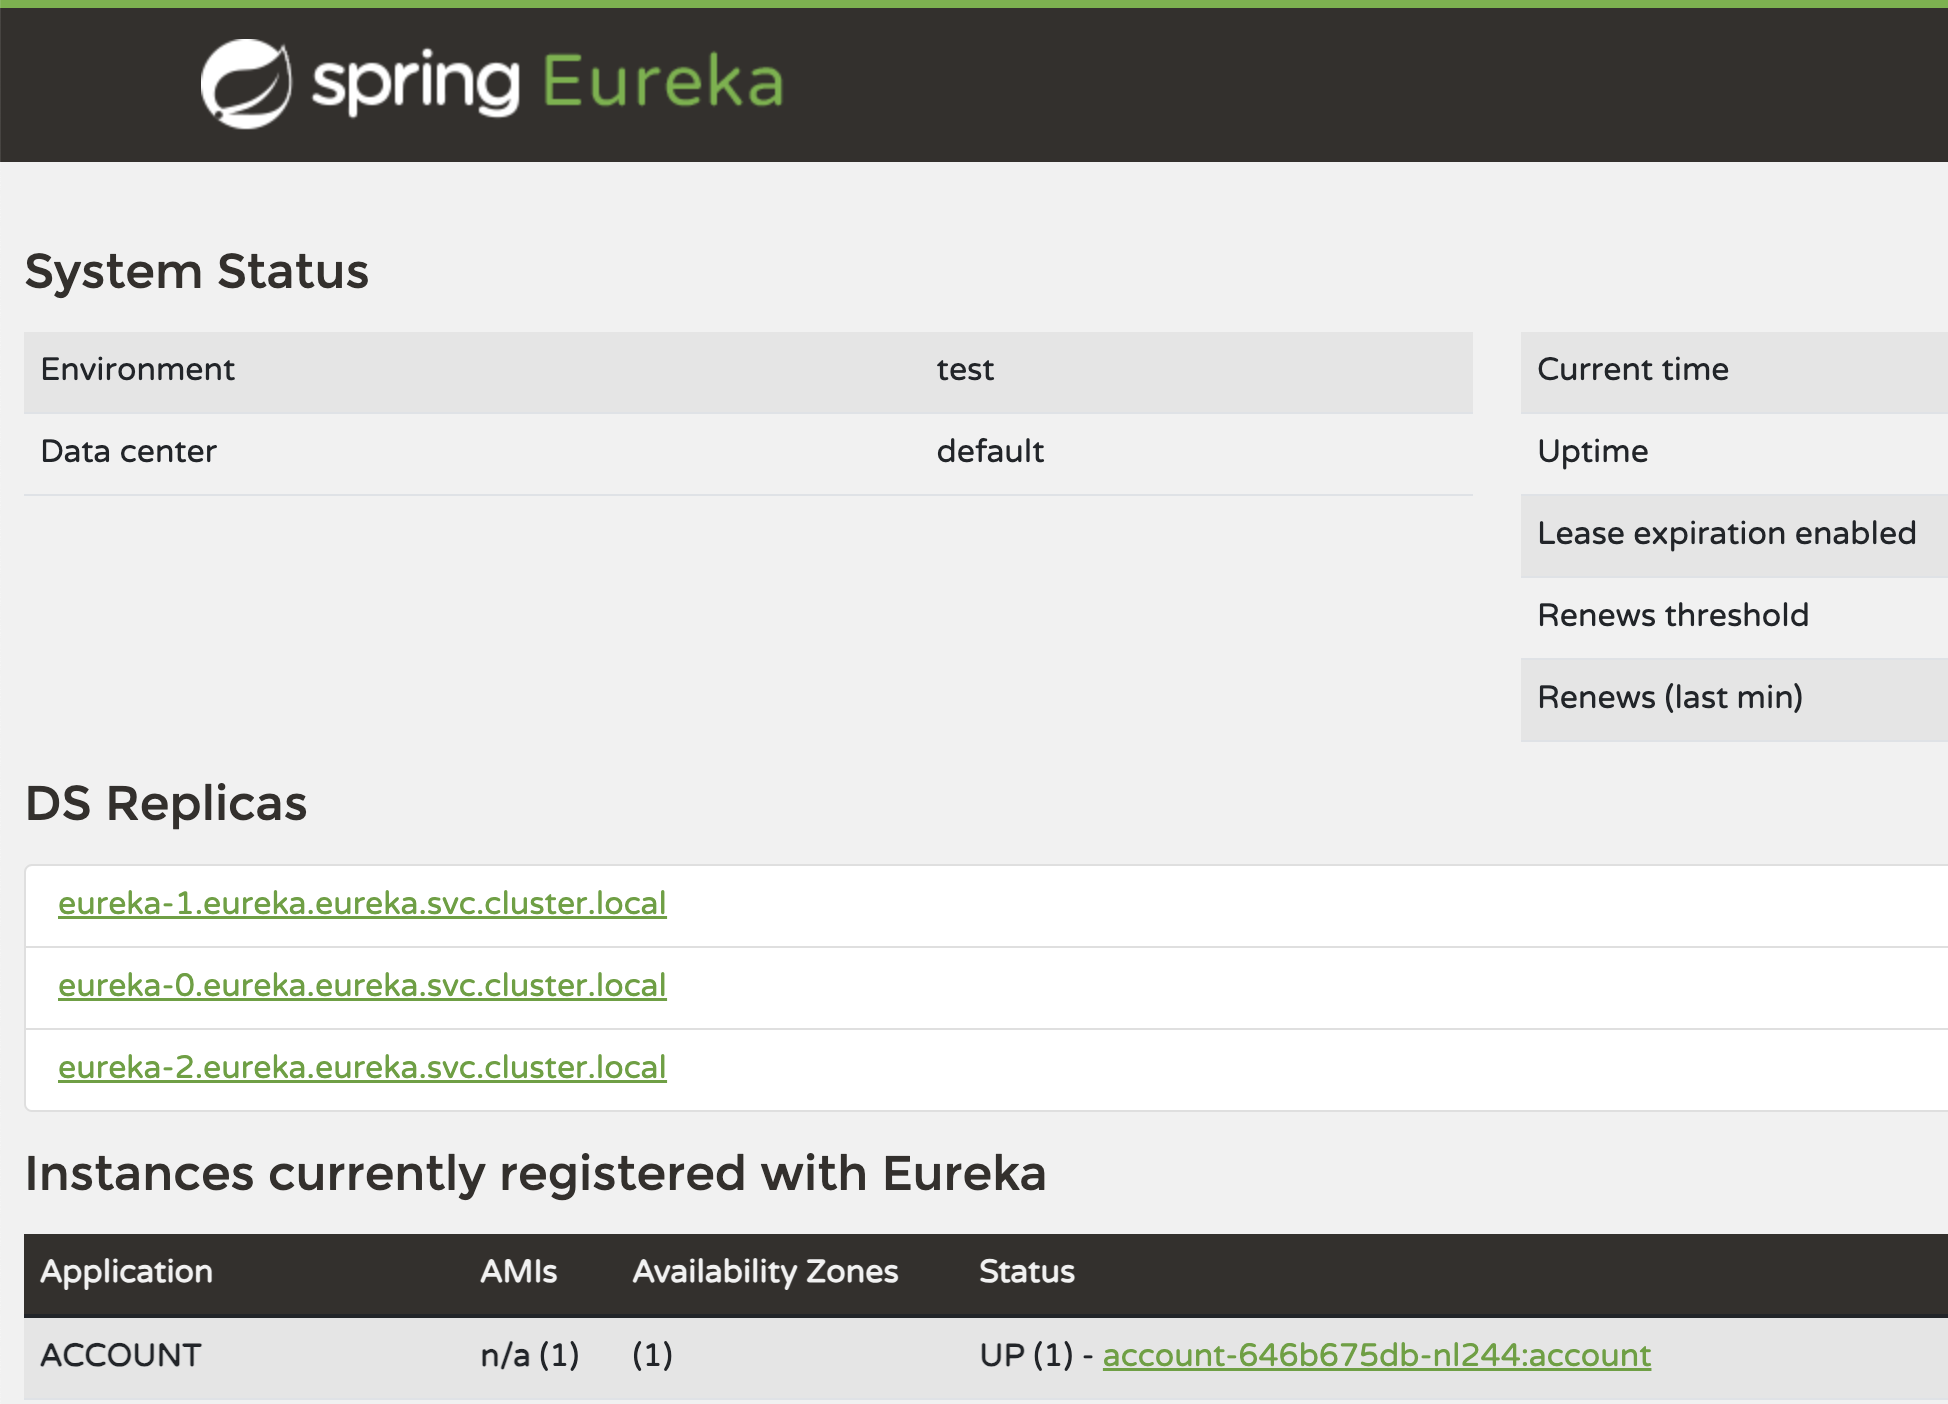
Check the Eureka Server
Create a tunnel to the Eureka server, so you can verify the
ACCOUNTSapplication has registered with the server.$ kubectl -n eureka port-forward svc/eureka 8761Open a web browser to Eureka Dashboard to vew the Eureka Server dashboard web user interface. It will look similar to this. Note that the
ACCOUNTapplication you have built has registered with Eureka.