Install in OCI Free Tier
This option allows you to run Oracle Backend for Microservices and AI in a containerized environment inside a single OCI Compute Instance. This option is good if you do not have enough free capacity on your local machine to run the environment, and if you do not have or want to use the resources required for a full production-sized deployment. This option provides an environment with adequate resources for development and testing, but minimizes the resource usage and costs.
Note: You only need to choose one of the three deployment options - local, OCI Free Tier or OCI Marketplace.
You can also use this approach in any regular commercial Oracle Cloud Tenancy - just skip the first step and start at step 2!
-
Get an Oracle Cloud Free Tier account
If you do not already have one, you can obtain an Oracle Cloud Free Tier account as follows:
- Open a browser and navigate to the Oracle Cloud Free Tier signup page.
- Complete the requested details and click on the Verify email button.
- You will receive an email from “Oracle Cloud” with instructions on how to verify your email address.
- On the Account Information page, enter the requested details.
- When completed, click on the Start my free trial button.
- You will need to wait a few minutes while your account is created and set up.
- When the set up is completed, you will see the login page. You will also receive an email confirmation.
- Log in to your new account. You may be asked to configured secure verification.
-
Copy the custom compute image
-
Choose a compartment in the drop down box on the left hand side of the OCI Console.
Note: If you use or plan to use this OCI Cloud account for other purposes as well, Oracle recommends creating compartments to simplify management. You can create a compartment by navigating to the Compartments page in the Identity section of OCI Console. You can use the root compartment if you wish, but it is not generally recommended.
-
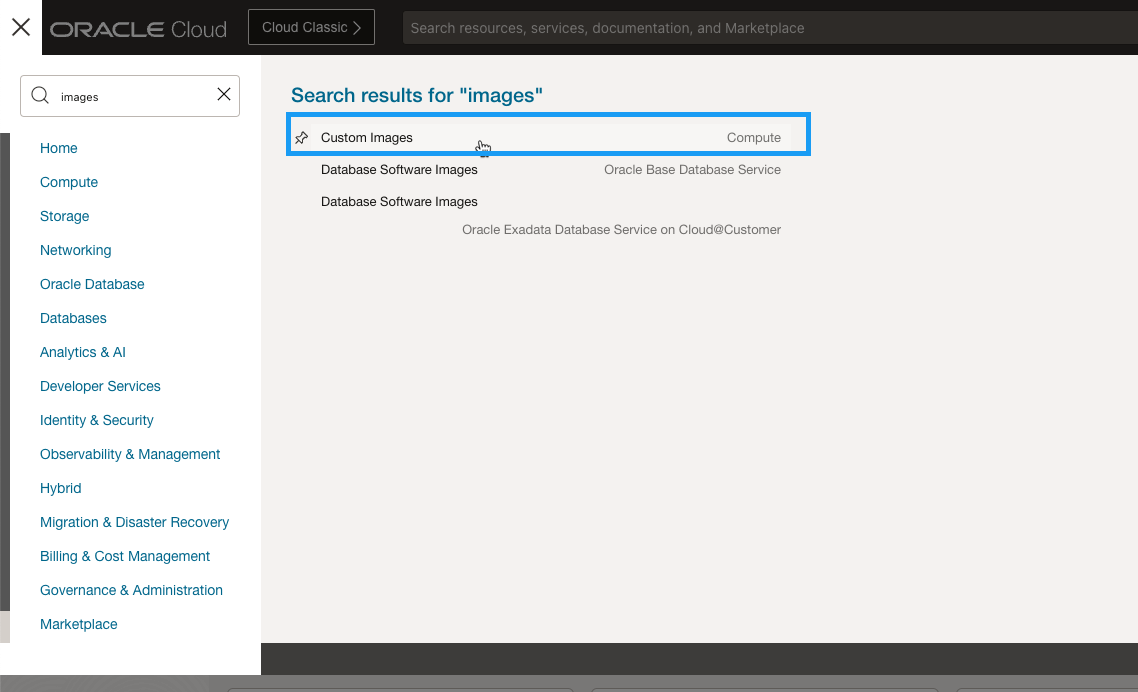
Navigate to the Custom Instances page by opening the main menu using the “hamburger” icon ( ) in the top left corner of the console and searching for “image”:
-
Click on the Import image button.
-
Choose the option to Import from an Object Storage URL and provide the following URL in the Object Storage URL field:
https://objectstorage.us-ashburn-1.oraclecloud.com/p/oSwRpU_9v5NGzkJ-P0qKzT1ZN-Y9lJZu1aXO_2N-rkGdJs-hKJt10bRk9TxsCceF/n/maacloud/b/cloudbank-public/o/obaas-1.3.0-2 -
(Important) Under Image type choose the OCI option.
-
Click on the Import image button to start the import.
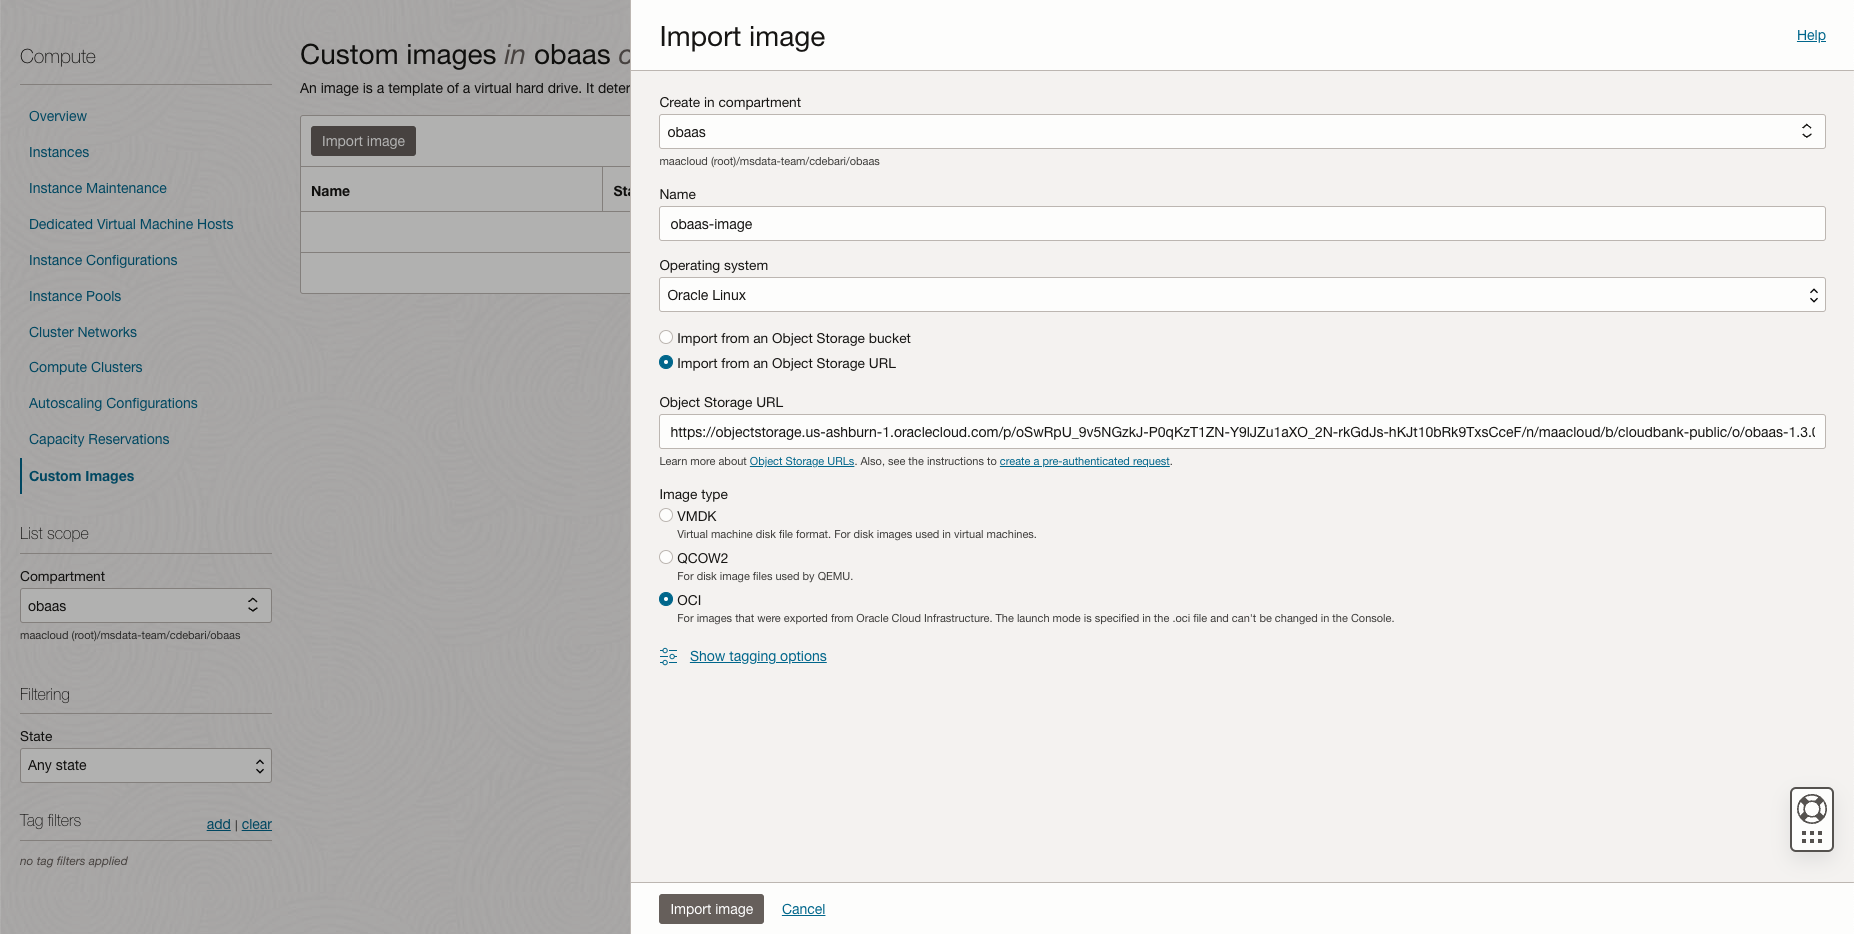
Note: that it might take approximately 10 to 15 minutes to complete the import. You can see the progress on the Custom image details page that will be displayed.
-
-
Create a compute instance
-
Choose a compartment in the drop down box on the left hand side of the OCI Console.
Note: If you use or plan to use this OCI Cloud account for other purposes as well, Oracle recommends creating compartments to simplify management. You can create a compartment by navigating to the Compartments page in the Identity section of OCI Console. You can use the root compartment if you wish, but it is not generally recommended.
-
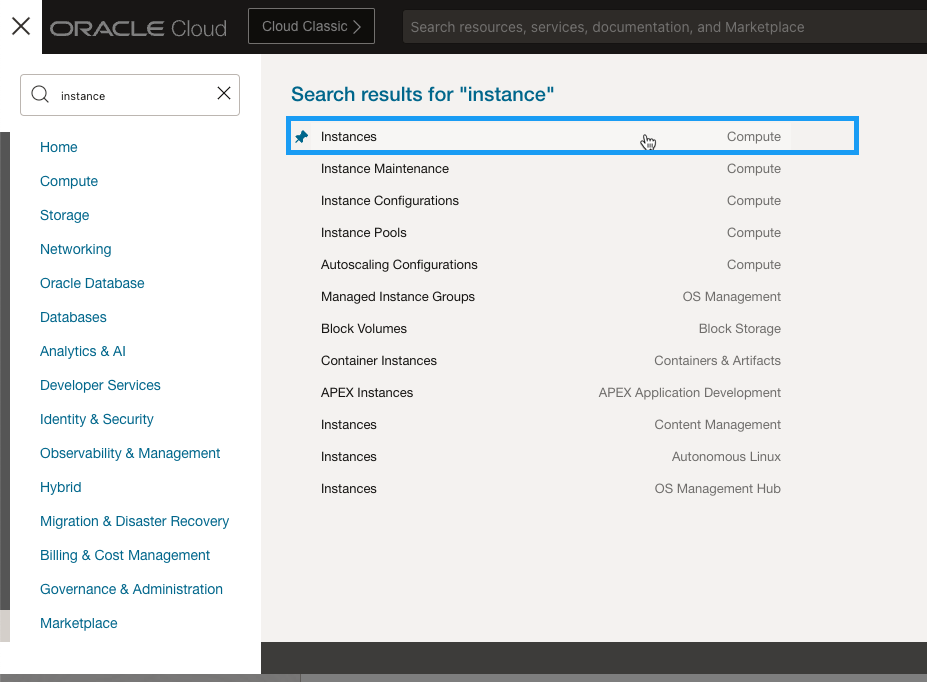
Navigate to the Compute Instances page by clicking on the link on the home page of the OCI Console or opening the main menu using the “hamburger” icon ( ) in the top left corner of the console and searching for “instance”:
-
Create a Compute Instance by clicking on the Create instance button.
-
Enter a name for the instance, for example obaas-instance.
-
Scroll down to the Image and shape section and click on the Change Image button to edit the details.
-
In the image source, choose the option for My ../images and choose the image the you imported in the previous step.
Note: The image will not show up until the import is completed.
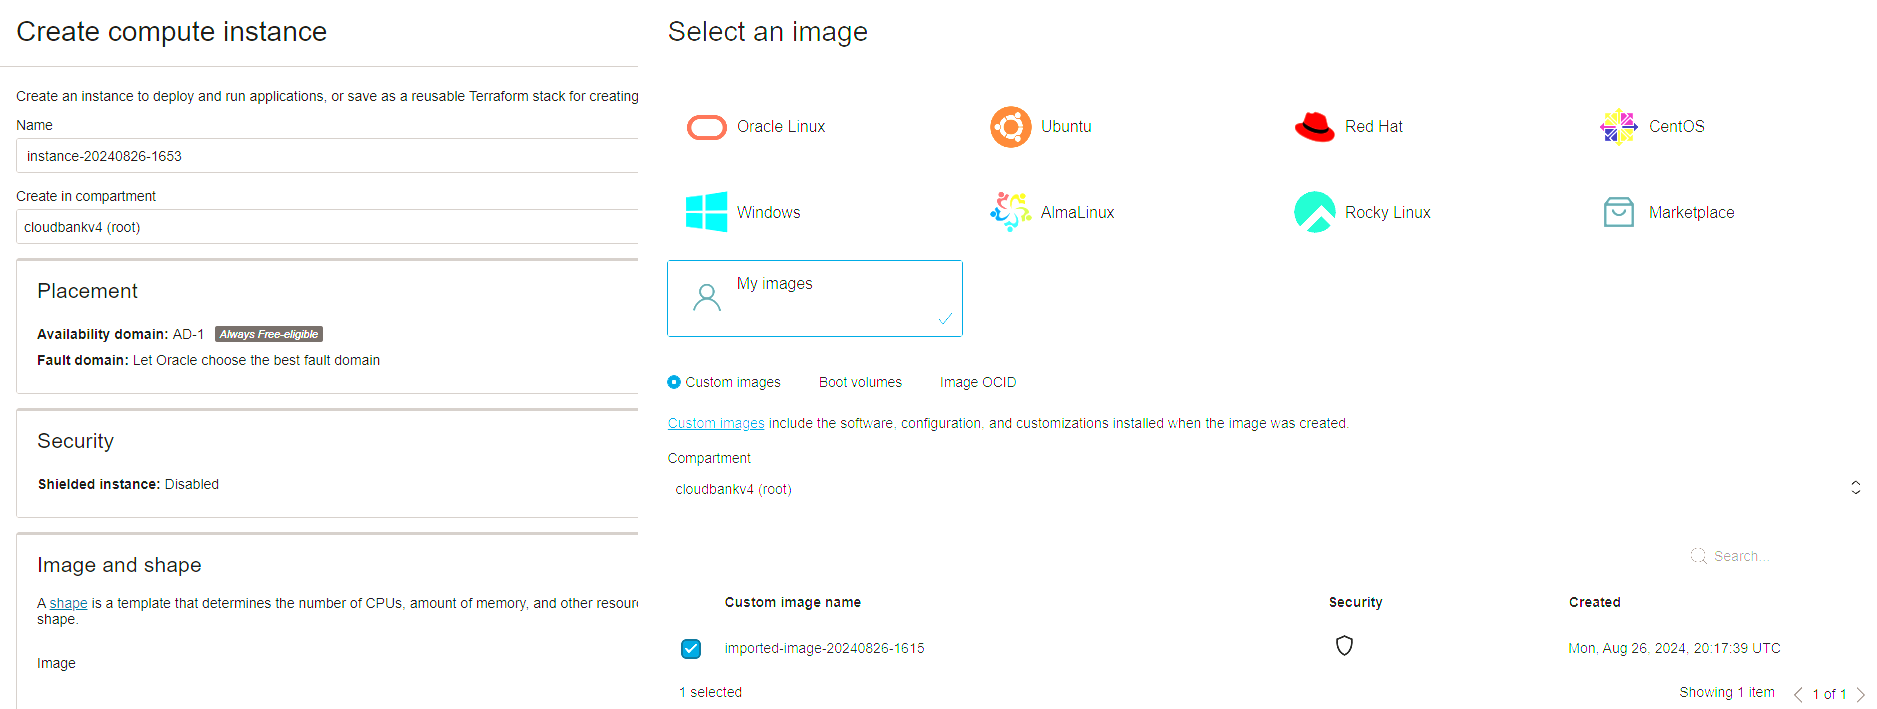
Click on the Select image button to confirm your choice.
-
Click on the Change shape button to choose the shape of your instance. Oracle recommends 2 OCPUs and 32 GB of memory to run this CloudBank environment.
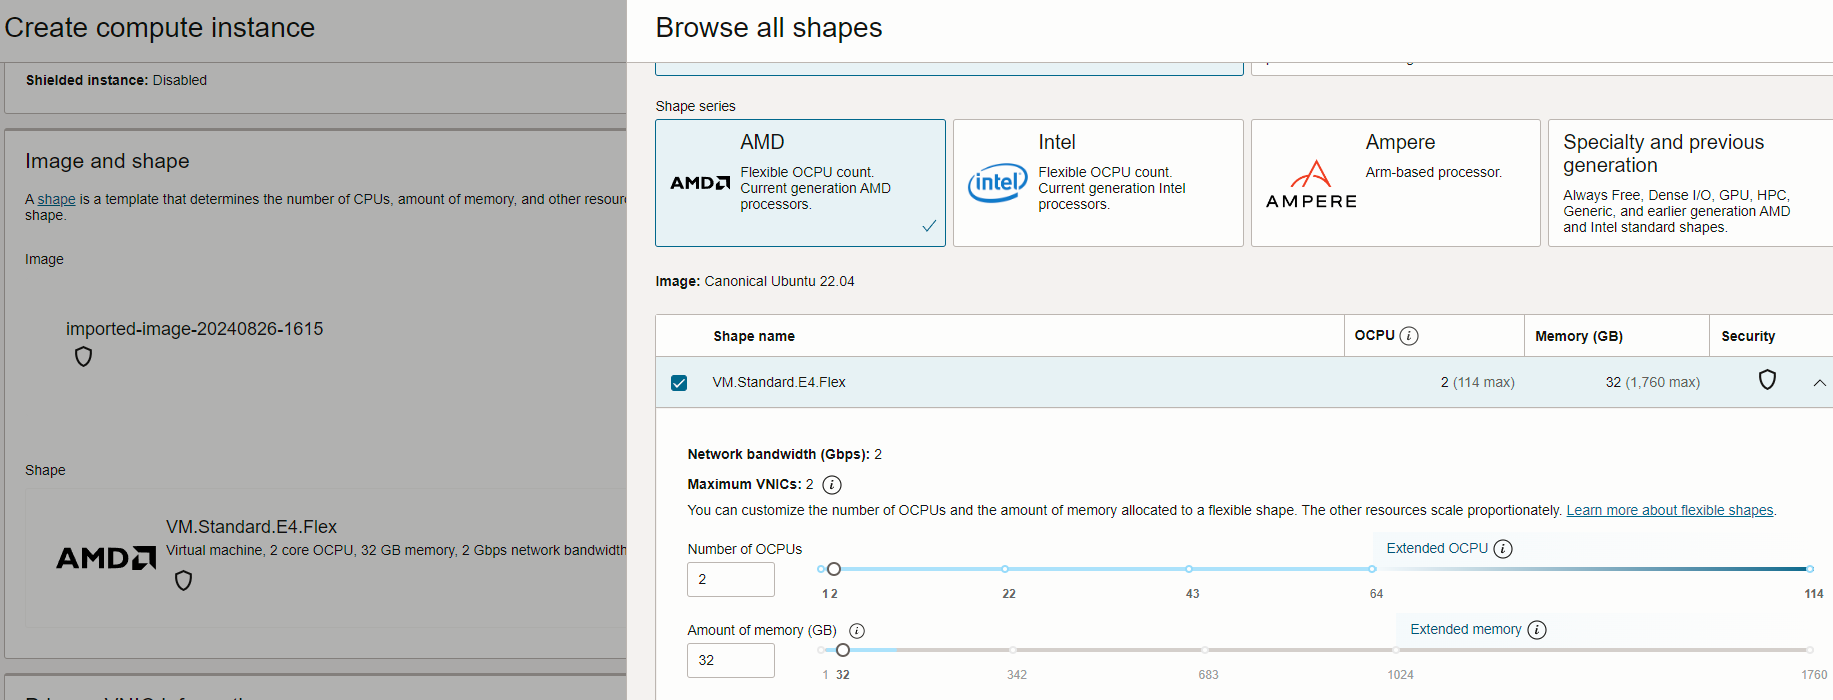
Click on the Select shape button to confirm your choice.
-
Leave the default values in the Primary VNIC Section. By doing so a virtual network and subnets will be created for you.
-
In the SSH Keys section, make sure you provide SSH keys so you can log into your instance. You may provide an existing public key if you have one, or generate new keys.
-
Click on the Create button to create the instance. The instance and the virtual network will be started, this will take a few moments.
-
-
Start Oracle Backend for Microservices and AI
-
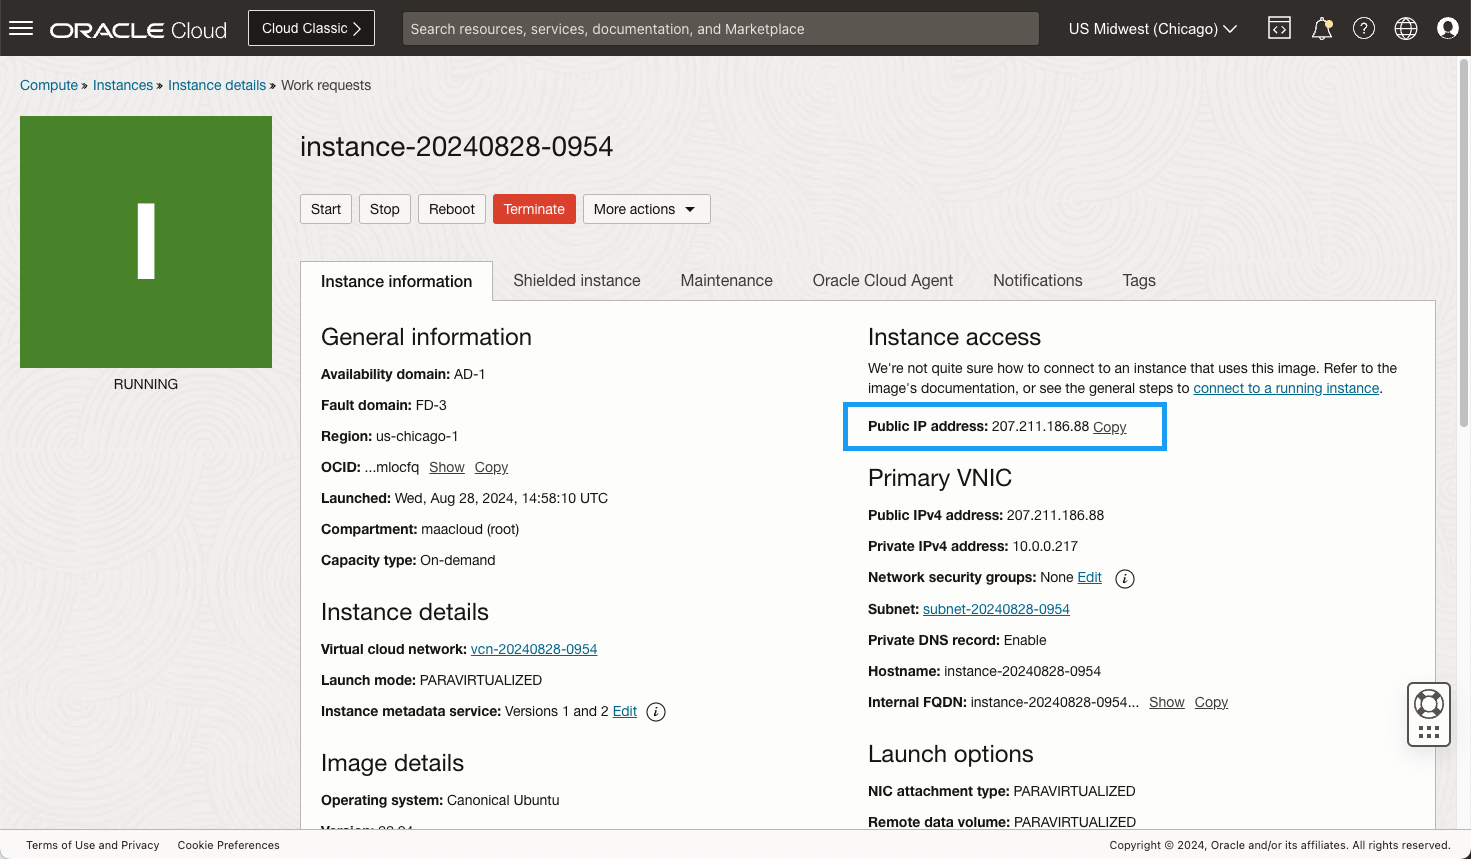
Note the Public IP Address of your newly created instance in the Instance access section of the Instance details page that is displayed.
-
Log into the compute instance using SSH, for example:
ssh -i <path and filename of private key> -L 8080:localhost:8080 ubuntu@207.211.186.88You will need to use the IP address of your instance in this command. Note that the example command also creates a port forward so that you will be able to access various endpoints from your local machine if you create a Kubernetes port-forward on port 8080 inside the instance.
-
You will be asked to confirm the authenticity of your SSH keys, enter
yes. -
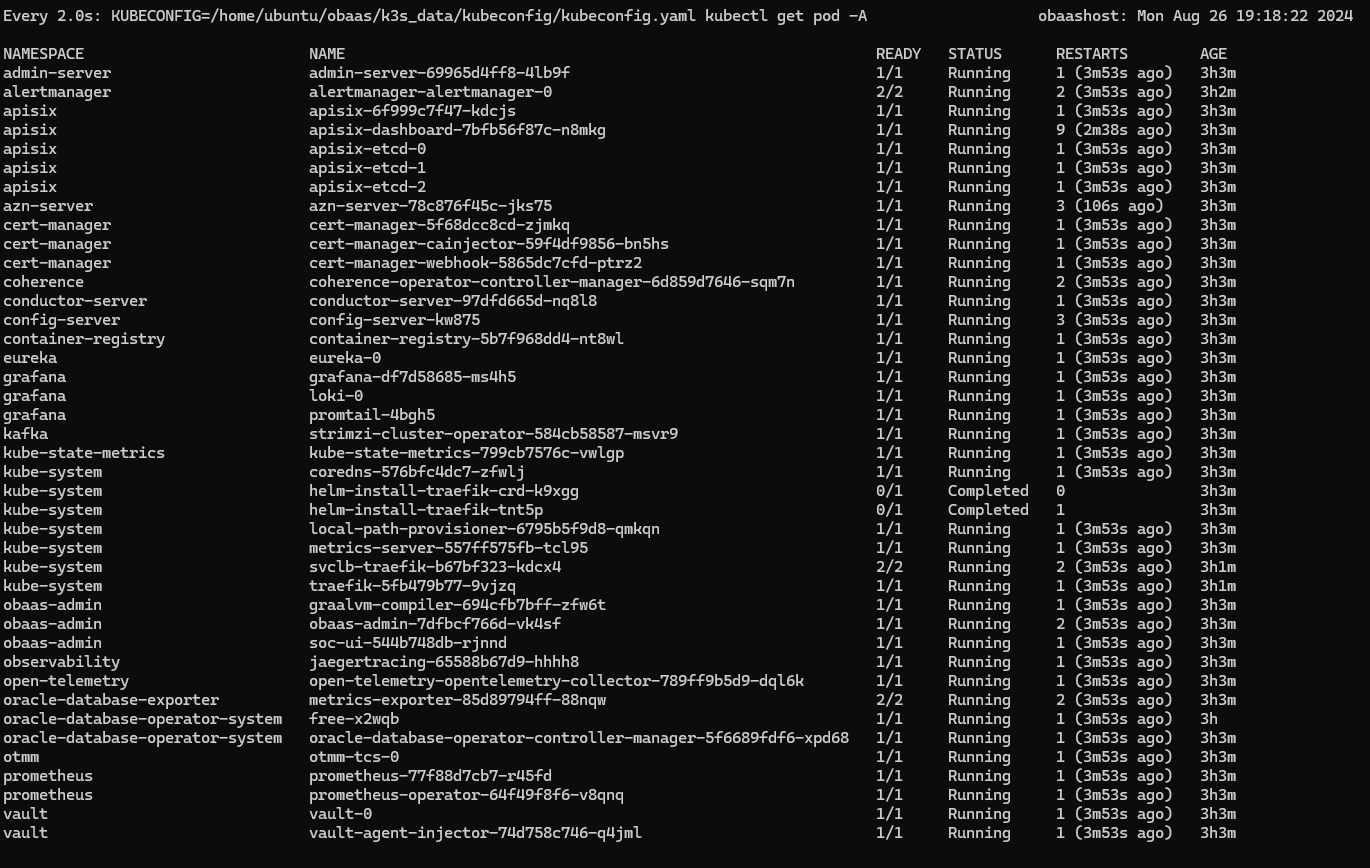
The environment will start automatically, including a Kubernetes cluster in a container (using k3s), Oracle Backend for Microservices and AI and an Oracle Database instance inside that cluster. It will take approximately six minutes for all of the containers to reach ready/running state. You can watch the progress using this command:
watch kubectl get pod -ANote: Should you require access to it, the
kubeconfigfile for your cluster is located at this location:/home/ubuntu/obaas/k3s_data/kubeconfig/kubeconfig.yamlWhen the environment is fully started, the output will appear similar to this:
-
-
Configure access to the instance from your local machine
-
On your local machine, open a browser and find your public IPv4 address using a service like ShowMyIP.
-
In the OCI Console, when viewing your compute instance, click on the link for the subnet in the Prinary VNIC section.
-
On the subnet page, click on the link for the Default Security List.
-
Click on the Add Ingress Rules button to create a new Ingress Rule.
-
Complete the form by specifying the Source CIDR. Make this as specific as possible, ideally just your one machine by specifying the IP address you just collected with the suffix
/32added. Set the Destination Port Range to443, and add a description if you wish. The completed form should look like this (in this example your machine’s IP address was1.2.3.4):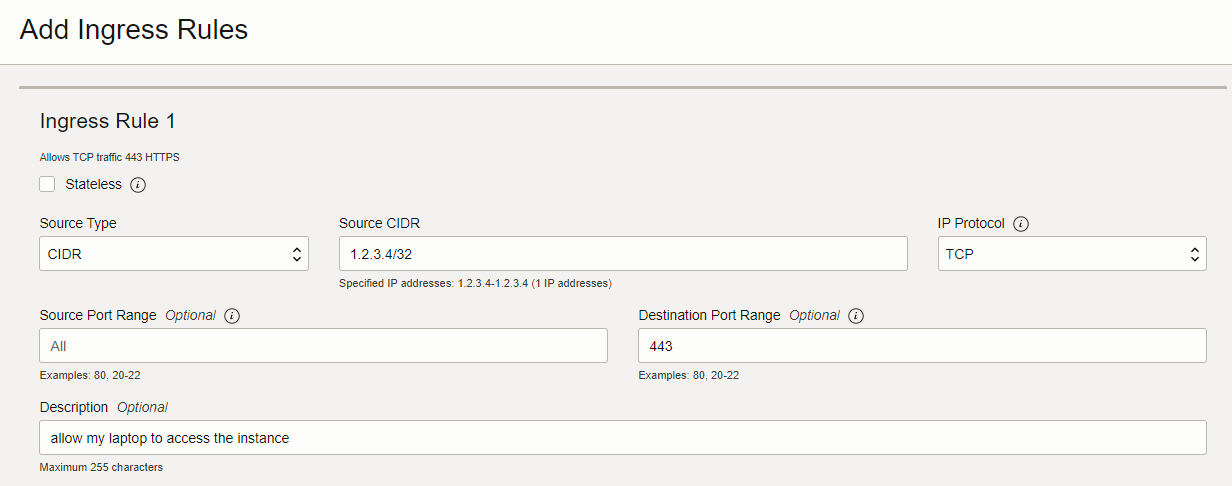
-
Click the Add Ingress Rules button to save the new rule.
-
-
Verify access to web user interfaces
-
On your local machine, open a browser and navigate to the Spring Operations Center using the IP address of your instance, for example, if you instance is
1.2.3.4, then the address will behttps://1.2.3.4/soc. -
Log in using the pre-defined user
obaas-adminand passwordWelcome-12345.
Note: Since this is a development environment with no DNS name, it is configured with self-signed certificates. Your browser will warn you about the connection security.
-
If you are using Chrome, click on the Advanced link and then the Proceed to localhost (unsafe) link. If you are using a different browser, perform the equivalent actions.
-
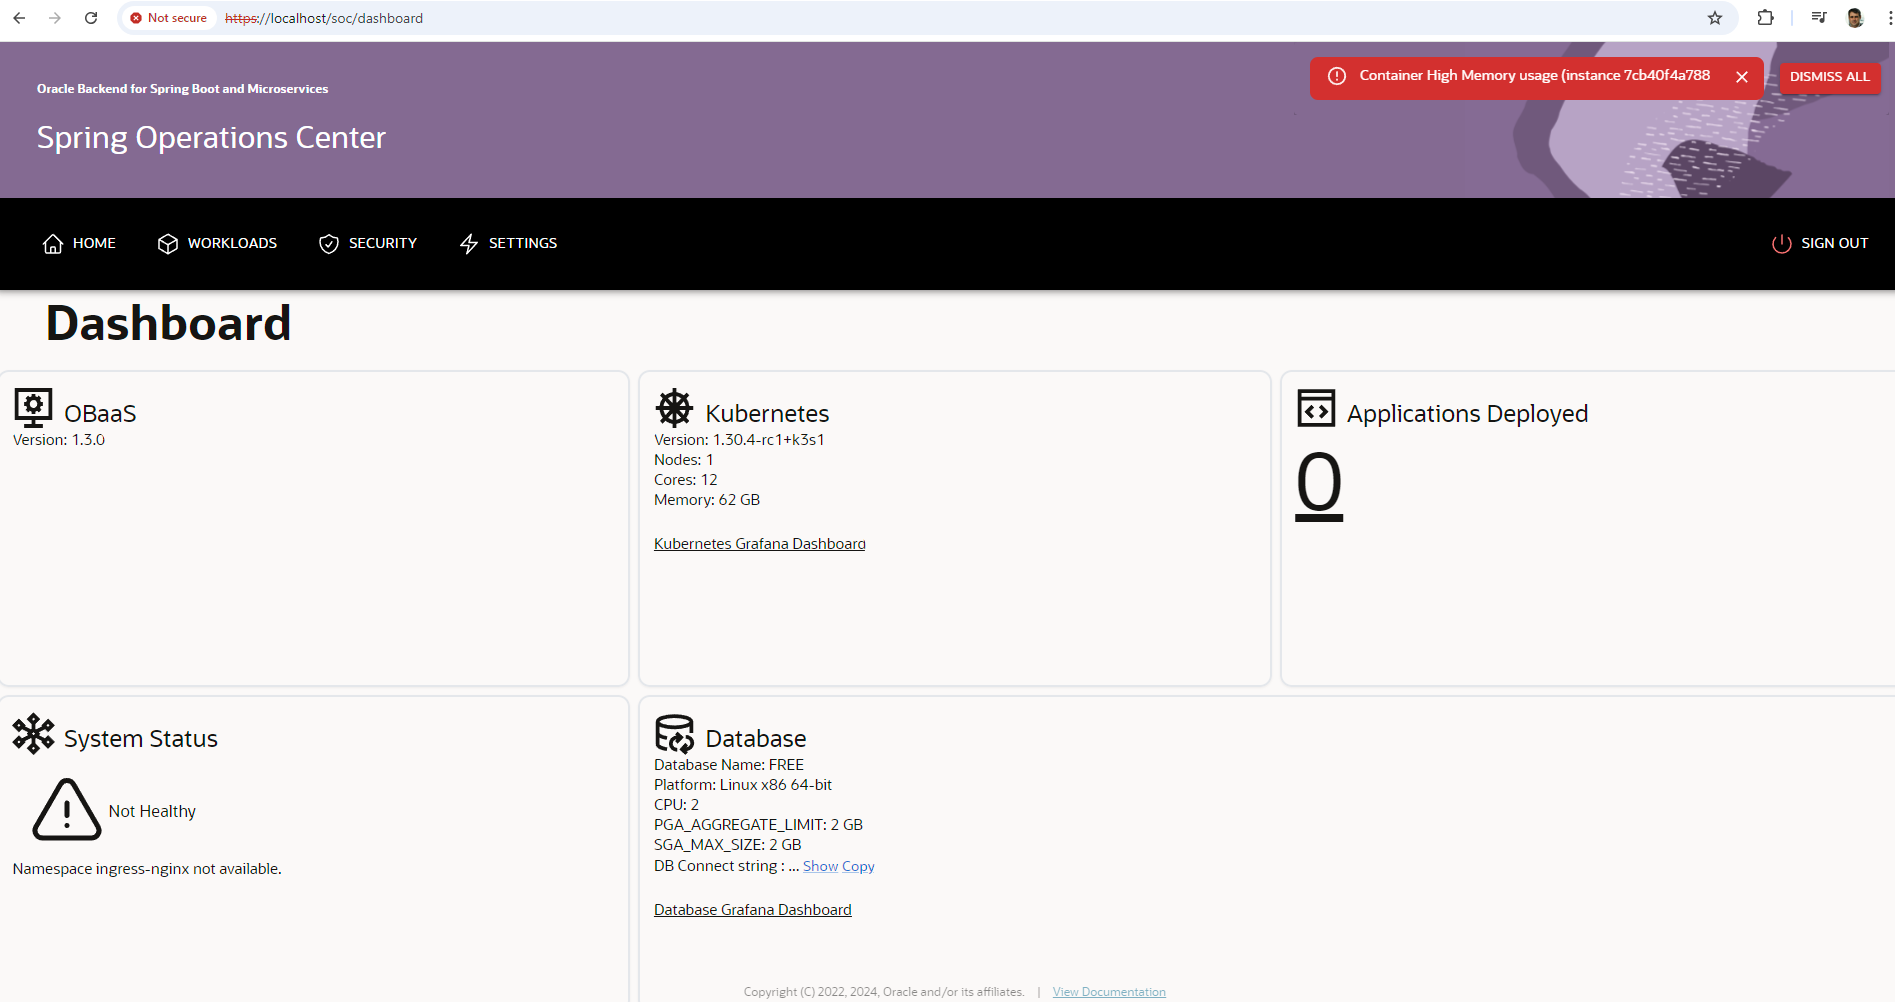
The Spring Operations Center main dashboard will appear similar to this:
-
-
DB Access & setup
-
Connect to your instance (using SSH), find the database pod with the following command:
kubectl get pods --all-namespaces.In the
oracle-database-operator-systemnamespace, look for a pods likefree-XXXX. -
Access to DB instance with the following command:
kubectl exec -it -n oracle-database-operator-system free-XXXX -- /bin/sh -
Login as sysdba to create the user
accountthat will be used in Module 3:sqlplus / as sysdba ALTER SESSION SET CONTAINER = freepdb1; CREATE TABLESPACE users DATAFILE '/opt/oracle/oradata/FREE/FREEPDB1/users.dbf' SIZE 100M AUTOEXTEND ON NEXT 10M MAXSIZE 500M; CREATE USER account IDENTIFIED BY Welcome1234## DEFAULT TABLESPACE users TEMPORARY TABLESPACE temp;
This step replaces the steps from 1 to 4 in the task Account Microservices/Prepare Database Objects.
In the step 5 of Prepare Database Objects, skip the command:create user account identified by "Welcome1234##";and execute all the rest, since the user account has been already created.If you need to access the db from an ssh connection, these are the commands to get
usernameandpassword:#to get <UID>: kubectl -n application get secret baas-db-secrets -o jsonpath='{.data.db\.password}' | base64 -d #to get <PWD>: kubectl -n application get secret baas-db-secrets -o jsonpath='{.data.db\.username}' | base64 -d #for pl/sql: kubectl exec -n oracle-database-operator-system free-<XXXX> -ti -- sqlplus <UDI>/<PWD>@localhost:1521/freepdb1 -
-
Kubernetes access from own desktop
-
On the compute node (logged in using SSH), execute the following command:
kubectl config view --minify --context=default --flatten > /home/ubuntu/context-config.yaml -
download the YAML configuration file on your desktop in <YOUR_DIR>, using
scpwith the reference to <YOUR_PRIVATE_KEY.key>:scp -i <YOUR_PRIVATE_KEY.key> ubuntu@<VM_IP>:/home/ubuntu/context-config.yaml <YOUR_DIR>/context-config.yaml -
In the
context-config.yamllocate theserverentry:... - cluster: certificate-authority-data: LS0tLS1CRUdJTiBDRVJUSUZJQ0FURS0tLS0tCk1JSUJlRENDQVIyZ0F3SUJBZ0lCQURBS0JnZ3Foa2pPUFFRREFqQWpNU0V3SHdZRFZRUUREQmhyTTNNdGM... server: https://127.0.0.1:6443 name: default ...and change with <YOUR_DIR>.
-
Add an Add Ingress Rules in the VCN security list belonging with your VM for the
6443port, to allow thekubectlconnection from your desktop. -
On your desktop create an alias, to use the downloaded context to connect the remote Kubernetes, resolving the certificate issue:
alias k='export KUBECONFIG=<YOUR_DIR>/context-config.yaml; kubectl --insecure-skip-tls-verify'In this way, any other
kubectlcommands in the rest of documentation can be executed as well, simply replacingkubectlwithkif you are using the provisioning procedure shown so far.
-