Introducing WebLogic Remote Console 3.x!
WebLogic Remote Console 3.0.3, the general availability (GA) release of WebLogic Remote Console 3.x, is now available!
Refer to the current documentation for the latest information.
WebLogic Remote Console 3.0.0, 3.0.1, and 3.0.2 releases were made available as technical previews for testing purposes only. You should now use release 3.0.3 or later.
WebLogic Remote Console 3.x is a substantial design update that delivers significant usability improvements to WebLogic Remote Console.
We’ve also made considerable cosmetic updates in 3.x. MBeans and their configurations remain in the same places, they just look a little different. You can continue to refer to the documentation for the latest GA release of WebLogic Remote Console for guidance on how to administer your domains.
To help you understand what has changed, we’ve outlined some of the major functional differences below.
Key Differences Between 2.x and 3.x
-
Enhanced Project management: Project management has been moved out of the File menu into its own dedicated page where you can add, edit, and delete projects and their constituent providers.
-
Improved Provider management: The Providers drawer has been re-imagined as a dedicated page where you can see all of the providers (and their details) in a project at a glance. You can add, edit, delete, and sort providers from this page.
-
Changes to Change Management:
- Improved Shopping Cart: Pending changes are now visible in a dialog box where you can see where the change was made and the old and new values.
- Change indicators: Configurations with non-default values are now marked by a green bar to the left of the field. Previously, changes were indicated by a black outline.
- Unsaved changes: WebLogic Remote Console no longer warns you when you try to leave a page that has unsaved changes. Previously, WebLogic Remote Console would ask you to confirm whether to save or discard your changes before letting you navigate away.
-
Clearer and sharper icons: Icons throughout WebLogic Remote Console have been updated to more clearly convey their functions. See Page Icons and Field Icons.
- Rearranged tool bar icons: Tool bar icons have been shifted around to better group functionality and workflow.
-
New-ish Field Settings button: This button allows for more granular editing of field values. It opens a separate dialog box where you can edit values, review lengthy field values, or revert existing values to their default values (that is, “unset” them). The Field Settings button will be familiar to users who managed WDT model files in WebLogic Remote Console.
-
Consolidated Navigation Tree: The NavStrip and Navigation Tree have been combined into a single panel, allowing you to switch between perspectives more intuitively.
-
More sophisticated Breadcrumb navigation: Move up, down, and across nodes of WebLogic Remote Console. Use the breadcrumb trail to not only help you understand your position within the domain, but to move through it.
Each breadcrumb in the trail is clickable so you can move up levels in the hierarchy, or you can click the dropdown menu beside the final breadcrumb (aka the current page) to jump to its child nodes or to its related pages in different perspectives.
-
Dark Mode!: /
In order to release the best possible product for general availability, we’re asking you to try out WebLogic Remote Console 3.x and tell us what you think.
If you want to give feedback, you can do so by:
-
Leaving a comment in the #remote-console Slack channel.
-
Opening an issue in the WebLogic Remote Console GitHub repository that describes your issue. Make sure to include your environment details (OS, JDK, WebLogic Server) and any relevant logs.
Connecting to a Provider
- Open WebLogic Remote Console.
- Click Create and choose a Provider type. See Provider Types.
- Fill in the necessary connection information. For more detailed steps:
- For an Admin Server Connection Provider, see Connect to an Administration Server.
- For a WDT Model File Provider, see Create a WDT Model File or Upload a WDT Model File.
- For a WDT Composite Model Provider, see Create a WDT Composite Model.
- For a Property List Provider, see Create a Property List.
- Click Done to save the provider.
- Click Connect/Activate.
-
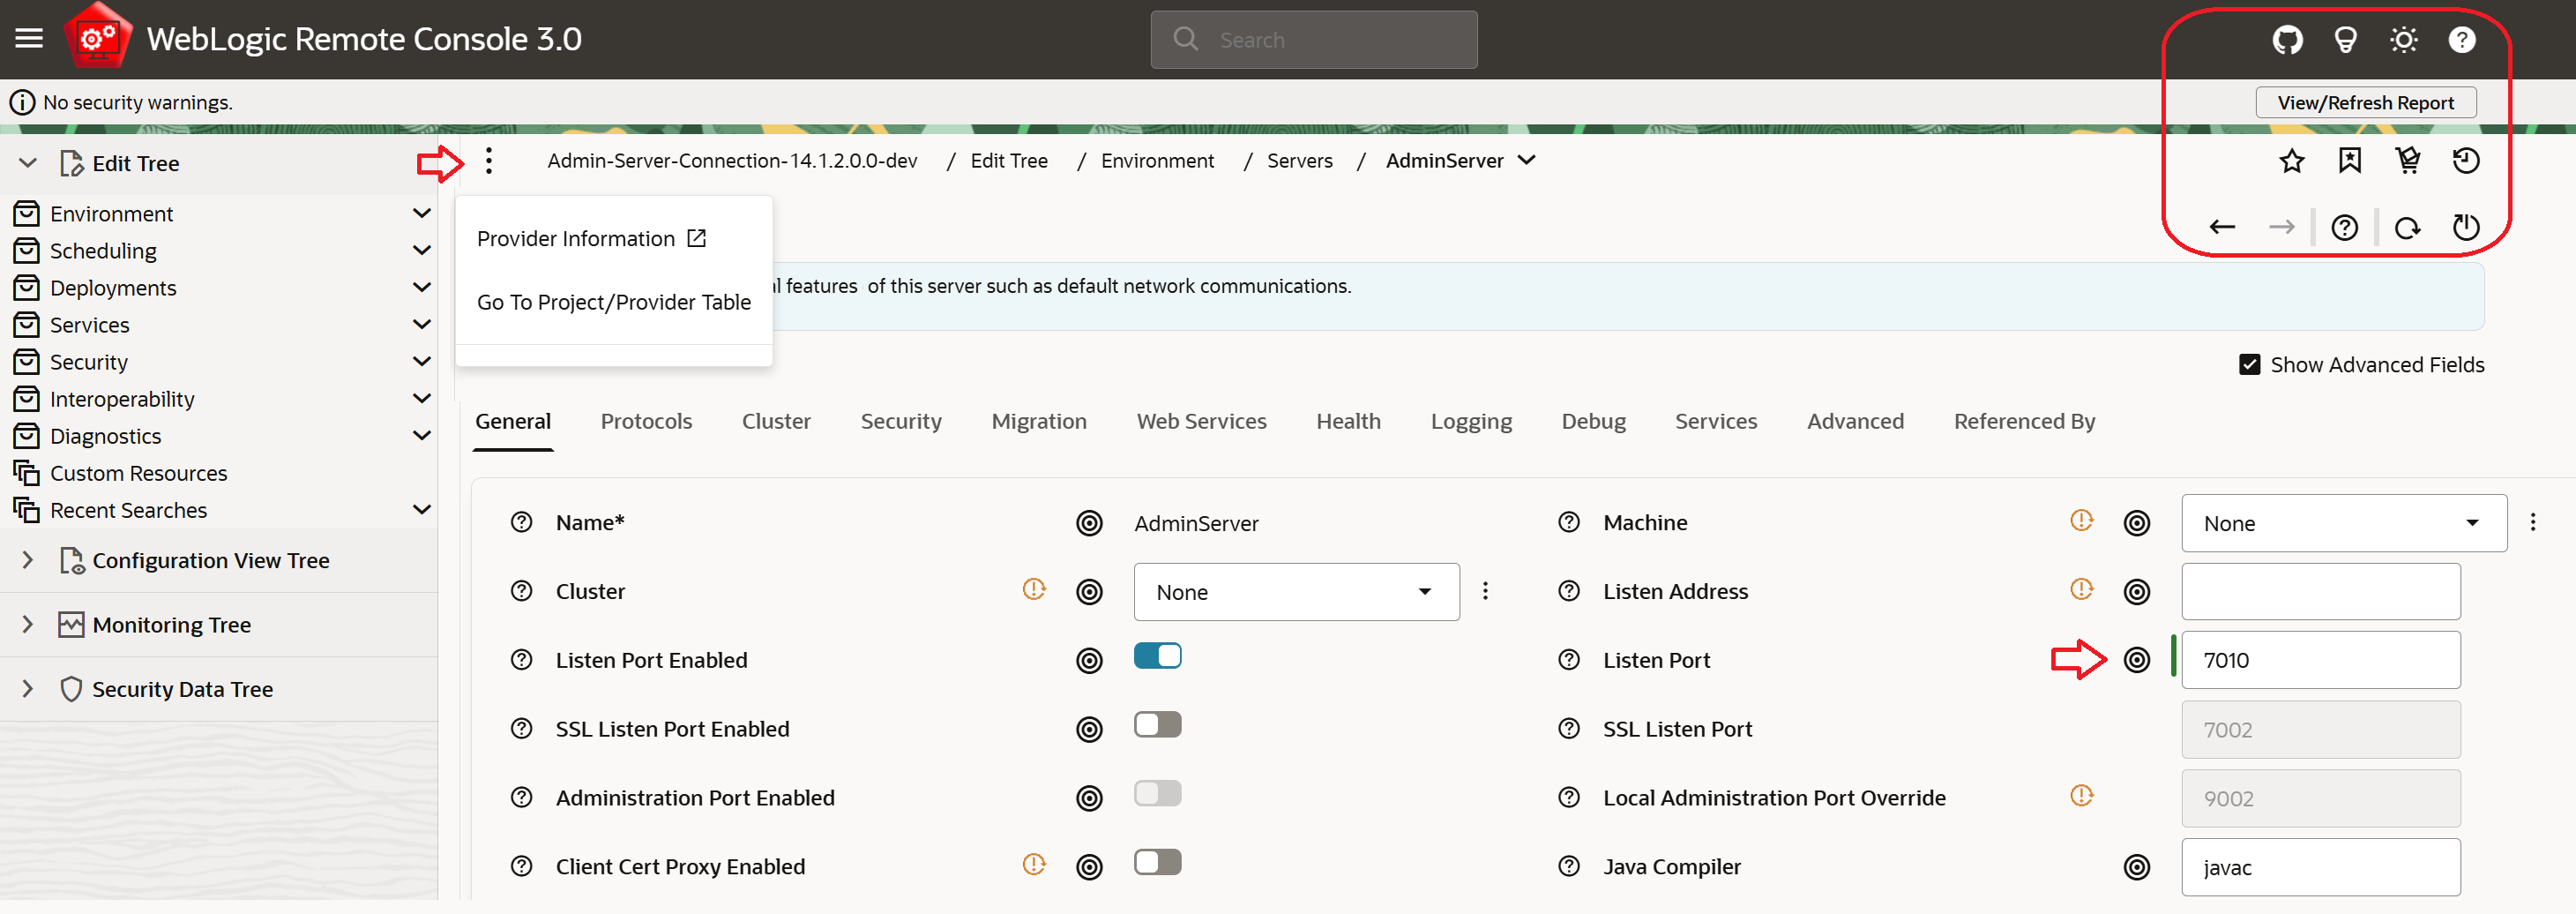
If you want to see the current provider’s details, click the Kebab menu beside the breadcrumb navigation and then click Provider Information. A dialog box with the provider’s details will open.
-
If you want to edit a provider’s details, click the Kebab menu beside the breadcrumb navigation and then click Go to Project/Provider Table. Select the provider you want to edit. After making your changes, click Save.
Page Icons
| Icon | Usage |
|---|---|
| GitHub - Opens the WebLogic Remote Console GitHub repository in your browser. | |
| User Tips - Provides tips on WebLogic Remote Console functionality. | |
| / | Dark/Light mode - Switches between Light and Dark modes. |
| User Help - Opens the WebLogic Remote Console user documentation in your browser. | |
| Add Bookmark - Saves the current page as bookmark so you can quickly refer to it later. | |
| Page Bookmarks - Opens a dialog box that lists all of your saved pages. | |
| Shopping Cart - Lists any pending changes in the active Administration Server provider. You can choose whether to commit or discard them. | |
| Show Pages History - Opens the Pages History dialog box, which lists the pages that you have previously visited in WebLogic Remote Console. | |
| / | Back/Forward - Browses backward or forward through your previously visited pages in WebLogic Remote Console. |
| Inline Field Help - Shows reference information about the attributes present on the current page. Click again to return to the editable fields. | |
| Reload - Refreshes any forms or tables on the current page with the latest available data. When Auto Reload Interval is enabled, this icon will bounce continuously. | |
| Auto-Reload Interval - Sets a time interval (in seconds) for how often WebLogic Remote Console should reload a page to refresh its information. If you select another tab or move to another page, automatic reload stops.To stop auto reload, click the bouncing Reload icon or click Auto Reload Interval and set the interval to 0. |
Field Icons
| Icon | Usage |
|---|---|
| Field Settings - Opens a dialog box where you edit values, review lengthy field values, or revert existing values to their default values (that is, “unset” them). | |
| | | Change Indicator - Indicates that the current value of the marked field differs from the default value. |
Managing Projects
You can use projects to organize your providers in a way that makes sense for your workflow.
-
While in a provider, click the Kebab menu beside the breadcrumb navigation and then click Go to Project/Provider Table.
The Project/Provider table lists all provider connections in a project and is your central place for managing providers in the project. For the current project you can also add more providers, edit existing providers, connect to a different provider, re-order providers, and delete providers.
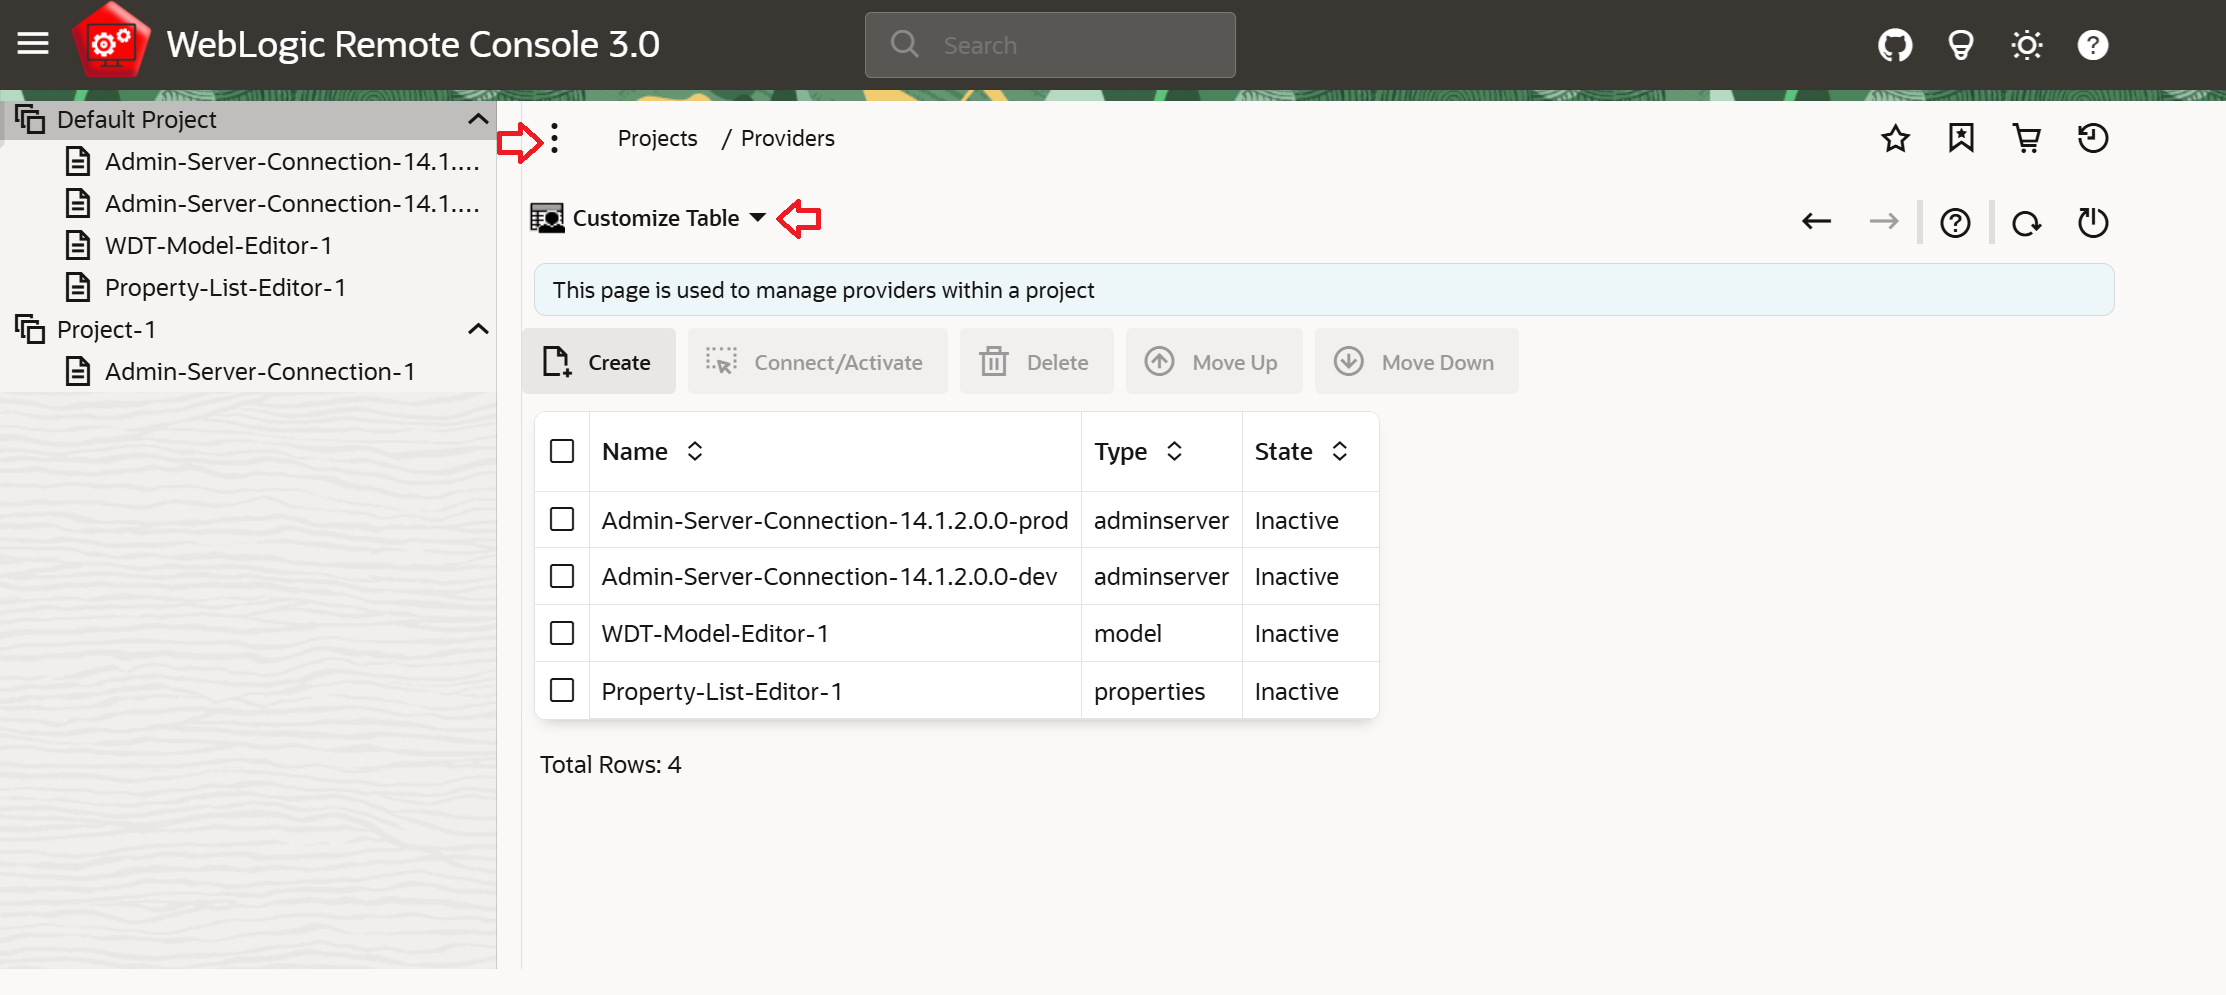
Tip: Use the Customize Table menu to control which columns are visible in the Provider Details table.
-
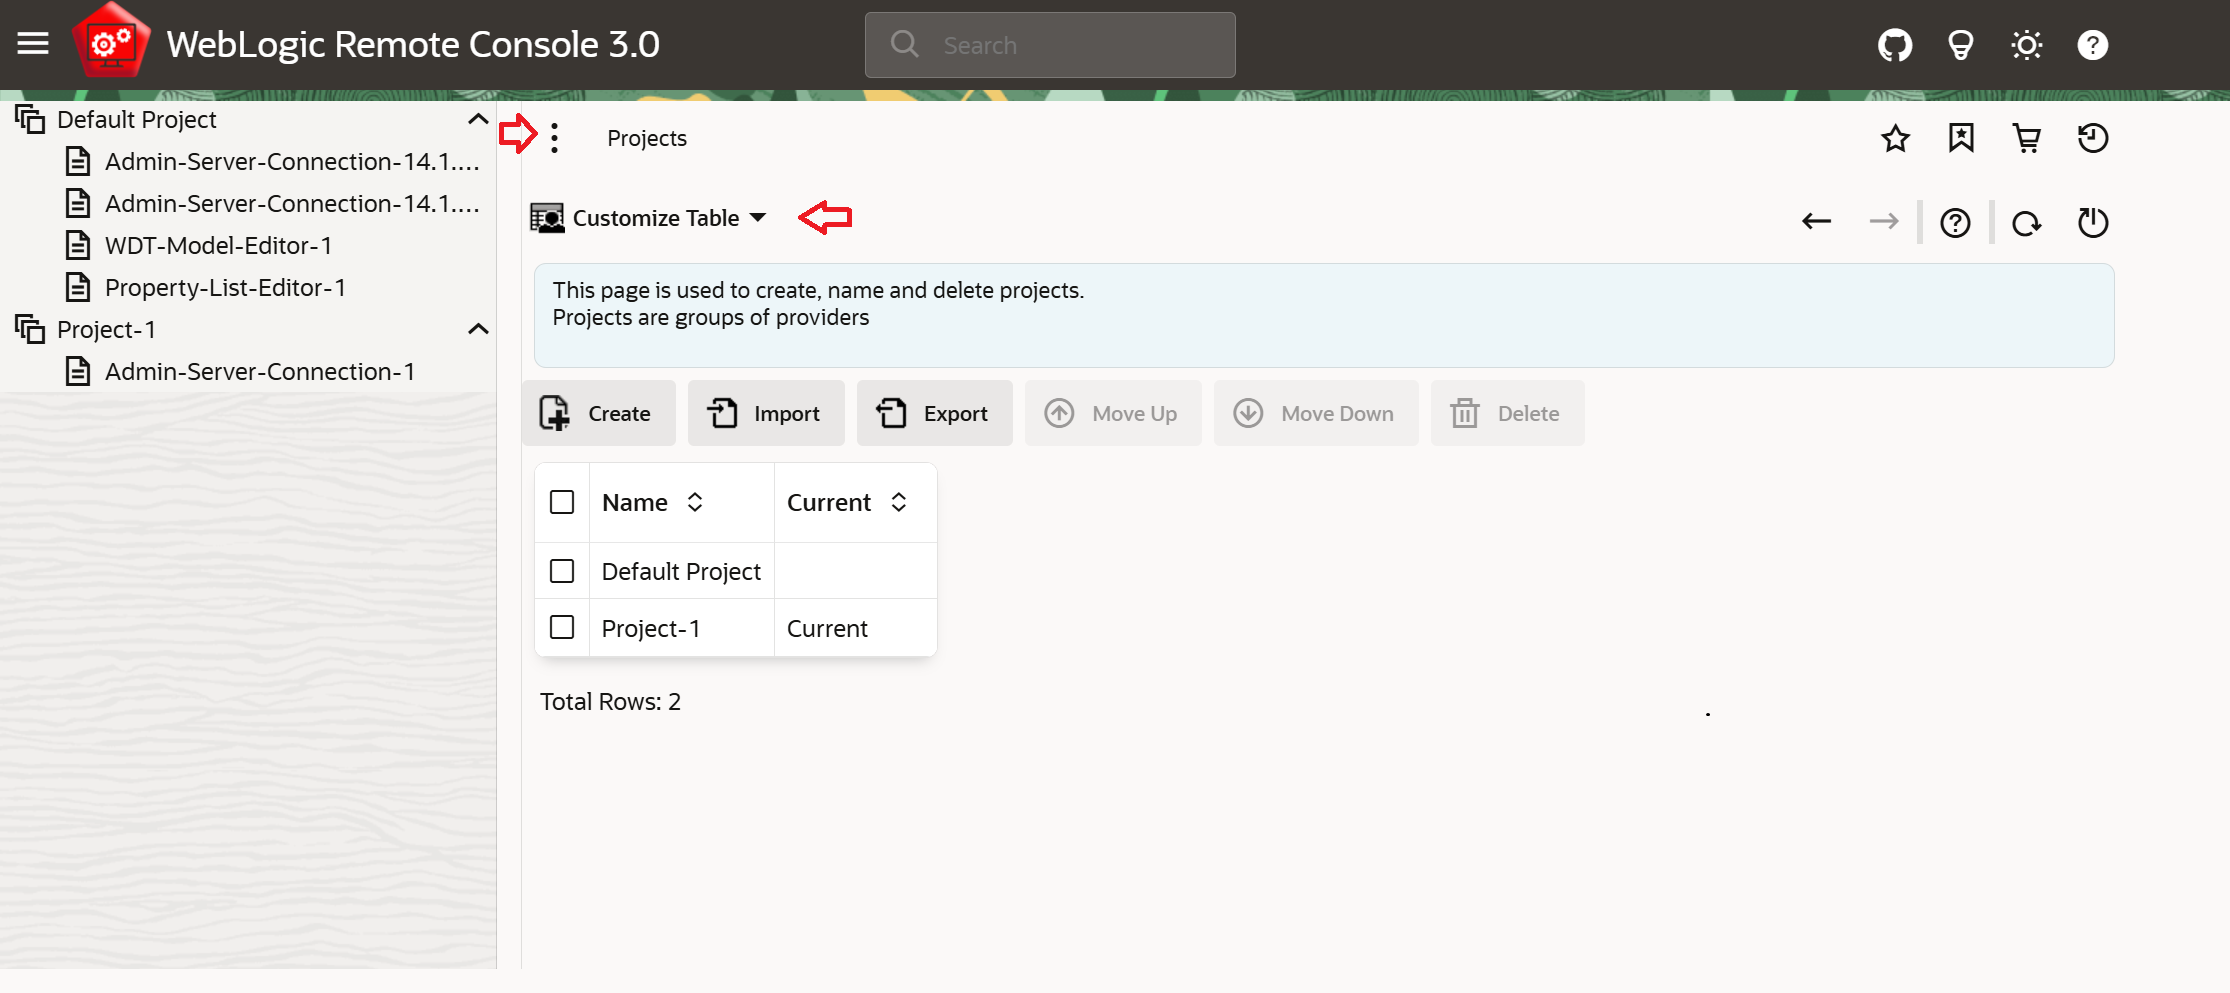
In the breadcrumbs trail, click Projects.
-
Click Create to create a new project.
You can also import or export a project (and its provider connection details) from the Projects page.
-
Select the new project and then click Create to add a provider to the project.
To switch between projects, return to the Projects page by clicking Projects in the breadcrumb trail and then selecting a different project.
To get back to the active provider (or switch to another provider in the project), select the project that contains the active provider, then, in the Project/Provider table, select the active provider. Click Connect/Activate.