![]()
Setting up your Cloud Tenancy
Introduction
Estimated module duration 20 mins.
Objectives
This module takes you through the process of setting up your tenancy to fit the lab instructions, creating a database and a development virtual machine to use in the coding parts of this lab. You only need to do this setup once in your tenancy.
Prerequisites
You need to an Oracle Cloud tenancy, with either full admin rights (For example a trial tenancy) OR if you have a tenancy but not full admin rights you need a existing compartment (ideally called CTDOKE to match the instructions) with full admin rights in that compartment.
Setup needed
This page explains all the steps to set up your Oracle Cloud Tenancy so you are ready to run the labs. Because participants can use different types of tenancies, not all steps need to be executed by everybody. In the situation that you are using a new Oracle Free Tier or Trial tenancy environment, you are probably starting from an “empty page” and will most likely have to execute all the steps below. If you are using an existing paid tenancy then you may need to get the tenancy administrator to create a compartment, create security roles with the appropriate policies and to assign your user to that role.
If you are attending an instructor-led lab, your instructor may have been able to arrange to have some steps complete to speed the lab up, if so they will detail steps you need to execute and which ones you can skip.
While we strongly recommend running the lab in the virtual machine we have built, running on the Oracle Cloud Infrastructure, if you do not want to use this VM and are willing and able to re-create the configuration of the virtual machine on your own computer (and adjust the labs content to reflect your differing environment as you go through it) there are some guidelines here
Self guided student - section video introduction
This video is an introduction to this section of the lab. Once you've watched it please press the "Back" button on your browser to return to the labs. [](https://youtu.be/fxrOnJjCLBc "Lab preparation introduction video") ---Step 1: Create the CTDOKE compartment
If you are in an instructor led lab the instructor may have already done this step for you, if so they will tell you.
-
Click the “Hamburger” menu (three bars on the upper left)
-
Scroll down the list to the Governance and Administration section
-
Under the Identity option chose Compartments
-
You should see a screen that looks like this :
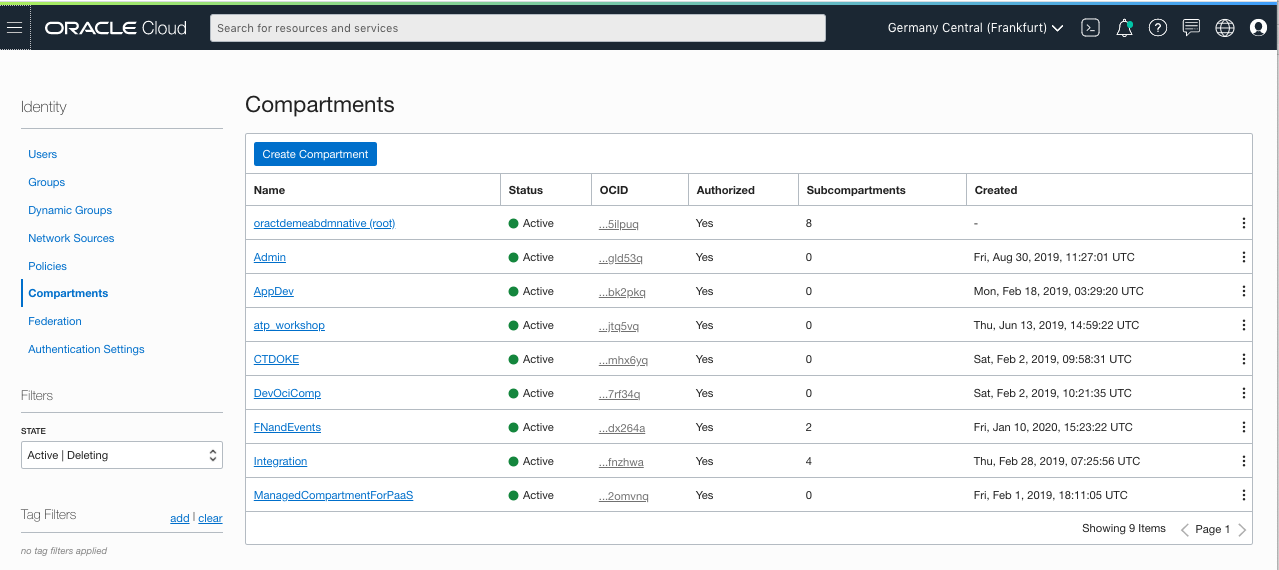
ATTENTION : if the compartment CTDOKE already exists, please move to the next step on this page, Importing the image for the development vm
If the CTDOKE compartment is not yet there, create it as below, if it it there jump to the Creating the VM IMage step :
-
Click the Create Compartment button
-
Provide a name, description
-
Chose
Rootas the parent compartment -
Click the Create Compartment button.
Step 2: Creating the VM Image
If you are in an instructor led lab the instructor may have already done this step for you, if so they will tell you.
Step 2a: Accessing the marketplace
-
Download the image location file from here
-
In the file you just downloaded locate the Cloud Market place URL - this will be something like
https://cloudmarketplace.oracle.com/marketplace/listing/123456(this is an example, it won’t work) -
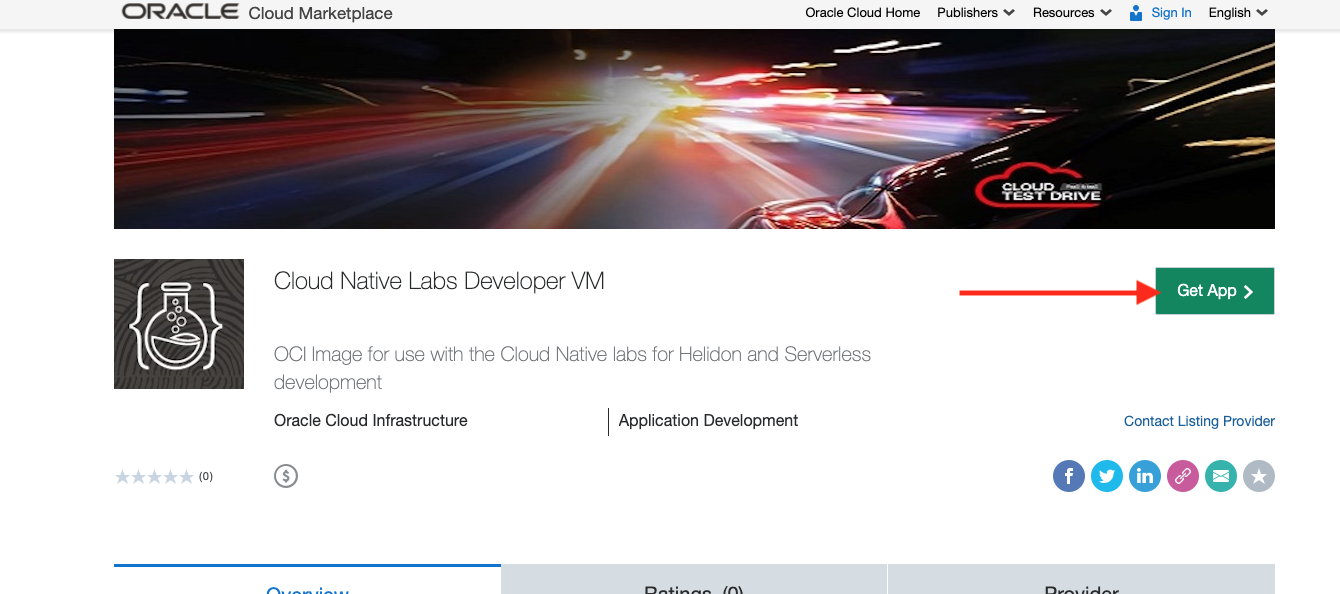
Open the Cloud Marketplace URL in a new web browser tab / window.
-
Click the Get App button
-
In the Install Application page chose the region you are using
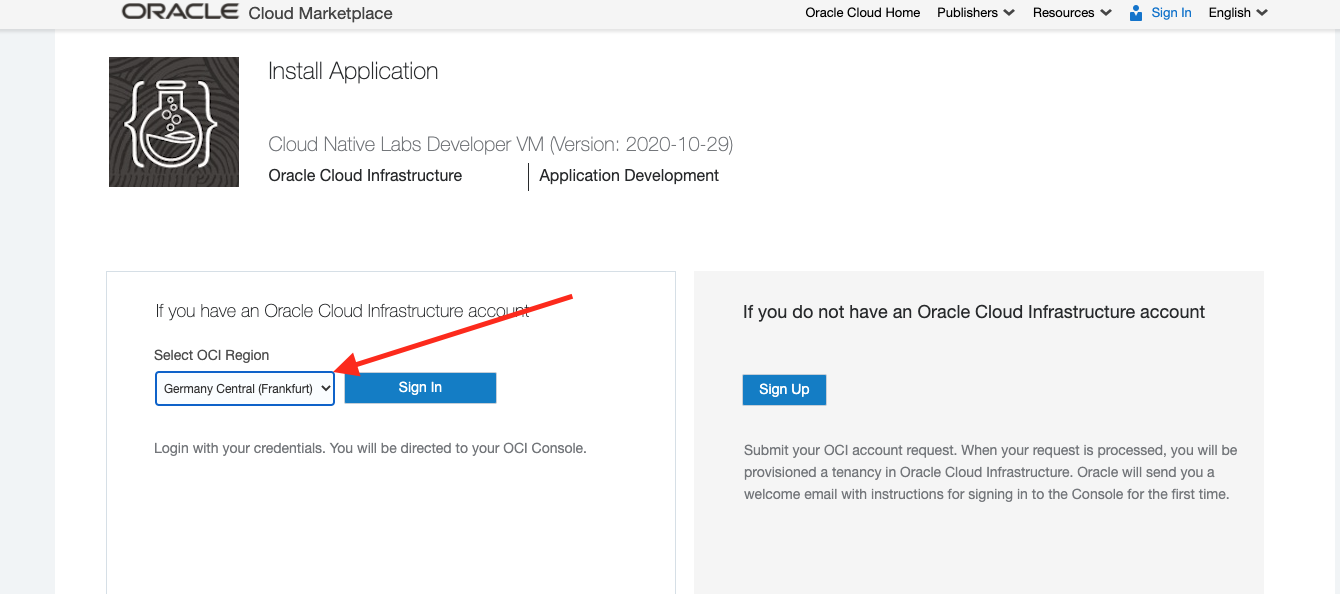
I chose Frankfurt, but yours may vary
If you don't know your region
In your OCI Console UI page look at the upper right, you will see something like this  In this case for my tenancy I'm in the Germany / Frankfurt region, but if you are using a different region it will show up there.-
Click the Sign in button
-
If prompted complete your OCI Cloud UI sign in, if you are not prompted do not worry.
-
In the Marketplace install page make sure that the Version matches the Version in the Image location file (In this image that’s 2020-10-29, but if we have released an updated image then the version will be more recent.)
-
Make sure that the Compartment matches the compartment you are using (probabaly
CTDOKE) -
Review the “Oracle Standard Terms and Restrictions”, then (assuming you do agree) click the I have reviewed and accept the Oracle Standard Terms and Restrictions. check box.
-
Once you’ve clicked the checkbox the Launch Instance button will be enabled. Click it.
A new browser window / tab may be opened
Step 2b: Creating the instance
-
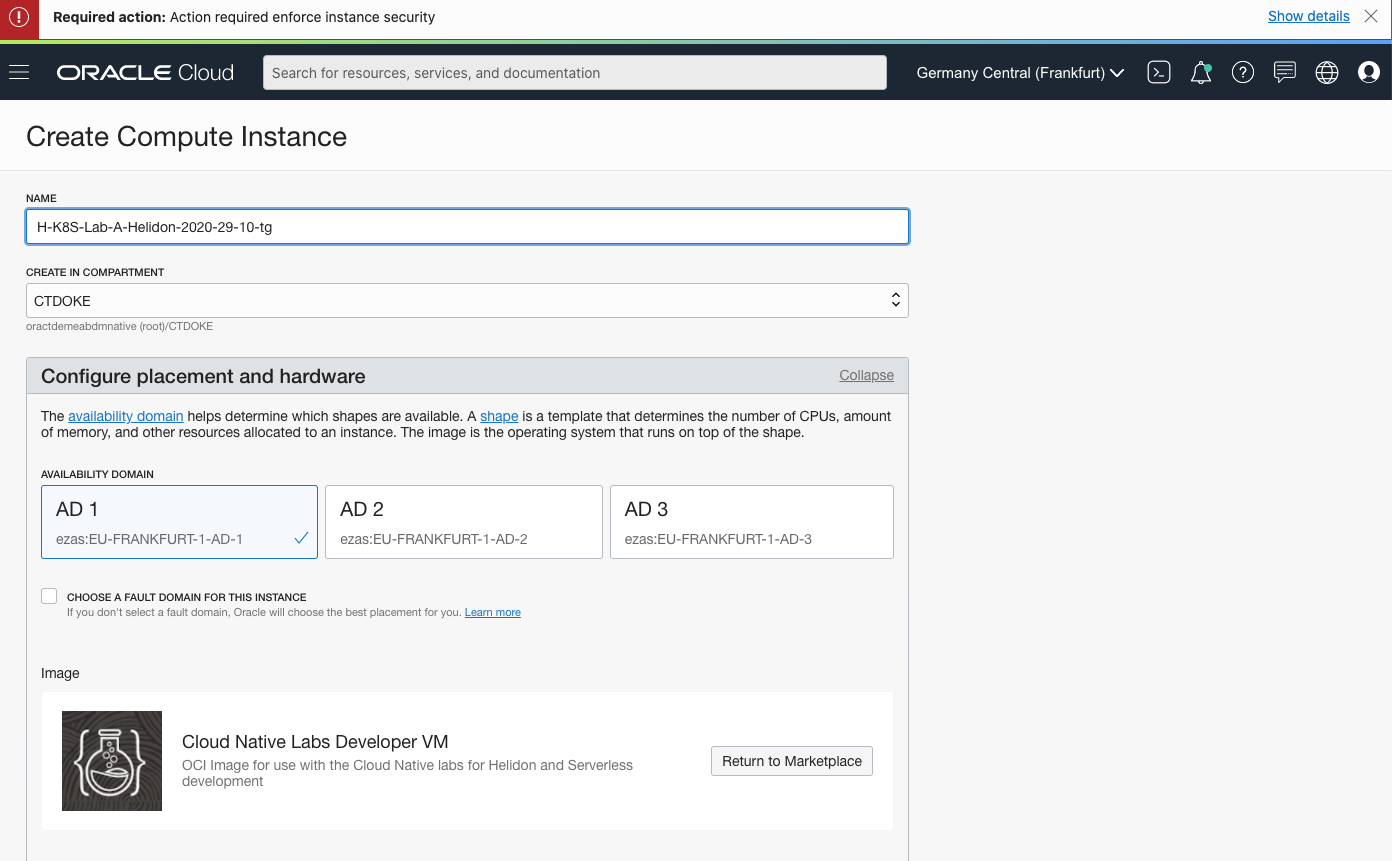
Name the instance based on the image version so you can track what version of the lab you are following. If multiple people are sharing the same tennacy you may want to put your initials in there as well e.g.
H-K8S-Lab-A-Helidon-2020-29-10-tg -
The Create in compartment should already be set to
CTDOKE. -
Expand the Configure placement and hardware selection if it’s not visible
-
Select an Availability domain (Which one doesn’t matter)
-
If
VM.Standard.E3.Flexwith 1 OCPU and 16GB memory is not the selected instance shape click the Change shape button, set the Instance type to Virtual machine, the Processor to AMD Rome and the OCPU count to1(This will set the memory for you) Then click Select shape to use this shape. (You can chose other shapes if you prefer, just at the time of writing this was the most cost effective)
-
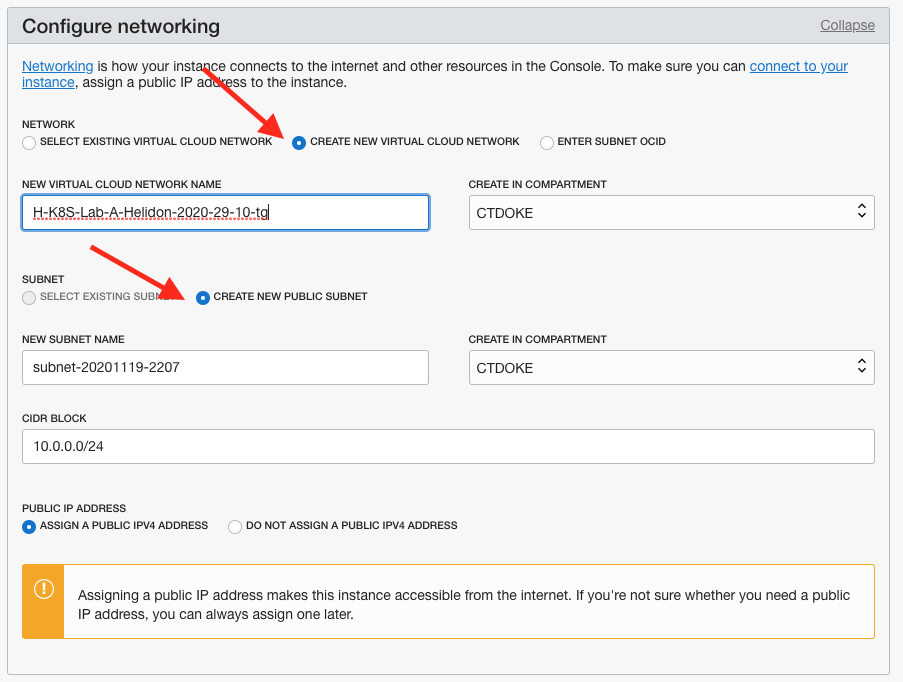
Expand the Configure networking section if it’s not already expanded
-
Select the Create New Virtual Cloud Network option
-
Name the network to match the name you gave to the instance
-
Select the Create new public subnet option. (You can ignore the subnet name)
-
Set both the Create in compartment fields to
CTDOKE -
Check the Assign a public IP address option is selected
-
Scroll down to the Add SSH Key section
-
Make sure the Generate SSH Key Pair option is selected
-
If you wish you can download the ssh keys by clicking on the buttons (This is not required as we will be using VNC to access the instance)
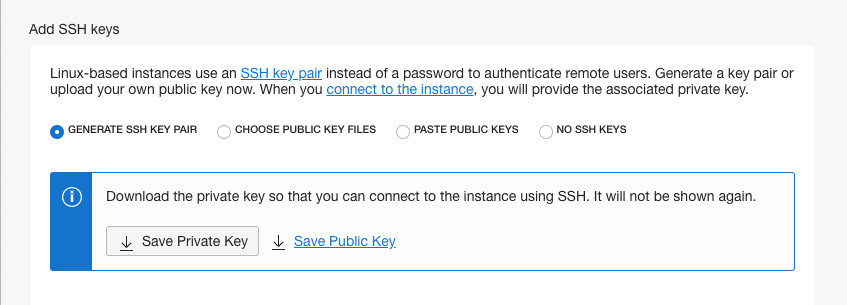
- Leave the boot volume settings unchanged (On some newer versions of the UI this may be below the SSH keys section, but you still don’t change it)
You have finished the wizard!
-
Click the Create button on the bottom of the wizard to initiate the creation.
-
If you get a No SSH Access warning you can ignore it, just click Yes, Create Instance Anyway
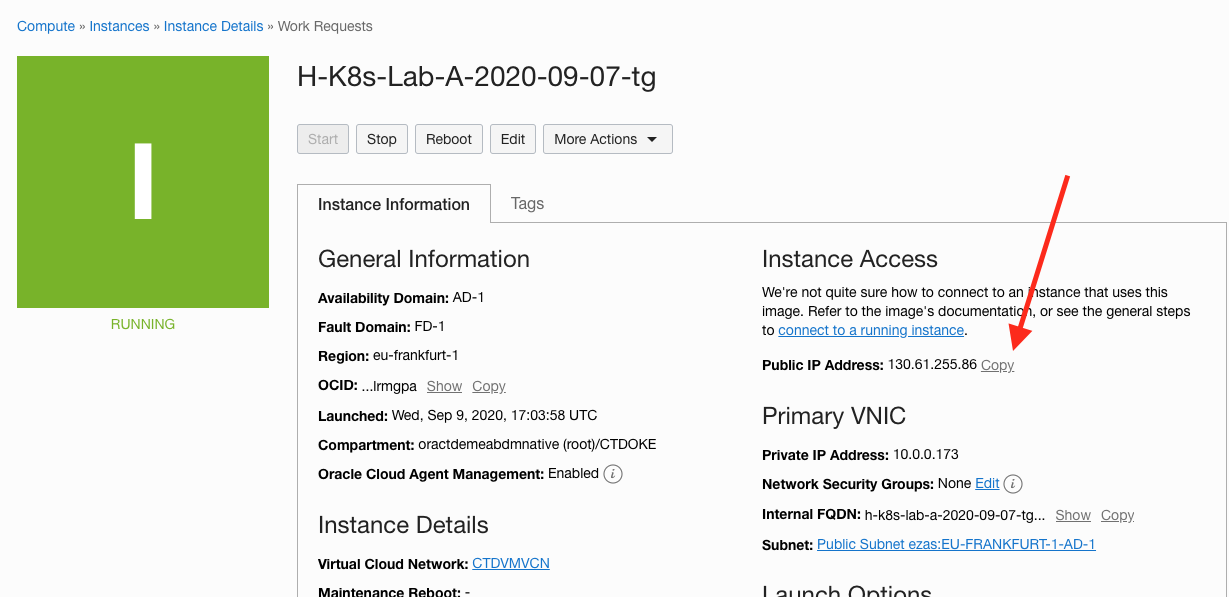
Once the create button has been clicked you will see the VM details page. Initially the state will be Provisioning but after a few minutes it will switch to Running, and you will see that a public IP address has been assigned. Make a note of that IP address (The copy link next to it will copy the address into your computers copy-and-paste buffer.)
While it’s starting you can work on the next step
Step 3: Adding an OCI ingress rule for VNC
If you are in an instructor led lab the instructor may have already done this step for you, if so they will tell you.
You need to be sure that the Virtual Cloud Network supports remote access using VNC.
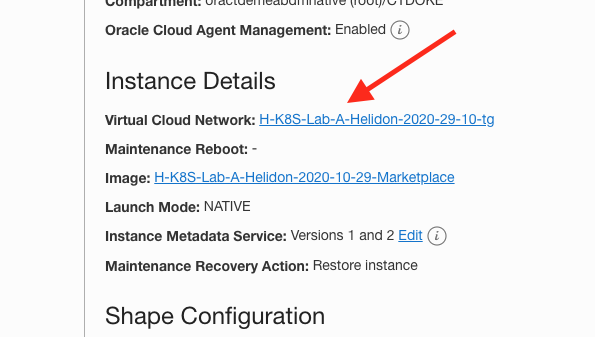
- Go to the VCN you created earlier, click the VCN name in the instance details page, I named mine
H-K8S-Lab-A-Helidon-2020-29-10-tg
-
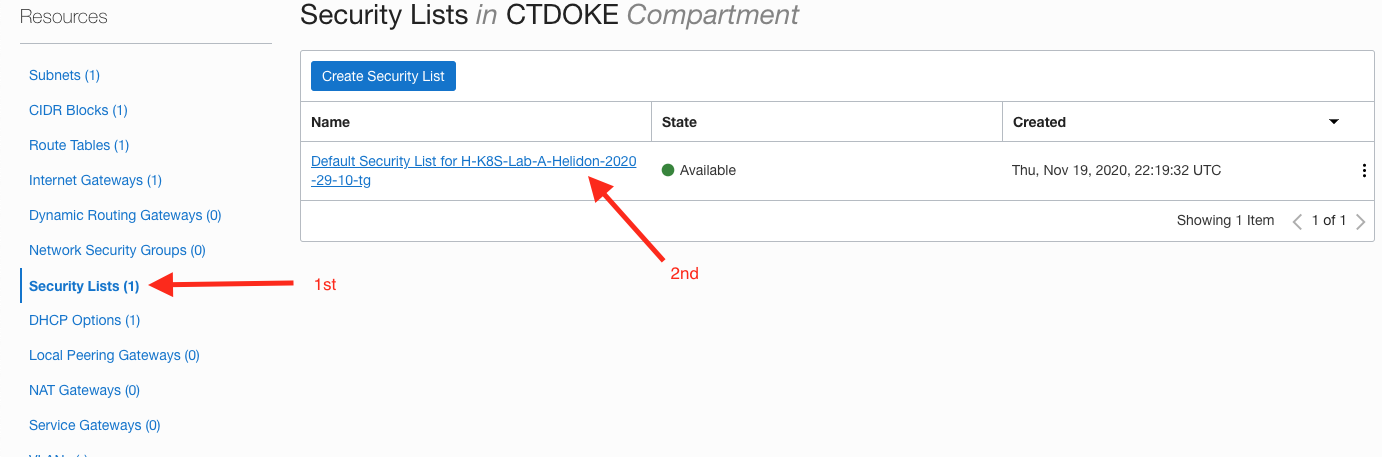
On the VNC page on the left hand side click the Security Lists option
-
Click on the security list in the list, If there is more than one chose the one with a name something like
Default Security List for H-K8S-Lab-A-Helidon-2020-29-10-tg(don’t select the private subnet one if it’s there)
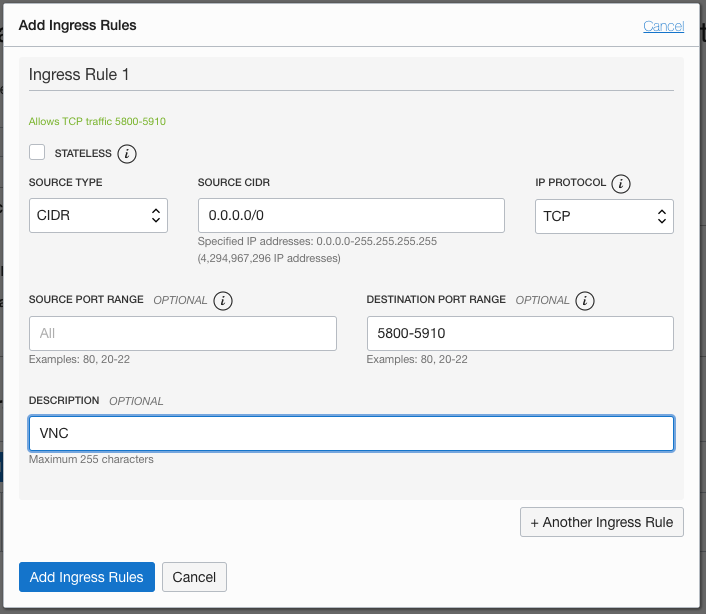
- In the security list page click the Add Ingress Rules button
An “Add Ingress Rules” popup will be dieplayed
-
Leave the Stateless option unchecked (This will provide for the returning traffic)
-
Leave the SOURCE TYPE as
CIDR -
In the SOURCE CIDR enter
0.0.0.0/0(basically the entire internet, in a production you might limit to your organizations address range) -
Leave the Protocol as
TCP -
Leave the SOURCE PORT RANGE blank
-
Set the DESTINATION PORT RANGE as
5800-5910 -
Set the DESCRIPTION to be
VNC -
Click the Add Ingress Rules button
Step 4: Setup the database.
If you are in an instructor led lab the instructor may have already done this step for you, if so they will tell you.
4a. Create a database
-
Use the Hamburger menu, and select the Oracle Database section, then chose Autonomous Transaction Processing
-
Click Create Autonomous Database
-
Make sure the
CTDOKEcompartment is selected -
Fill in the form, and make sure to set a unique display and database name for you in case multiple users are running the lab on this tenancy. For example
HK8STG(whereTGare my initials, use yours of course) -
Make the workload type Transaction Processing
-
Set the deployment type Shared Infrastructure
-
Chose the most recent database in the Chose database version selector, allocate 1 OCPU and 1 GB of storage (this lab only requires a very small database)
-
Turn off Auto scaling
-
Enter the Admin password, there are rules for what this should look like, they will appear under the password field.
-
Enter the password again in the Confirm password field
-
Make sure that the Allow secure access from everywhere option is enabled.
-
For a trial tenancy chose the BYOL License option, for a paid tenancy chose the License included option (Unless your organization already has enough available suitable licenses, in which case you can use the BYOL option)
Be sure to remember the admin password, save it in a notes document for later reference.
-
Click the Create Autonomous Database button
-
Once the instance is running go to the database details page, on the center left of the general information column there will be the label OCID and part of the OCID itself. Click the Copy just to the right and then save the ODIC (and if like me you are forgetful also the admin password.)
4b. Setup your database user
-
On the details page for the database, click the Service Console button
-
On the left side click the Development option
-
Open up the SQL Developer Web console
-
Login as ADMIN, using the password you just chose
-
Click on ‘SQL’ to open the SQL Developer tool
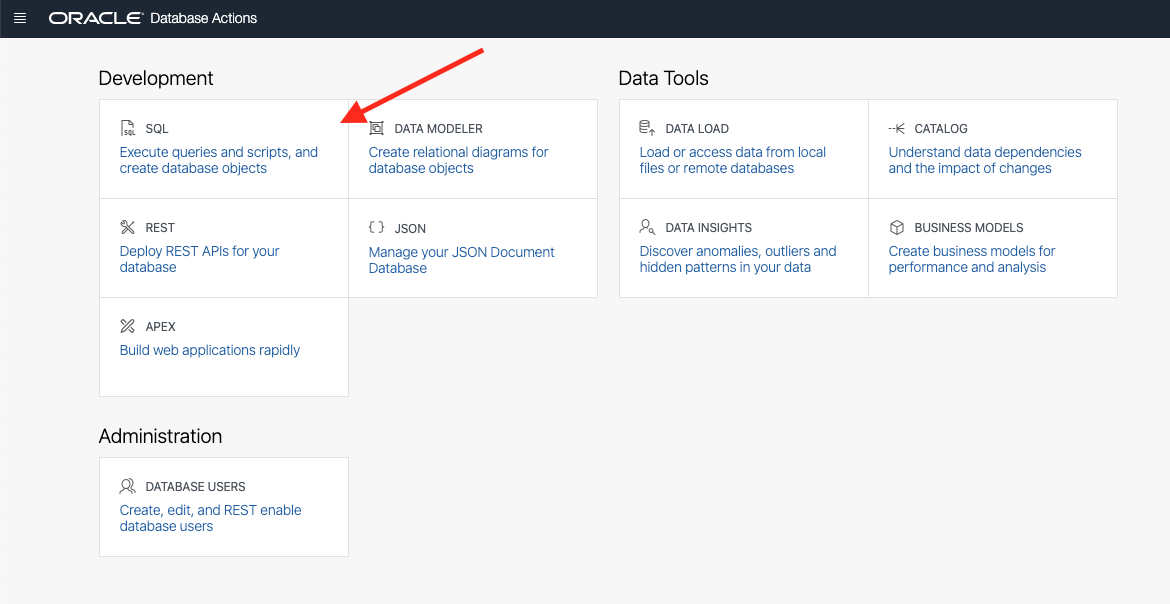
You may get introduction info guiding you through the page, just close that if it’s displayed.
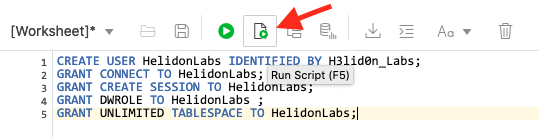
- Copy and paste the below SQL instructions into the top section of the page:
CREATE USER HelidonLabs IDENTIFIED BY H3lid0n_Labs;
GRANT CONNECT TO HelidonLabs;
GRANT CREATE SESSION TO HelidonLabs;
GRANT DWROLE TO HelidonLabs ;
GRANT UNLIMITED TABLESPACE TO HelidonLabs;
- Run the script (The Page of paper with the green “run” button, identified in the image below.) if it works OK you will see a set of messages in the Script Output window saying the User has been created and grants made.
Step 5: Accessing the Developer VM
Access to the Developer VM is via a VNC client, this allows us to provide direct access to the desktop and enables easy use of the developer tools. If you do not already have a VNC client on your computer you will need to install one.
Step 5a: Installing a VNC client
There are multiple possible clients, chose from the list below or use another if you already have it. Note that the following may require you to have some level of admin rights on your machine.
Installing a VNC viewer on MacOS
For macOS we recommend realVNC which can be obtained from
- https://www.realvnc.com/en/connect/download/viewer/macos/
Installing a VNC viewer on Windows
For Windows, suggested packages are TigerVNC viewer or TightVNC Viewer but if you already have a preferred VNC viewer you can use this. TigerVNC viewer has a simpler install process, as it is a standalone executable, but has fewer features.
TigerVNC: Download ‘vncviewer64-1.9.0.exe’ from
https://bintray.com/tigervnc/stable/tigervnc/1.9.0#filesand save it to your desktop. It is a self-contained executable file, which requires no further installation.
TightVNC Viewer: Select the ‘Installer for Windows (64-bit)’ from
-
https://www.tightvnc.com/download.php -
When prompted, select to save the file. Next, run the executable to install the program. This requires you have the privileges to install software on your machine
Step 5b: Accessing your Development VM using VNC
We are using VNC to provide you with a remote desktop, this let’s us use a Integrated Development Environment for the Helidon labs.
You need to let your VM run for a couple of mins to fully boot and start the VNC server.
-
Open your VNC Client
-
Connect to the client VM. Depending on your client you may be asked to different information, but usually you’ll be asked for a connect string. This may look like
123.456.789.123:1where the123.456.789.123is the IP address and the:1is the display number. Some VNC clients require the use of the port number in which case it will be123.456.789.123:5901where the123.456.789.123is the IP address and the:5901is the port number. Unfortunately this is client specific, so if one approach doesn’t work try the other. Note that is an example connection, you will need to use the IP address of your VM. -
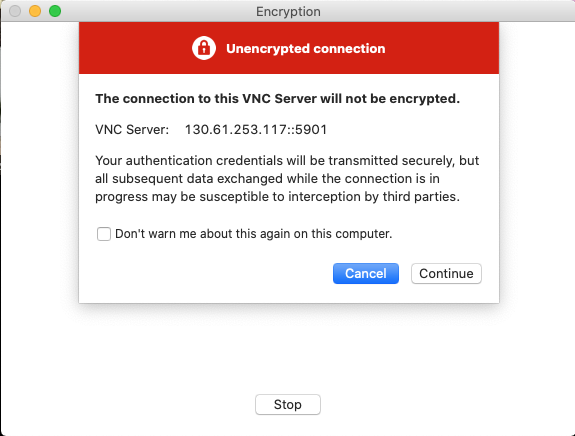
You VNC client may warn you that you’re making an insecure connection, this is expected as we have not setup security certificates. For example for a real VNC client on a Mac this may look like
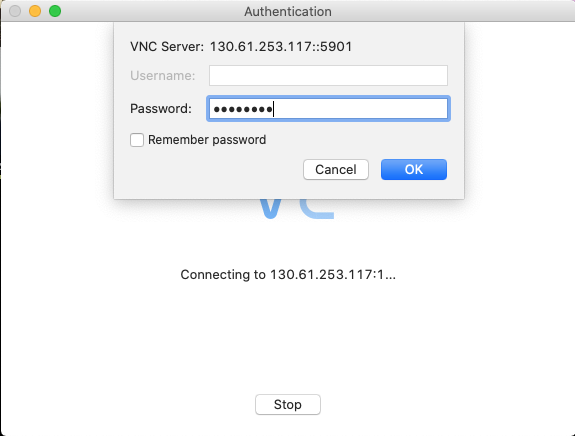
- You will be asked to enter a password to access the virtual screen. Your instructor will have provided this or it will have been in the file with the marketplace URL. This is an example showing this with the Real VNC client running on a Mac
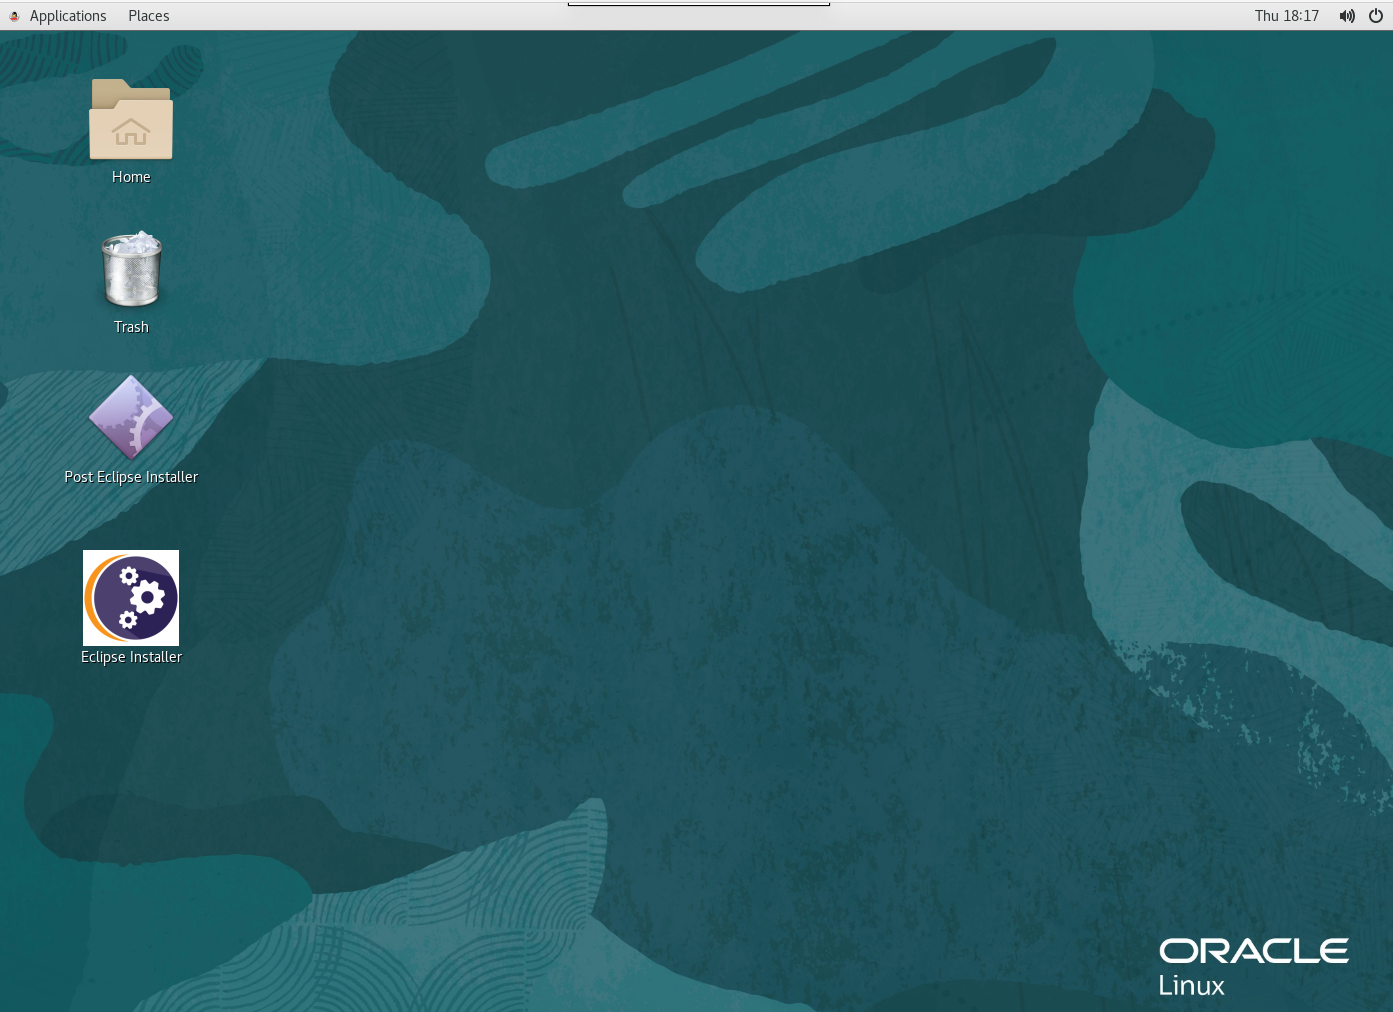
Once you have logged in you will see the Linux desktop, it will look similar to this, though the background and specific icons may differ.
Step 5c: Changing the VNC Password (optional)
We have provided a pre-set VNC password. If you are in a instructor led lab this may have been provided to you by your lab instructor, or it may be in the image location file you downloaded earlier.
While not required we do recommend that you change this password to prevent access by other people, this is especially important if you plan on leaving the VM running for a while.
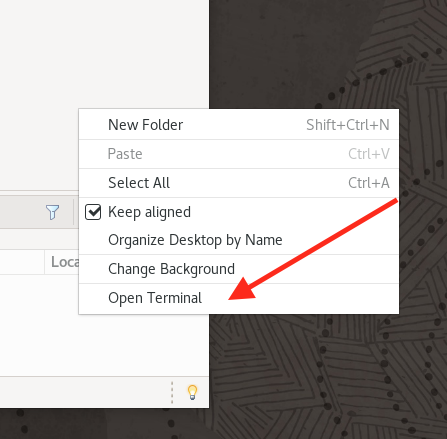
- On the desktop background click right, then the Open Terminal option
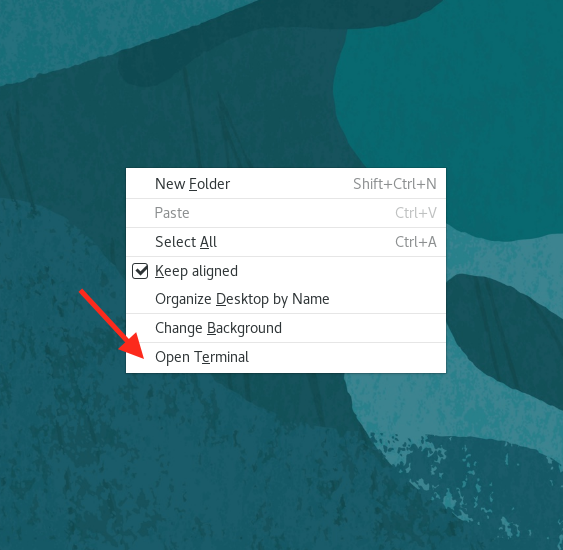
-
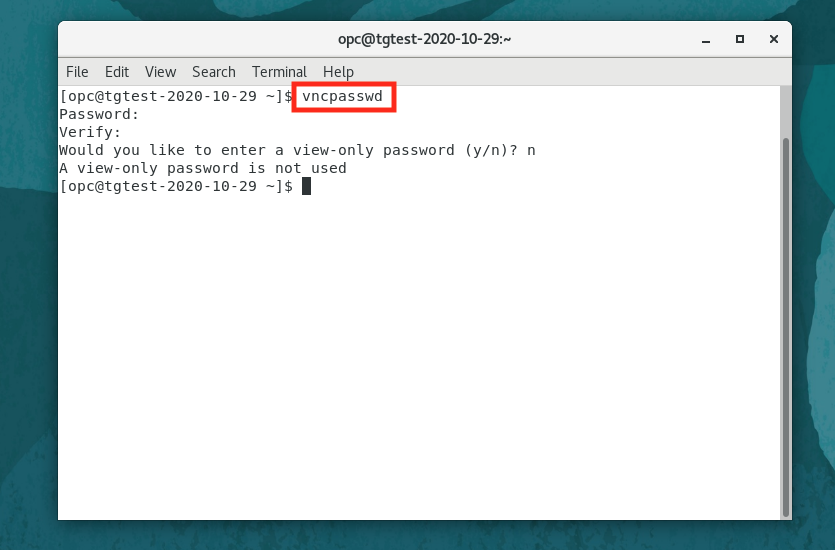
In the resulting terminal window type
vncpasswd -
At first the prompt enter your new VNC password
-
At second the prompt reenter your new VNC password
-
When prompted if you want a view only password enter
n
The easiest way to apply the new password is to reboot the VM
- In the terminal enter
sudo reboot
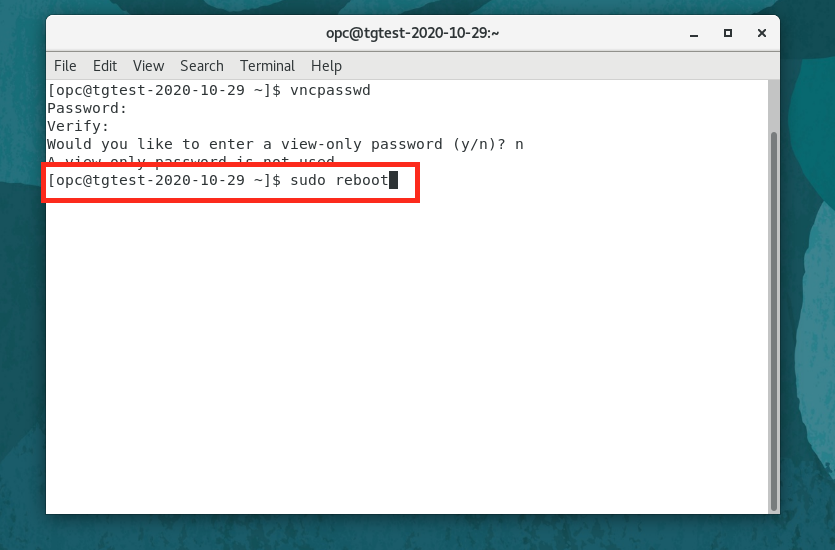
The VNC connection will probably drop immediately and the VNC client will try to reconnect (in which case close the VNC window) or it may just close the window for you (the specific behavior is VNC client specific.)
When the VM has rebooted (allow about 60 - 90 seconds) Open a new VNC connection, the IP address should remain the same, and at the VNC login enter the new VNC password you just set.
Step 6: Installing Eclipse in the developer VM
We have installed a developer configuration of Oracle Linux, and added tools like Maven, git and the Java development kit. To ensure that you have the latest integrated developer environments (IDE’s) and starting point source code for the labs there are a couple of steps you need to take.
There are many IDE’s available. We have chosen Eclipse as it’s open source licensed. As Eclipse requires the acceptance of a license we can’t automate the process for you.
Step 6a: Downloading Eclipse
We have installed the Eclipse installer and places a short cut to it on the desktop.
- Double click on the eclipse-installer icon on the desktop. This will open the installer. It may look like a text page and be named
eclipse-installer.desktoprather than the icon shown below, if it does still click it. You may be warned it’s an Untrusted application launcher, if this happens click the Trust and launch option. Do not click the Post Eclipse Installer icon.
![]()
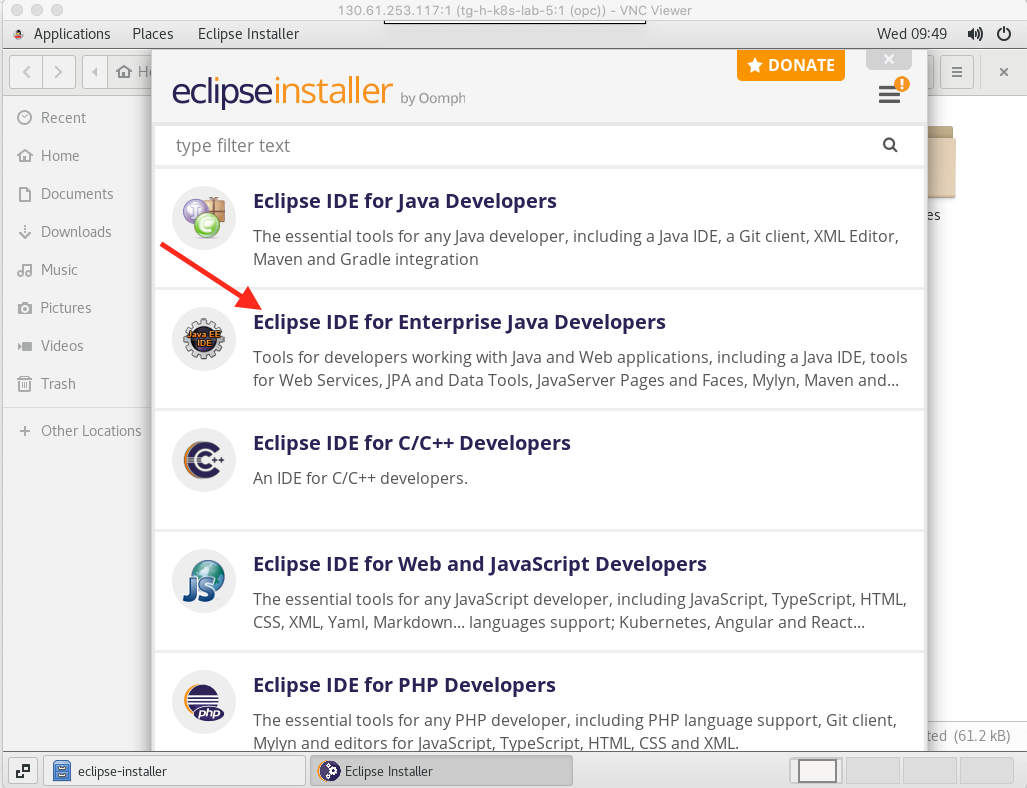
The Eclipse installer will start.
- Select the Eclipse IDE for Enterprise Java Developers option
The installer switched to the next page
-
In the Java JVM dropdown Select the
/usr/lib/jvm/java-11-openjdk** DO NOT PRESS INSTALL YET** -
Set the Install Path to be
/home/opc
(It’s really important that you do this, otherwise you’ll have to manually setup a lot of the following)
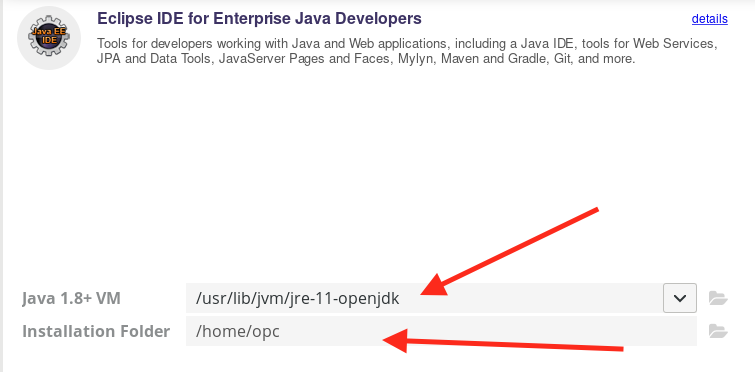
-
Then click the Install button
-
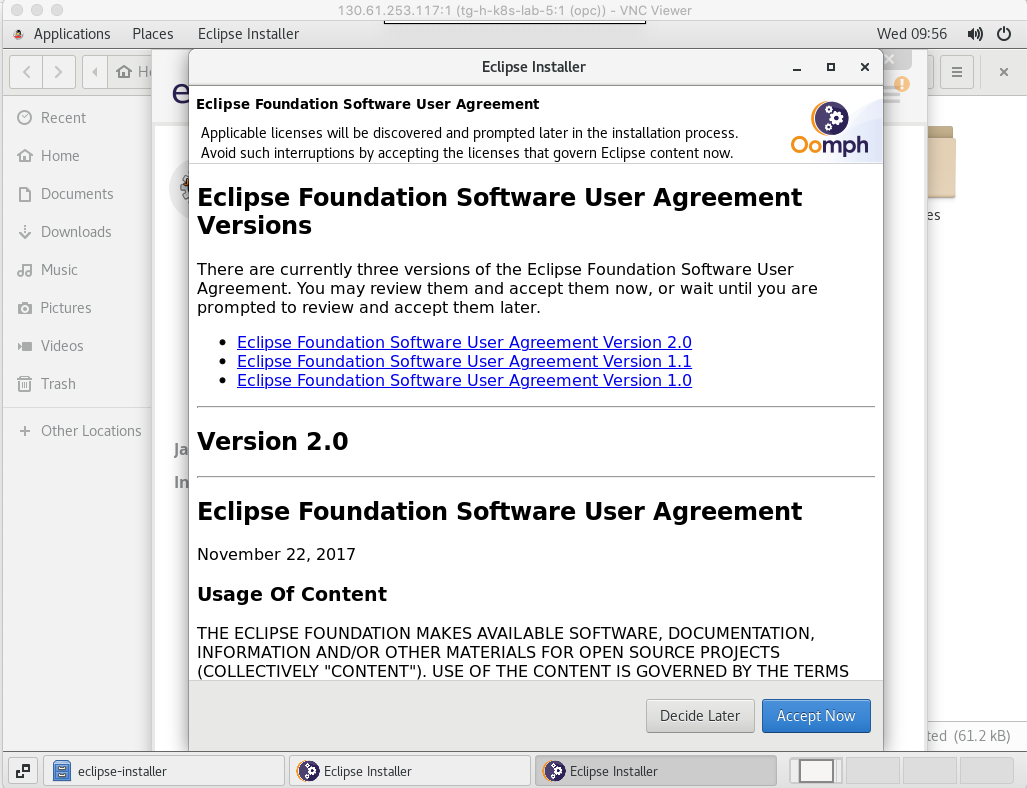
Assuming you agree with it click Accept Now on the license page. (If you don’t agree with the license you can install your own IDE but all of the instructions are on the basis of using Eclipse.)
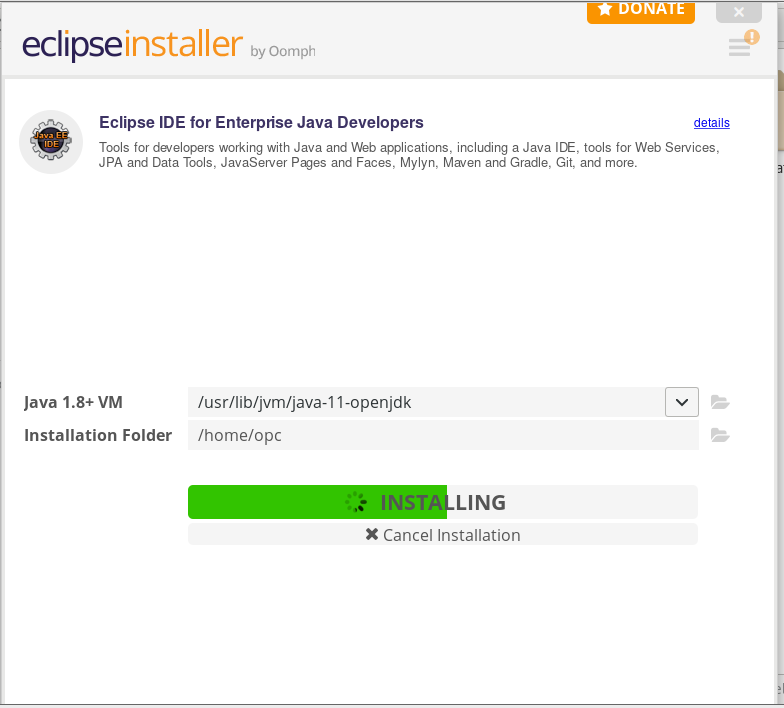
The installer progress will be displayed
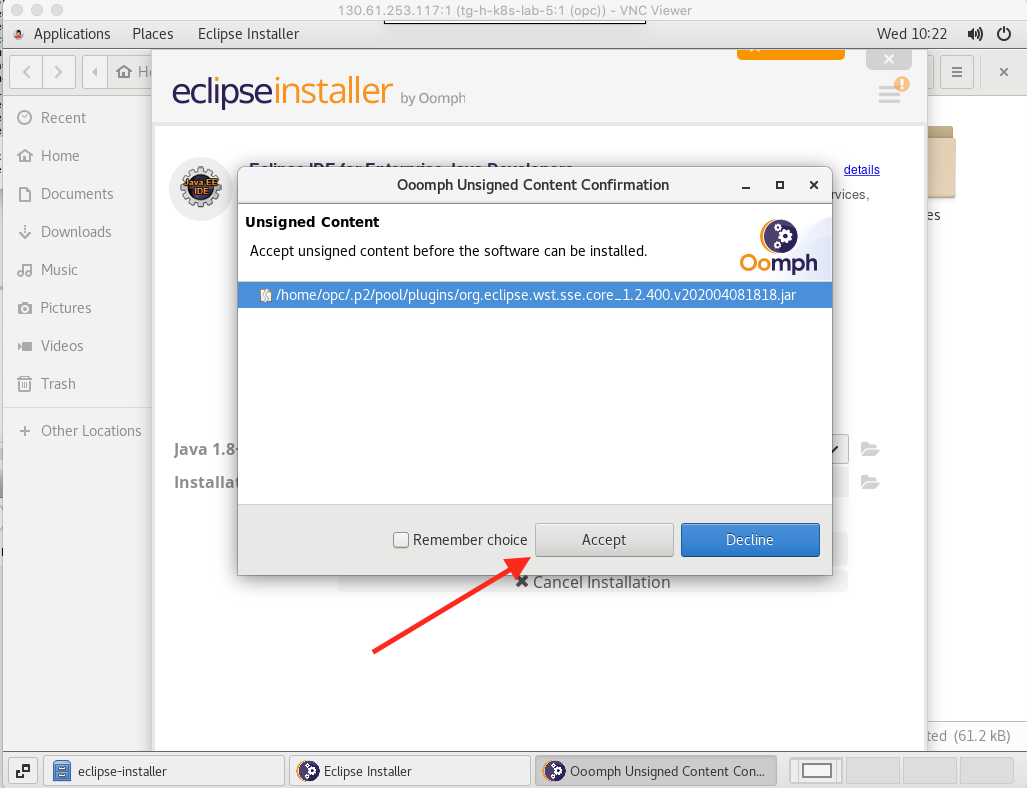
- You may be presented with warnings about unsigned content, if you are click the Accept button
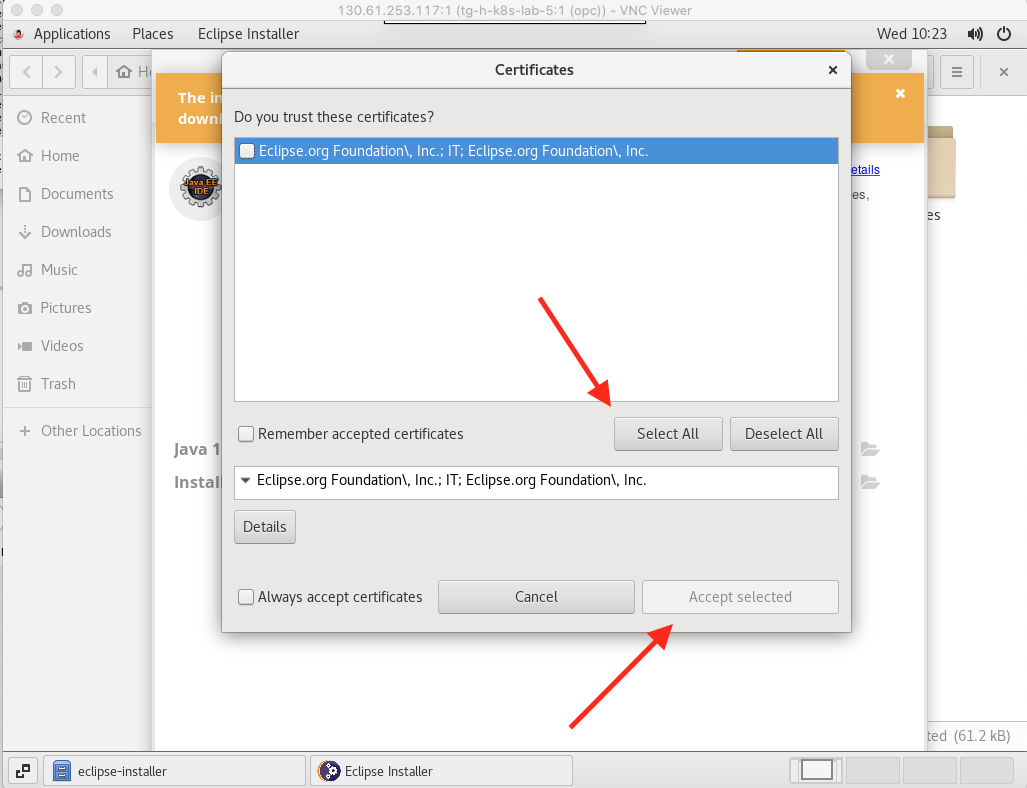
- You may be presented with warnings about certificates. If you are click the Select All button, then the Accept Selected button (this is not enabled until certificates have been selected)
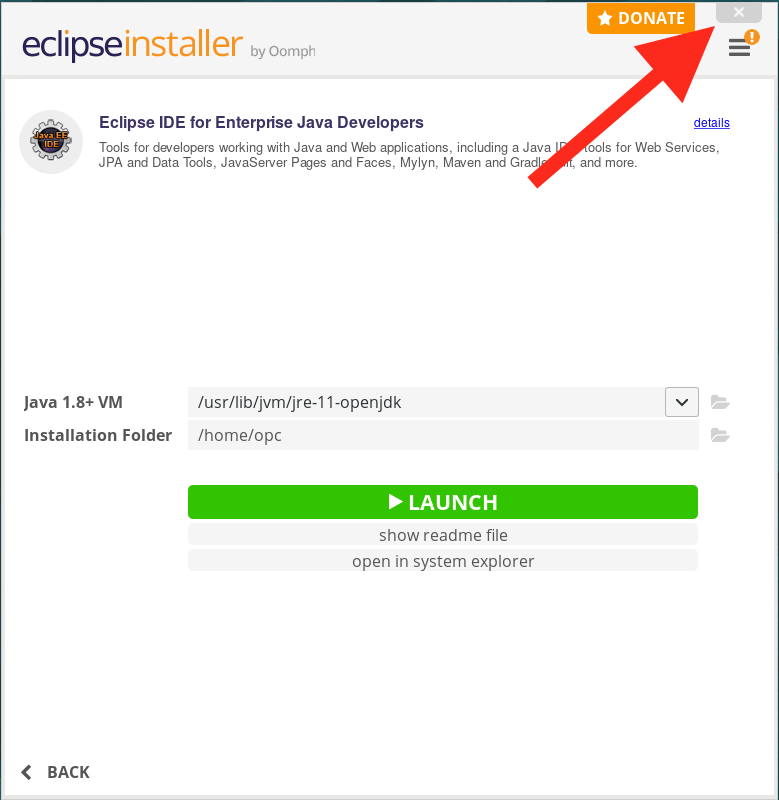
- On completion close the installer window (X on the upper right.) Do not click the Launch button.
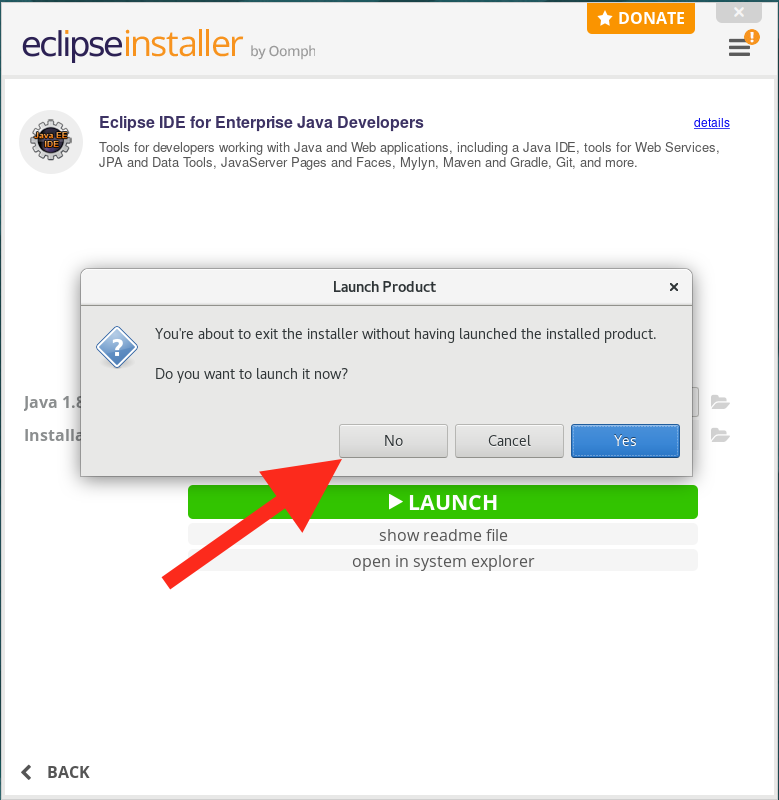
- Click No on the exit launcher page that’s displayed to confirm you do not want to launch Eclipse at this point.
Step 6b: Configuring post Eclipse install
We’re now going to run a script that tidies up the desktop and creates an eclipse desktop icon
- Double click on the Post Eclipse Installer icon on the desktop. This will run the script. It may look like a text page and be called
posteclipseinstal.desktoprather than the icon shown below, if it does still click it. You may be warned it’s an Untrusted application launcher, if this happens click the Trust and launch option.
![]()
If the eclipse installation was in the right place then the two desktop icons will disappear and be replaced with an Eclipse icon (Do not start eclipse now). If the Eclipse installation was in the wrong place then it will exit immediately without making any changes. In that case re-run the installer and ensure you use /home/opc as the Eclipse installation path.
To enable us to update the labs without having to update the Developer VM image each time we hold the setup code in a git repository (where we can update it as the lab is enhanced) You need to download this into your development VM and run the setup script.
- In the VM Open a terminal
- In the terminal execute the following command to download the latest setup
git clone https://github.com/CloudTestDrive/cloud-native-setup.git
Cloning into 'cloud-native-setup'...
remote: Enumerating objects: 88, done.
remote: Counting objects: 100% (88/88), done.
remote: Compressing objects: 100% (52/52), done.
remote: Total 88 (delta 22), reused 76 (delta 16), pack-reused 0
Unpacking objects: 100% (88/88), done.
- Run the setup script
bash $HOME/cloud-native-setup/cloud-native-setup/scripts/setup/downloadedSetup.sh
Running post eclipse scripts
Running Lombok Installer
Getting latest version of Lombok
--2020-11-26 18:11:41--  https://projectlombok.org/downloads/lombok.jar
Resolving projectlombok.org (projectlombok.org)... 184.72.218.95
Connecting to projectlombok.org (projectlombok.org)|184.72.218.95|:443... connected.
HTTP request sent, awaiting response... 200 OK
Length: 1914266 (1.8M) [application/java-archive]
Saving to: \u2018lombok.jar\u2019

100%[======================================>] 1,914,266   2.72MB/s   in 0.7s

2020-11-26 18:11:42 (2.72 MB/s) - \u2018lombok.jar\u2019 saved [1914266/1914266]

Installing Lombok
Configuring Eclipse to use lombok
Running maven repo init process
Cleaning maven environment, compiling and running test program
[INFO] Scanning for projects...
Downloading from central: https://repo.maven.apache.org/maven2/org/codehaus/mojo/exec-maven-plugin/3.0.0/exec-maven-plugin-3.0.0.pom
.
.
.
Lots of Maven Output
.
.
.
Downloaded from central: https://repo.maven.apache.org/maven2/commons-codec/commons-codec/1.11/commons-codec-1.11.jar (335 kB at 805 kB/s)
LombokHelloWorld(hello=World)
[INFO] ------------------------------------------------------------------------
[INFO] BUILD SUCCESS
[INFO] ------------------------------------------------------------------------
[INFO] Total time:  10.692 s
[INFO] Finished at: 2020-11-26T18:11:54Z
[INFO] ------------------------------------------------------------------------
- Once the script has completed (this may take a few mins) then close the terminal window.
Step 6c: Starting Eclipse for the first time
Note that sometimes the Eclipse installer will create it’s own desktop icon to start Eclipse. This does not happen every time, but if it does create one you can also use that icon to start Eclipse as well.
- Double click on the Eclipse icon on the desktop. It may look like a text page rather than the icon shown below, if it does still click it. You may be warned it’s an Untrusted application launcher, if this happens click the Trust and launch option.
![]()
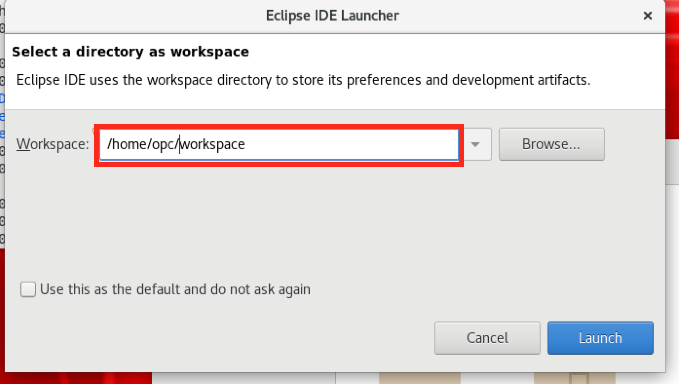
As Eclipse starts you will be presented with a start up “splash” then workspace selection option.
- Set the eclipse workspace to be
/home/opc/workspace(If you chose a different location you will have to remember to use that new location in many later stages.)
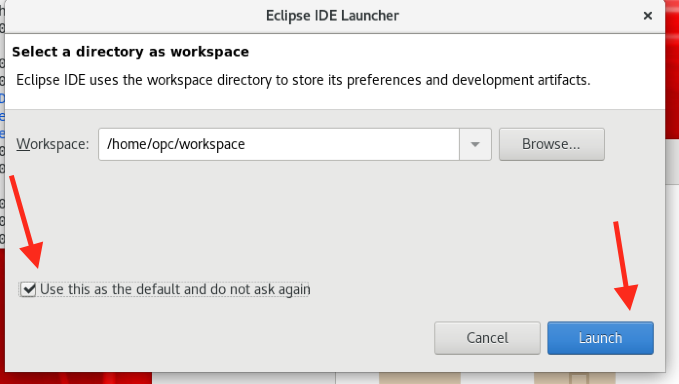
- Click the Use this as the default and do not ask again option, then the Launch button
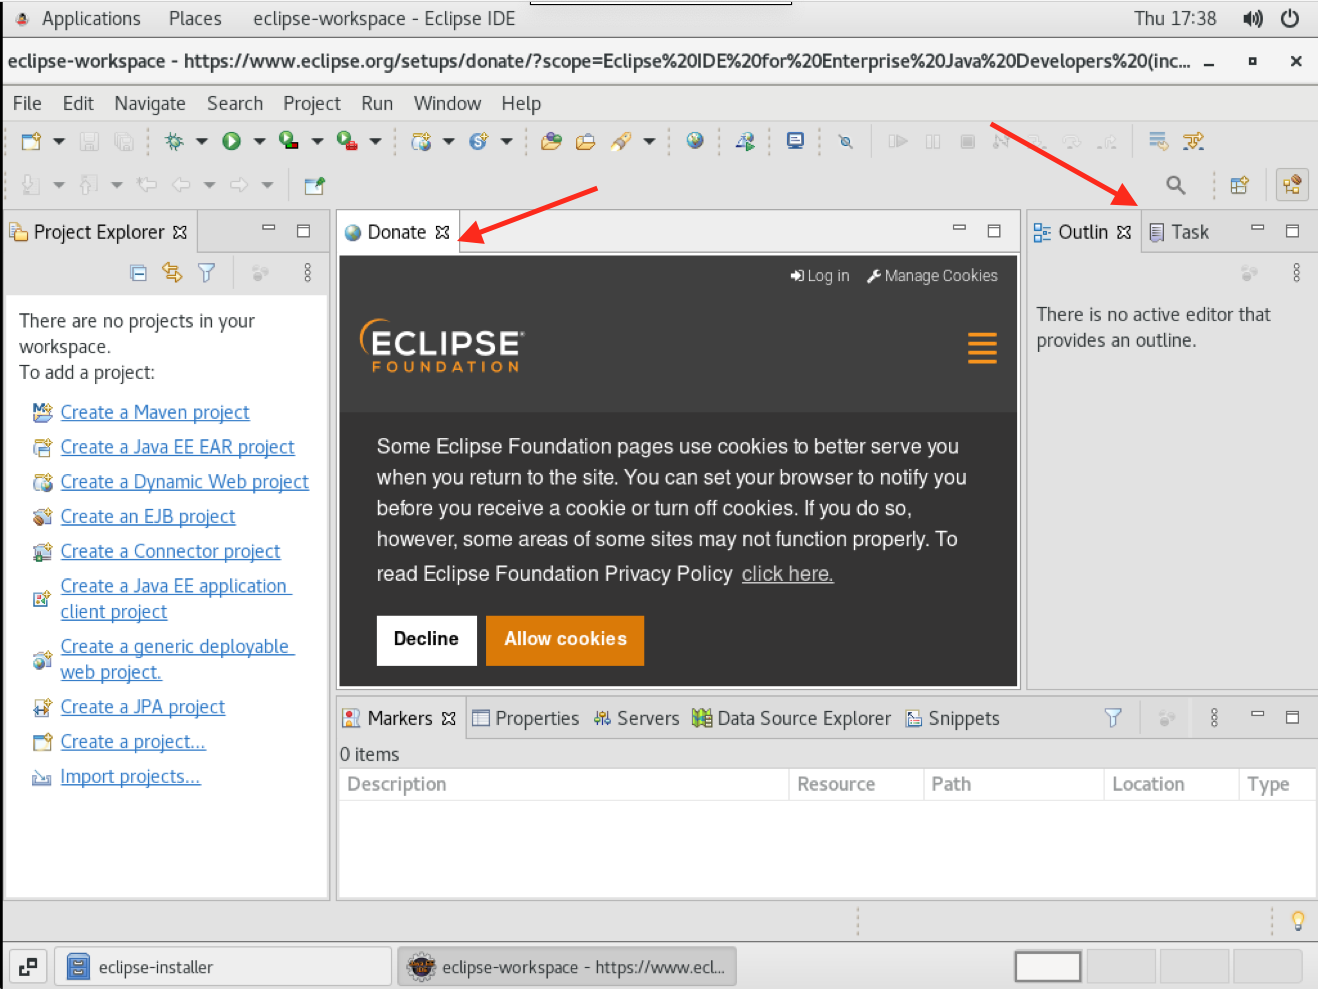
You will be presented with the Eclipse startup. This may include a welcome page. You can close it by clicking the x as per normal with sub windows.
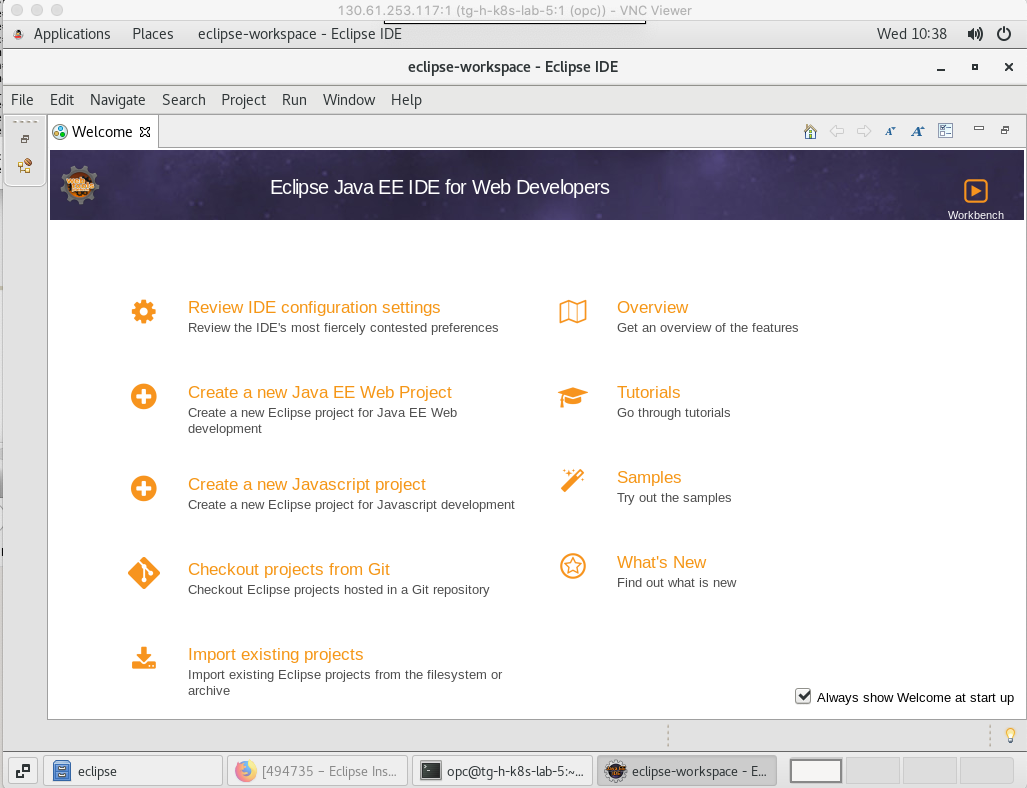
- You can close the Donate, Outline and Task list tabs to get the most usage from the screen.
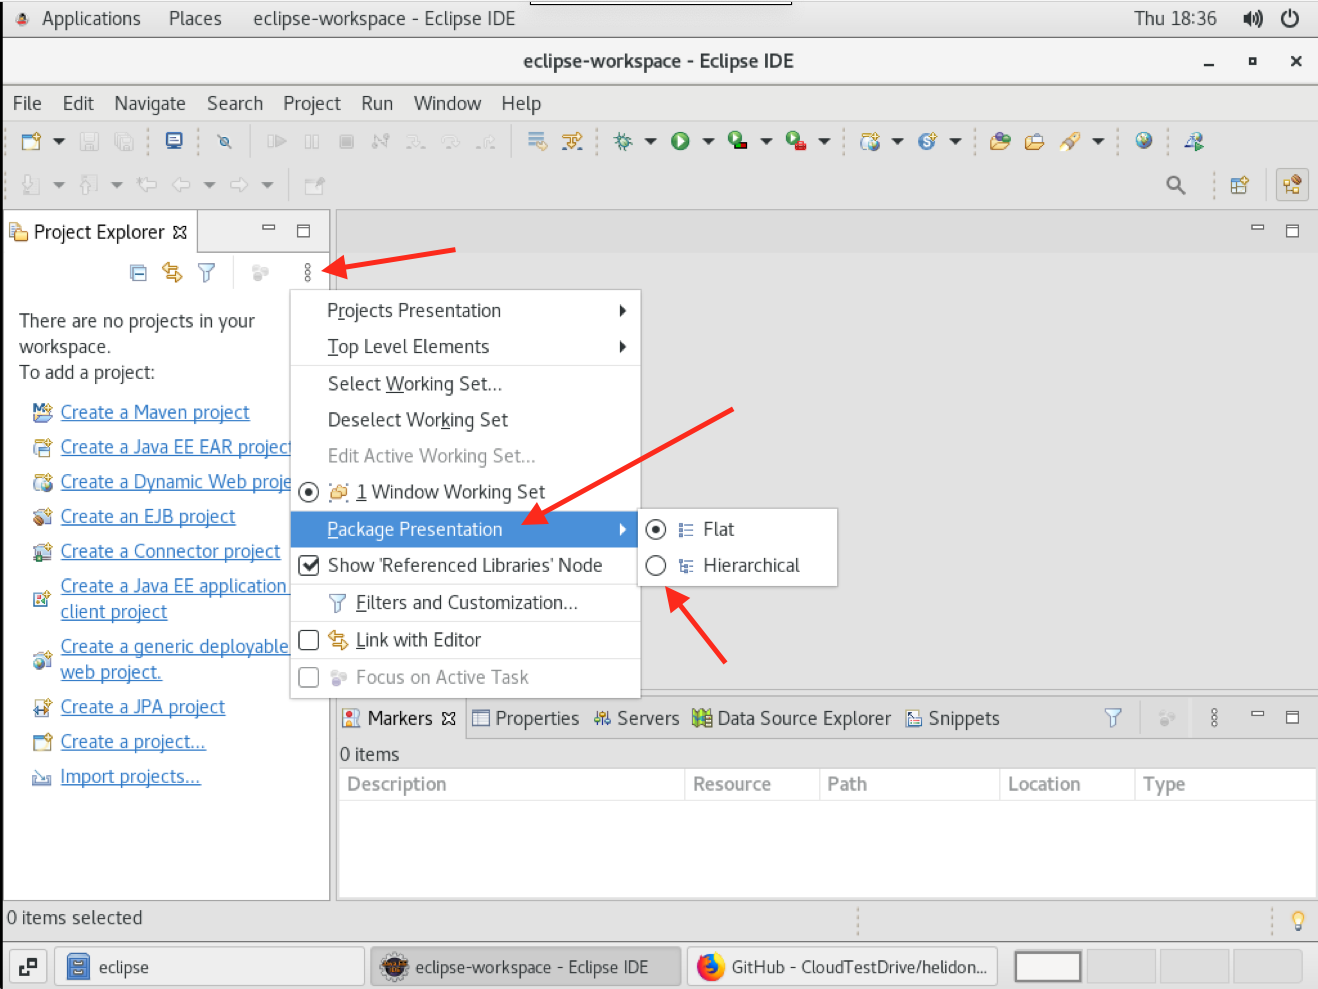
This image shows you the empty Eclipse workspace with the non required tabs all closed
![]()
We need to configure Eclipse to display the course files in a hierarchical manner (this is so it matches the images you will have in the lab instructions, if you prefer to use the Eclipse “Flat” view then you can ignore this step)
- Click on the Three dots in the Project Explorer panel, then take the Package Presentation menu option and click the radio button for Hierarchical
Step 6d: How to re-open Eclipse if it’s been closed
Double click on the Eclipse icon on the desktop. It may look like a text page rather than the icon shown below, if it does still click it. You may be warned it’s an Untrusted application launcher, if this happens click the Trust and launch option.
![]()
Step 7: Downloading the database Wallet file.
The database Wallet file contains the details needed to connect to your database instance, it needs to be downloaded to the development VM and placed in the right location.
The easiest way to get the database Wallet file into your virtual machine is to use the cloud console to download it.
-
Open a web browser inside the virtual machine
-
Login to the Oracle Cloud Console
-
Open the “Hamburger” menu (three bars on the top left)
-
Scroll down (if needed) to the Oracle Database section. Click on the Autonomous Transaction Processing menu option
-
If you need to select the
CTDOKEcompartment you created earlier in the Compartment selector on the left side of the page. -
Click on your database name in the list (it’s a link)
-
On the database page click the DB Connection button
This will display a Database connection details popup
-
Leave the Wallet type as
Instance connection -
Click the Download Wallet button
-
A password pop-up will be displayed. Enter and confirm a password, this is used to encrypt some of the details.
-
Once your password is accepted and confirmed click the Download button
-
If you are asked what to do with the file make sure you chose the Save file option
-
The wallet file will start to download and the password pop-up will disappear and you’ll be returned to the Database connection pop-up
-
Click Close on the Database Connection popup
End of the tenancy level setup
Congratulations, you have successfully prepared your tenancy to do the labs, there will be lab specific setup instruction where appropriate in the labs.
Acknowledgements
- Author - Tim Graves, Cloud Native Solutions Architect, OCI Strategic Engagements Team, Developer Lighthouse program
- Author - Jan Leemans, Director Business Development, EMEA Divisional Technology
- Last Updated By - Tim Graves, February 2021