![]()
Creating your own Kubernetes cluster
ATTENTION !!!
If you are doing the lab self guided, or the instructor does not tell you they have created a cluster for you then you need to complete this section.
If you are in an instructor led lab they may have already created Kubernetes clusters for you, only in the situation where you have been given a kubeconfig file and you do not need to continue with this section.
Introduction
Estimated module duration 5 mins.
Objectives
Creating a Managed Kubernetes cluster on the Oracle Cloud.
Prerequisites
If you are doing the full labs (these include modules on Helidon and Docker) you need to have completed the steps in the Helidon modules (including the setup)
If you are only doing the Kubernetes based labs you need to have completed the steps in the Tenancy Setup for the Kubernetes Labs module.
Step 1: Creating your Kubernetes cluster
Step 1a: Navigate to the Managed Kubernetes dashboard
A. Log into the OCI Console
B. Once on the OCI infrastructure page, click on the “Hamburger” menu
C. Scroll down to Solutions and Platform section, Click Developer services, then Container Clusters (OKE)
D. In the List Scope section, use the dropdown to select the CTDOKE compartment
- You may have to expand the tree nodes to locate this compartment
E. Click the Create Cluster button at the top of the clusters list
F. Choose the option for the Quick Create, then click the Launch workflow button
Step 1b: Creating the cluster
Fill in the form with following parameters:
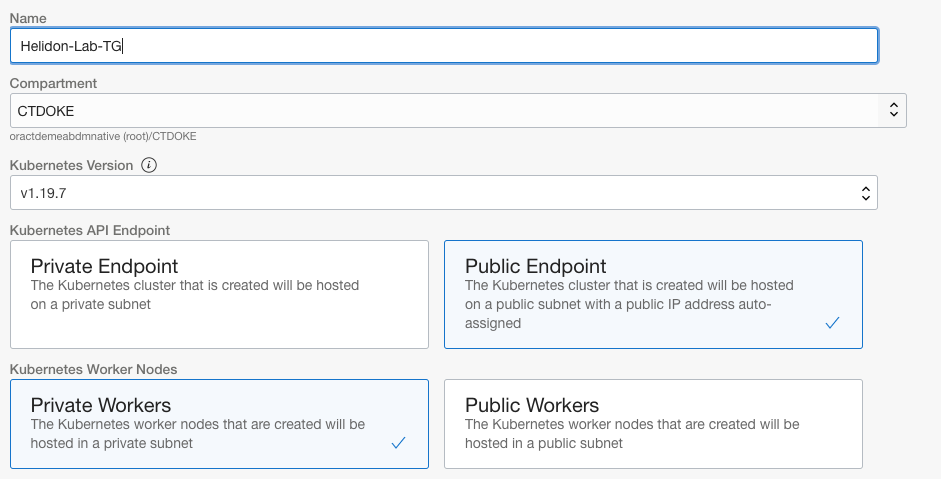
A. Set the cluster Name to be something like Helidon-Lab-YOUR-INITIALS
B. Make sure the Compartment is CTDOKE
C. Make sure the Kubernetes version is the highest on the list (at the time of the last update of this document in August 2021 that was 1.20.8 , but it may have been updated since then)
D. Make sure that the Kubernetes API Endpoint is set to Public Endpoint
E. Check the Kubernetes Worker Node Subnet is set to Private Workers
These images are for creating a 1.19.7 cluster, they may be slightly different for later versions.
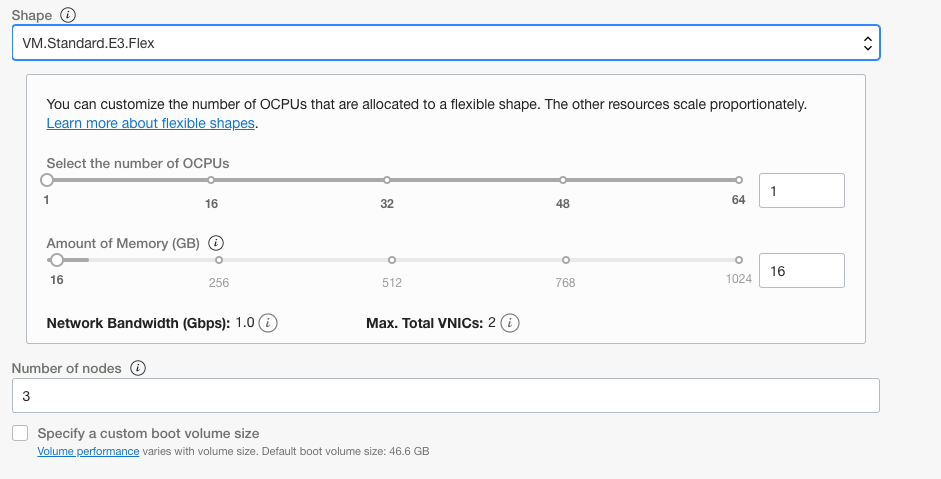
F. Set the Shape dropdown to VM.Standard.E3.Flex and the number of OCPU’s to 1 (this should set the memory to 16GB automatically)
G. Set the Number of nodes to be 3
There is no need to do anything in the Advanced Options section.
These images are for creating a 1.19.7 cluster, they may be slightly different for later versions.
H. Click the Next button to go to the review page.
I. On the review page check the details you have provided are correct
J. Click the Create Cluster button.
You’ll be presented with a progress option, if you want read what’s happening
K. Scroll to the bottom and click the Close button
The state will be “Creating” for a short while (usually 3-4 mins)
End of the cluster setup, What’s next ?
You can move on to the Cloud Shell Setup for the Kubernetes Labs module while the cluster continues to be provisioned.
Acknowledgements
- Author - Jan Leemans, Director Business Development, EMEA Divisional Technology
- Contributor - Tim Graves, Cloud Native Solutions Architect, OCI Strategic Engagements Team, Developer Lighthouse program
- Last Updated By - Tim Graves, November 2020