![]()
Connecting to Databases with Helidon
Self guided student - video introduction
This video is an introduction to the Helidon database capabilities lab. Depending on your browser settings it may open in this tab / window or open a new one. Once you've watched it please return to this page to continue the labs. [](https://youtu.be/-qNDJtjGfhQ "Helidon database capabilities lab introduction video") ---Introduction
Estimated module duration 15 mins.
Objectives
Here we will see how we can use Helidon CDI to get an EntityManager to access a database from within our microservice, and how to quickly make the microservices transactionaly safe.
Prerequisites
You need to have completed the Core Helidon module.
Introduction to Databases
Unlike SPRING with the SPRINGData projects microprofile (and thus Helidon) does not currently have a built in mechanism for accessing databases. This is however something that is being looked at and hopefully at some point there will be a Microprofile standard for accessing data which Helidon can implement. At that point these labs will be updated to reflect the changes. However, just because Microprofile and thus Helidon do not have a set of data access annotations and abstractions themselves does not mean you can't access databases (and other persistence solutions) from with Helidon microservices. You simply use the existing technologies such as the Java Persistence API (JPA) and the JTA (Java Transaction API) In this set of lab modules we will look at how we can combine those with Helidon techniques such as the configuration mechanisms to implement database accesses. For the labs we will be using the **Oracle Autonomous Transaction Processing database** running in the Oracle Cloud, and have already installed in the client VM maven repository the required OJDBC jar files to support this. We have also downloaded into the environment the "Wallet" file for the database which defines the database configuration, access information and such like. We are using the Hibernate implementation of the JPA standard to actually do the work of accessing the database. If you wanted to change the database instance or the JPA implementation in a deployment it's simply the case of getting the right driver classes and updating the configuration to use them. ---As mentioned in the helidon core labs we are only looking at the programming aspects here. We do not cover the Maven pom.xml file. If you want to use this code as a starting point for your own projects then we strongly recommend looking at the pom.xml file so you can see what dependencies are made available to the projects.
What’s in the lab We will be looking at the helidon-labs-stockmanager project. This set of classes operate on the database and provides Create Read, Update, Delete (CRUD) functionality for the database front end, specifically modifying the database tables. It will be called by the storefront.
What’s not in this lab This lab does not attempt to go into all of the detail or JPA and JTA, the goal is to see how they can be handled in a Helidon based microservice. Because of that the lab does not go into great about how those Java API’s operate.
If you want to understand JPA and JTA in a lot of detail there are courses available, and of course lots of books on the subject.
Task 1: Configuring the project to be personal to you
For some versions of this lab, all attendees will are operating on a shared database, and updating the same table. To ensure that your work doesn’t interfere with other peoples work you need to provide a unique identity for yourself
-
In Eclipse, switch to the helidon-labs-stockmanager project.
-
Navigate into the folder conf
-
Open the file stockmanager-config.yaml
-
In the
app:section, uncomment the sample department property and set it to be your your name, initials or something that’s going to be unique to you:
department: "your_name"
Example :
app:
  persistenceUnit: "stockmanagerJTA"
  department: "just_a_name"
(There is a sample line there already, if you prefer modify the value and uncomment the line)
The StockResource class will automatically and transparently add the department to the primary key in all requests. This shows how using a microservice as the access point to the database beneficial, the view of the data as seem by the business logic in the StorefrontResource is unaware that by the simple addition of an extra column (which is not visible beyond the StockManagerRecource, so no changes are needed there) the database is multi department. Of course here we are identifying the department by information from a config file, in reality we would get the department information from the request, for example extracting the user identity and looking that up to determine the department. The optional module Accessing the request context shows how to get this identity information.
What’s the difference from the storefront labs ? This set of lab sections concentrates on the data accesses. You are assumed to be familiar with things like @POST, @ApplicationScope, loading configurations and such like.
There is less coding than the helidon core lab and more reading here.
This lab also uses exactly the same security configuration so users jack, jill and joe are provided, with password password, and user jack is an admin as before.
Before you start Please make sure that for now you have stopped the storefront application.
Task 2: Overview of the classes
Let’s have a look at the classes we’re going to be using.
Task2a: Quick overview of the database functionality
The com.oracle.labs.helidon.stockmanager.resources.StockmanagerResource class is the primary class we’ll be working with in this lab. If you’re not familiar with JPA however there are some other classes you should look at.
The classes in the com.oracle.labs.helidon.stockmanager.database package represent the actual structure of the database. In the database configuration we tell the JPA, JTA layers these are the classes we want the database to represent. You’ll see that they have some annotations on them, some of which will be familiar. Let’s look at the StockLevel class first:
-
Expand the folder src/main/java, then the folder database
-
Open the file StockLevel.java
@Data
// setup the constructors for us
@NoArgsConstructor
@AllArgsConstructor
// Tell JPA This is something that we want to save, hibernate will do a bunch of stuff for
// us on this basis, including creating the required tables (assuming we've setup it's
// properties file correctly
@Entity
@Table(name = "StockLevel")
public class StockLevel {
	@EmbeddedId
	private StockId stockId;

	@Column(name = "itemCount")
	private int itemCount;
}
The annotations explained
`@Data`, `@NoArgsConstructor` and `@AllArgsConstructor` are Lombok annotations that tell Lombok to automatically create the constructors,getters and setters, toString, equals and hashcode. We could of course do this manually or use tooling in the IDE to generate them, but using Lombok means that the source code is less cluttered and also that if we change the class (say by adding new fields) all of the related methods and constructors update automatically. The other annotations are used by Java persistence to identify what the classes are : At the class level `@Entity` means that this is something that JPA can save into the database as a database row (rather than something that's embedded in a row) `@Table` specifies the table name to use, a default will be generated based on the class name, but it's nicer to know exactly what we're getting On our fields in the class `@EmbeddedId` means that the primary key is this object, because it's embedded the actual primary key can have multiple columns `@Column` defines the details of the column name, again it can be generated automatically, but this will force a specific name. ---- Open the file StockId in the same folder
Looking at the StockId class
@Embeddable
@Data
@AllArgsConstructor
@NoArgsConstructor
public class StockId implements Serializable {
	private static final long serialVersionUID = 4014326887605314630L;
	@Column(name = "departmentName")
	private String departmentName;
	@Column(name = "itemName")
	private String itemName;
}
The annotations explained
The Lombok annotations are the same The class level `@Embeddable` means that JPA treats this class as part of an Entity (so a DB row in this case) which means JPA will construct the primary key using the fields in this class As with the StockLevel we're choosing our own column names using `@Column` rather than letting the system chose them for us. The Java Persistence system at runtime looks for these annotations and will automatically setup the database mappings based on them. The actual JPA implementation that's being used here is hibernate, it's an open source project, and it will not only handle the database interactions for us, but if we wanted it to could create the database tables on our behalf (this is controlled by the hibernate.hbm2ddl.auto setting in the persistence.xml file, at the moment it will just check that the database schema matches what our entities require). The entity manager represents the connection to the JPA system, it can be used to locate existing object and create new ones (see the StockResource.createStockLevel method) It can merge updates to existing data (see the StockResource.adjustStockLevel method) and delete objects in the database (see the StockResource.deleteStockItem method). For this lab we've got a little bit of logic around those entity manager functions to act as a starting point to let us provide REST CRUD APIs. It is important to note that each item retrieved from or saved to the database using the entity manager is almost certainly a different instance of the object. Even if you save an object then look at the returned object that has "just been saved"! So retrieving the same object twice is two separate objects, which contain the same data, not two references to the same object. This means that you need to think carefully if you're going to implement comparisons or equality (hence the benefits of Lombok generating this type of code automatically for us) ---Task 2b: Using path parameters for methods
In the Storefront object we were processing Java objects directly as out method arguments (the helidon framework was converting them to / from JSON for us)
For the StockmanagerResource we are using @PathParams. A path param is basically part of the URL that can contain data, for example a GET method with a @Path("/stocklevel/{item}") when called with /stockLevel/Pencil would extract the Pencil and make it available as the PathParam “item”
Let’s look at the StockResource.createStockLevel method to see how this works
-
Navigate to folder resources
-
Open file StockResource.java
3.Locate the method createStockLevel approximately in the middle of the file
@Path("/{itemName}/{itemCount}")
	@PUT
	@Produces(MediaType.APPLICATION_JSON)
	public ItemDetails createStockLevel(@PathParam("itemName") String itemName,
			@PathParam("itemCount") Integer itemCount) throws ItemAlreadyExistsException {
The @Path("/{itemName}/{itemCount}") makes two params called itemName and itemCount available. Then in the method signature the @PathParam("itemName") binds whatever was in the itemName path param to the itemName parameter, and the same for the itemCount.
Helidon does sanity checks here. If the itemCount wasn’t a String version of an integer then the caller would get an error message from the Helidon framework itself before the method was called.
Here (to make it clear what’s happening) I’ve used the same name for the path and method param, but that’s not required.
Other possible sources for the params are @QueryParam and @FormsParam. Which one you chose will depend on what URL you are expecting (or want) to get.
Task 3: Accessing the database
Task 3a: Getting an entity manager
JPA requires an entity manager to do the work of interacting with the database for us. Historically however that would require code like the following which is in the StockResource constructor.
	public StockResource(@ConfigProperty(name = "app.persistenceUnit") String persistenceUnitProvided,
			DepartmentProvider departmentProviderProvided) {
		persistenceUnit = persistenceUnitProvided;
		EntityManagerFactory emfactory = Persistence.createEntityManagerFactory(persistenceUnit);
		this.entityManager = emfactory.createEntityManager();
		departmentProvider = departmentProviderProvided;
	}
There are a several problems here. Firstly, we do this each time we create a new instance of the StockResource, and that happens every time we get a request. That’s a potentially expensive set of method calls.
Secondly we have to close the entity manager down when it’s no longer needed, that can result in some complex code paths to follow, especially if there are exceptions being handled as well.
Also why write code when we don’t have to ? However, with Helidon, we have the context and dependency injections capabilities, so we don’t need to setup the entity manager itself; we can have Helidon do that for us.
-
In file StockResource.java, scroll up to the constructor of the class StockResource
-
Remove the lines that set up the entity manager
The resulting method should now look like this
	public StockResource(@ConfigProperty(name = "app.persistenceUnit") String persistenceUnitProvided,
			DepartmentProvider departmentProviderProvided) {
		persistenceUnit = persistenceUnitProvided;
		departmentProvider = departmentProviderProvided;
	}
- Scroll up to the top of the file, just below the class definition, and locate where the EntityManager is defined and add an annotation :
<copy>@PersistenceContext(unitName = "stockmanagerJTA")</copy>
The result should look like
public class StockResource {
	@PersistenceContext(unitName = "stockmanagerJTA")
	private EntityManager entityManager;
Java Imports
You may need to add the following import to the class ```javaNote that the name of the persistence context is defined as a hard coded String, and there is no mechanism for it to be injected via a config property. However, this is not as restrictive as it seems, the name just refers to entries in the persistence.xml file, which itself uses configuration data from the Helidon configuration system, so if we do want to change the database details we can achieve that by modifying the config, and that can be done without source code modifications.
Task 3b: Configuring the database
Helidon CDI configures the JPA / JTA (transaction system) for us and creates the Entity manager. The JPA / JTA uses the classpath resource META-INF/persistence.xml to define what classes will be persisted, however we don’t want to encode things like the database access details in something that’s part of the jar file distribution, somewhat of a security risk!
Normally you’d include the database settings in an external configuration file, but to demonstrate another aspect of the Helidon configuration system we will use the Java system properties to specify the settings (we could equally have used the environment variables, and in the Kubernetes lab we will do just that, with no code changes to handle that switch).
Specifying the database connection details
We need to provide the details of the database connection. Helidon has many ways to do this as you’ve seen earlier, and so to show a different way than using a config file we’re going to define them as part of the Java system properties. The Java system properties are the highest priority of configuration items (environment variables are the next level, then files, directories and URL’s) These are defined on the java command line using the syntax -Djavax.sql.DataSource.stockmanagerDataSource.dataSourceClassName=oracle.jdbc.pool.OracleDataSource As we’re using Eclipse to start our microservices we need to configure the Eclipse to pass the properties along for us.
If you are using a database provided by an instructor then they will give you the values for the database connection, or may have already set this up in your virtual machine. If you setup your own database then you will have specified a username and password (if you used our example that will be a username of HelidonLabs and a password of H3lid0n_Labs) have downloaded the wallet file from which you will have got the connection name, for example tg_high **yours will be different unless your database is called tg!
We are now going to configure the Eclipse run configuration to add the database connection properties every time the java command is called to run our Main class.
- In the Eclipse navigator window on (on the left) select the stockmanager main class

- Now click the right mouse button and in the resulting menu navigate to
Run As, thenRun configurations
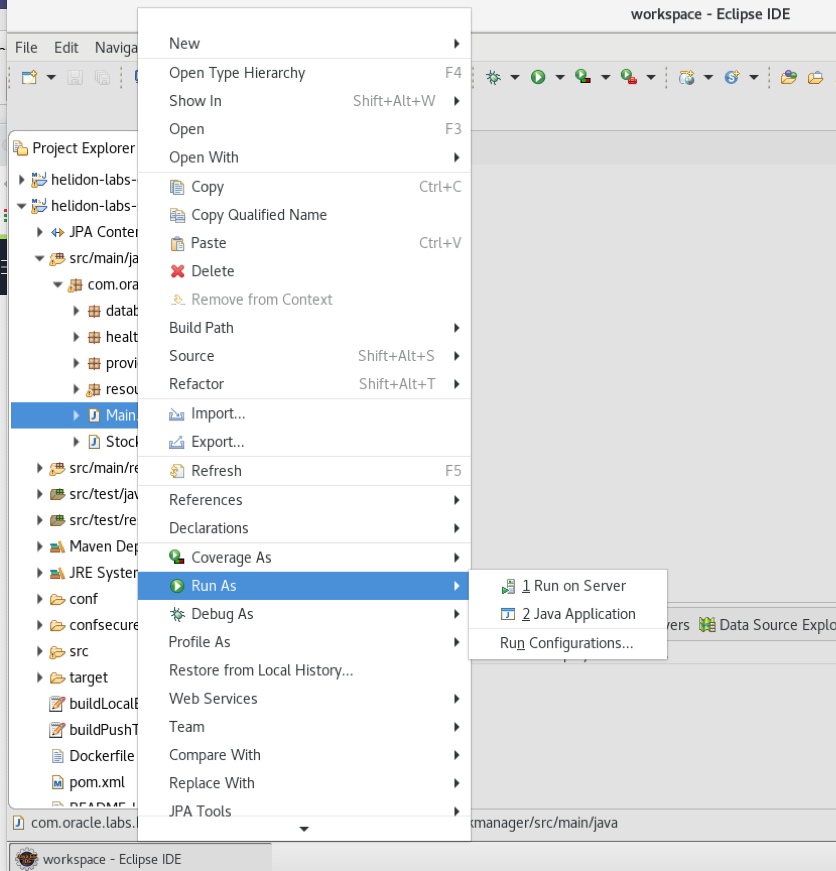
The run configurations popup appears
- In the left side of the Run Configurations popup select
Java Applications
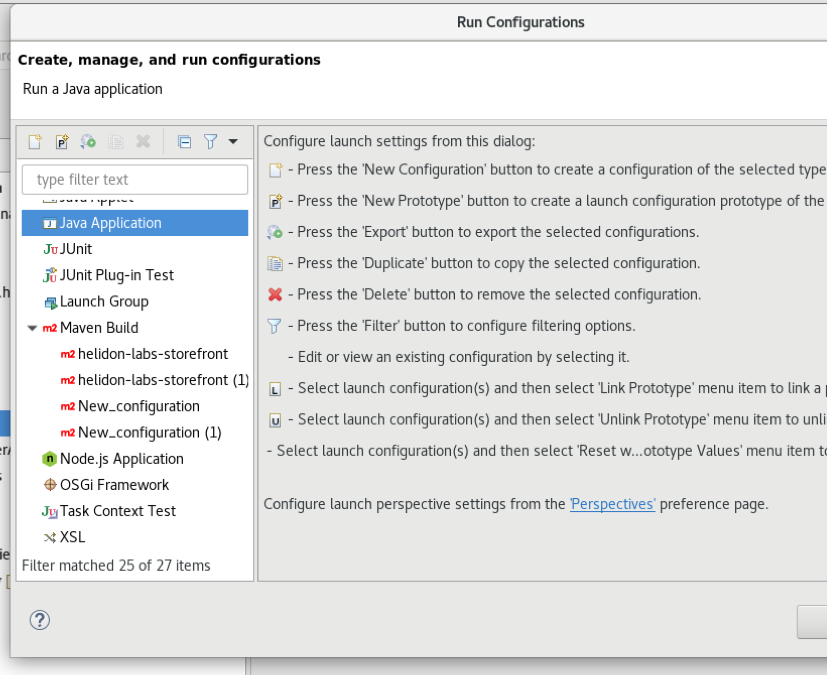
- Click the new configuration button, this looks like a blank page at the top of the left hand list
The Run configurations popup will create and display a new configuration
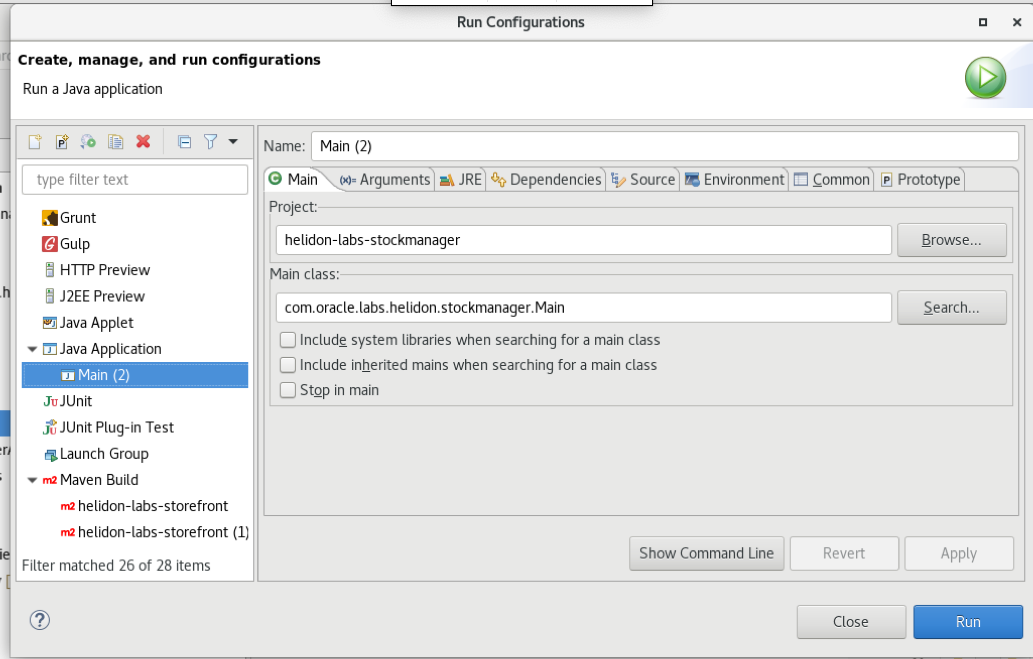
Note that in this case it is named Main (2) but that may vary
-
Click the name
Main (2)in this case (but yours may vary) and name this configurationstockmanager -
Make sure that the project is set to
helidon-labs-stockmanager -
Make sure that the Main class is set to
com.oracle.labs.helidon.stockmanager.Main
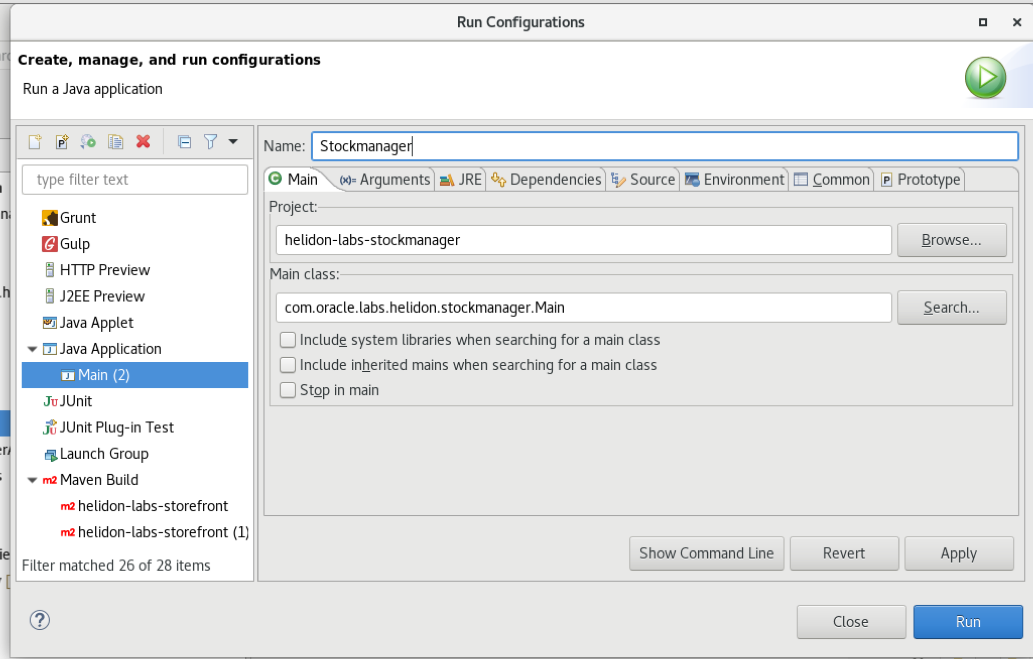
- Now click on the
argstab (this is just below the name)
The Run configurations popup will now switch to the arguments tab (this may have been abbreviated to args in the UI
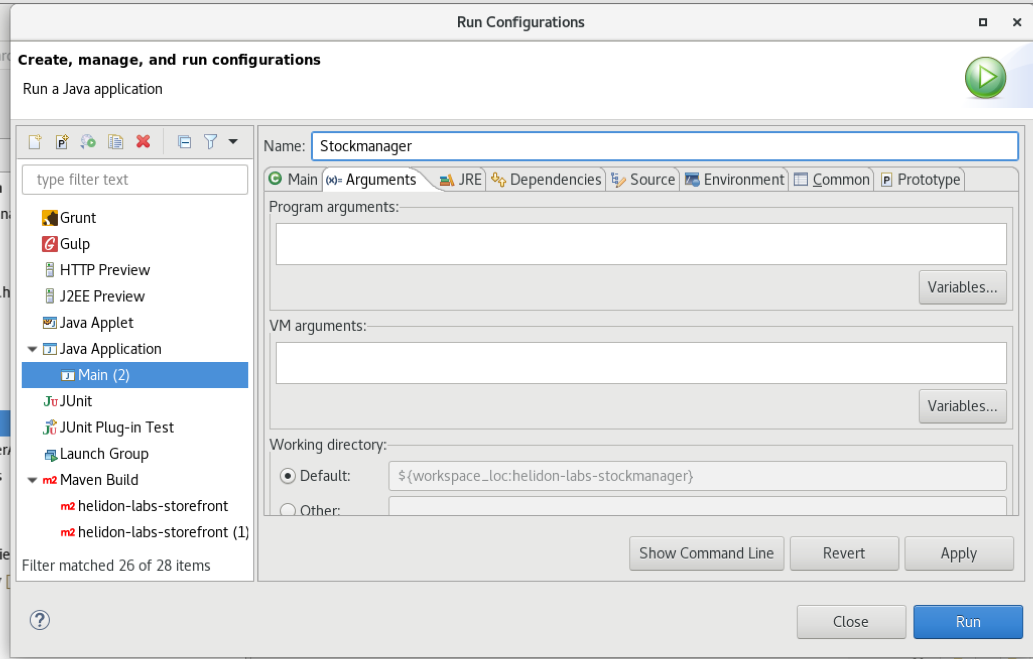
- Copy the text below into a notepad or ASCII text editor you will need to make some changes to it before you use it. (Do not use a word processor like Microsoft Word or anything that makes the text “pretty” as they replace the
-characters automatically with a non ASCII visually longer version, and that won’t work)
Be careful not to add any newlines or extra spaces, tabs etc. Note that this is a long line, and you may have to scroll in the text box to see all of it.
<copy>-Djavax.sql.DataSource.stockmanagerDataSource.dataSourceClassName=oracle.jdbc.pool.OracleDataSource -Djavax.sql.DataSource.stockmanagerDataSource.dataSource.url=jdbc:oracle:thin:@\<database connection name\>?TNS_ADMIN=./Wallet_ATP -Djavax.sql.DataSource.stockmanagerDataSource.dataSource.user=HelidonLabs -Djavax.sql.DataSource.stockmanagerDataSource.dataSource.password=H3lid0n_Labs -Dhibernate.dialect=org.hibernate.dialect.Oracle10gDialect -Dhibernate.hbm2ddl.auto=update</copy>
- In the text editor replace
<database connection name>with the name of your database connection, in my case that’stg_high, yours will be different
-
Make sure you replace the entire thing including
<and> -
If you created a database and used different names for the username and password than we suggested (or have been told by an instructor that there are different user names or passwords) you will need to replace those here as well.
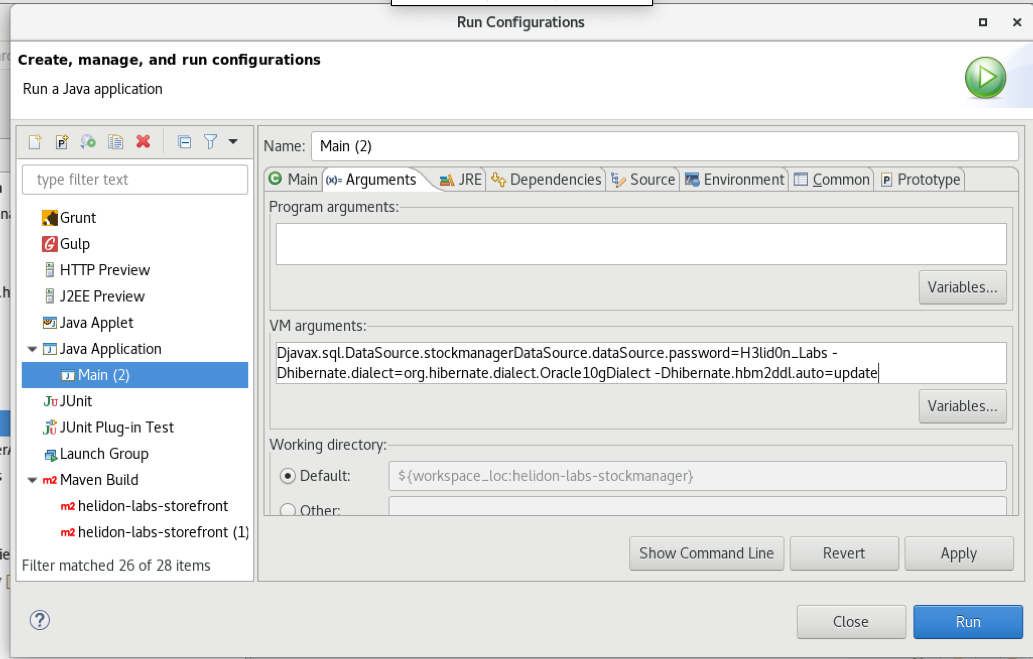
As an example for my database it looks like this, but yours will vary
-Djavax.sql.DataSource.stockmanagerDataSource.dataSourceClassName=oracle.jdbc.pool.OracleDataSource -Djavax.sql.DataSource.stockmanagerDataSource.dataSource.url=jdbc:oracle:thin:@tg_high?TNS_ADMIN=./Wallet_ATP -Djavax.sql.DataSource.stockmanagerDataSource.dataSource.user=HelidonLabs -Djavax.sql.DataSource.stockmanagerDataSource.dataSource.password=H3lid0n_Labs -Dhibernate.dialect=org.hibernate.dialect.Oracle10gDialect -Dhibernate.hbm2ddl.auto=update
-
Copy the updated text
-
In the
VM Argumentsfile of the Run configurations popup paste the updated text
-
Click the
Applybutton to save the changes -
Click the
Closebutton to exit the Run configurations popup.
In case you wanted to see how to use the a config file for the database settings there is an example in example-config-data/stockmanager-database.yaml file. This isn’t actually an imported part of the config files, but it shows you how it could be done using a config file.
Using Helidon to create our PersistenceContext will also ensure that the entity manager is correctly shutdown when the program exits so we won’t have any unused resources hanging around in the database.
- Run the Main class of the project (right-click on Main.java, Run As, then Java Application).