Kubernetes / Helm
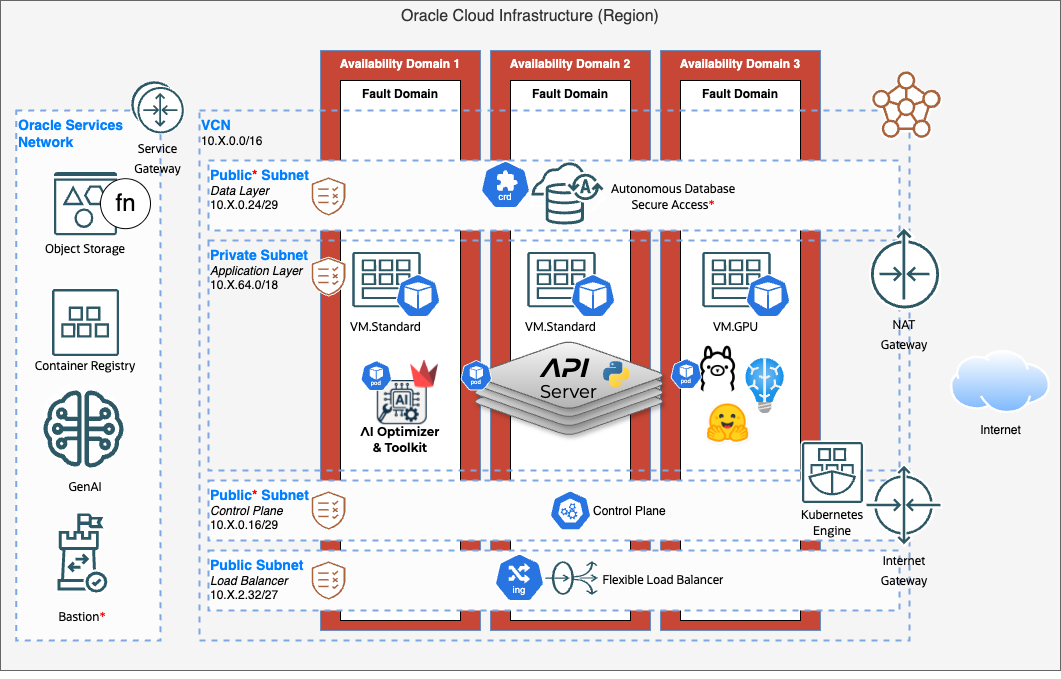
The AI Optimizer is designed to run in container orchestration environments such as Kubernetes, including managed Oracle Kubernetes Engine (OKE). The Helm chart deploys separate Server and Client workloads, with optional Ollama and Oracle AI Database resources. For ADB-S deployments, the chart can use the Oracle Database Operator.
Prerequisites
A container runtime, such as Podman or Docker, is required to build the Server and Client images.
The command examples use a Linux/macOS-compatible shell and Podman. Where applicable, replace podman with docker to use Docker.
Helm 3 is required to install the chart. The Helm CLI can be installed from https://helm.sh/docs/intro/install/.
⭐️ Depending on the deployment path, you may also need additional tools, which are documented in each path.
Download and Extract the AI Optimizer
Download and extract the source for this documentation version into a new directory: TAR.GZ archive
curl -LO https://github.com/oracle/ai-optimizer/releases/download/v2.5.0/ai-optimizer-src.tar.gz
mkdir ai-optimizer
tar zxf ai-optimizer-src.tar.gz -C ai-optimizer

cd ai-optimizer
Build the Server and Client Images
APP_VERSION="$(sed -nE 's/^__version__ = "([^"]+)"/\1/p' src/_version.py)"

podman build -f src/client/Dockerfile -t localhost/ai-optimizer-client:${APP_VERSION} .
podman build -f src/server/Dockerfile -t localhost/ai-optimizer-server:${APP_VERSION} .
The chart rejects latest, head, and canary image tags. Use the same immutable version in the image tags and chart configuration.
Helm Chart Repository
Add the published chart repository:
helm repo add ai-optimizer https://oracle.github.io/ai-optimizer/helm
helm repo update
Choose a Deployment Path
- Existing cluster: Tag the built images for a registry your cluster can access, push them, then install the Helm chart.
- Local evaluation: Use Kind to load the built images directly into a local Kubernetes cluster. Skip to Try It Locally with Kind.
Deploy to an Existing Cluster
Additional Requirements:
- Kubernetes 1.23+
kubectlconfigured for the target cluster.
Push the Images to a Registry
Set the registry host and namespace that your cluster can access, then sign in before pushing images.
For example, if using the Oracle Cloud Infrastructure Container Registry (OCIR) in the Ashburn region, use:
REGISTRY_HOST="iad.ocir.io"
REGISTRY="${REGISTRY_HOST}/<registry-namespace>"

podman login "${REGISTRY_HOST}"
Where <registry-namespace> is your tenancy and compartment path, such as mytenancy/mycompartment.
Tag the images for the registry, then push them:
podman tag localhost/ai-optimizer-client:${APP_VERSION} \
  ${REGISTRY}/ai-optimizer-client:${APP_VERSION}
podman tag localhost/ai-optimizer-server:${APP_VERSION} \
  ${REGISTRY}/ai-optimizer-server:${APP_VERSION}

podman push ${REGISTRY}/ai-optimizer-client:${APP_VERSION}
podman push ${REGISTRY}/ai-optimizer-server:${APP_VERSION}
Create Kubernetes Secrets
Create a namespace, the API key used by the Client and Server, and the Client cookie-signing key:
kubectl create namespace ai-optimizer
kubectl -n ai-optimizer create secret generic optimizer-api-key \
  --from-literal=apiKey="$(openssl rand -base64 32)"
kubectl -n ai-optimizer create secret generic optimizer-cookie-key \
  --from-literal=cookieSecret="$(openssl rand -base64 32)"
If your image registry is private, also create a registry pull Secret. Substitute the credentials supplied by your registry:
kubectl -n ai-optimizer create secret docker-registry registry-creds \
  --docker-server="${REGISTRY_HOST}" \
  --docker-username='<registry-username>' \
  --docker-password='<registry-password>'
Create a Values File
Helm uses a YAML configuration file, conventionally named values.yaml, to describe a deployment.
Create its directory in the repository root:
mkdir -p deploy
Then create deploy/values.yaml with the following starter configuration.
Replace <registry-host>/<registry-namespace> with the ${REGISTRY} value used to tag and push the images, and replace <version> with the ${APP_VERSION} value used to build them.
global:
  api:
    secretName: optimizer-api-key

server:
  image:
    repository: <registry-host>/<registry-namespace>/ai-optimizer-server
    tag: "<version>"

client:
  image:
    repository: <registry-host>/<registry-namespace>/ai-optimizer-client
    tag: "<version>"
  cookieSecretName: optimizer-cookie-key
For a private registry, add the pull Secret to the existing global: section:
global:
  imagePullSecrets:
    - registry-creds
When two examples use the same top-level key, such as server:, add their settings to the existing section rather than duplicating the key. The chart's complete values.yaml lists every available option.
Use Kubernetes Secrets rather than committing credentials to a values file.
Configure the Database
Choose a database mode when the deployment needs a chart-managed or external Oracle database. To run the Server without a database configuration, leave server.database.type empty. The chart then omits database resources and database environment variables; database-backed features such as RAG and NL2SQL are unavailable.
| Mode | Use when | Notes |
|---|---|---|
SIDB-FREE | Running Oracle Database Free in the cluster. | Requires a pinned database image. Its data is ephemeral unless you enable persistent storage. |
ADB-FREE | Running Autonomous Database Free in the cluster. | Requires a pinned database image. Its data is ephemeral unless you enable persistent storage. |
ADB-S | Connecting to an OCI Autonomous Database. | Requires the Oracle Database Operator CRD when the chart creates the database resource. |
OTHER | Connecting to another Oracle database. | Requires connection details and usable credentials in a Secret. |
For SIDB-FREE, use:
server:
  database:
    type: SIDB-FREE
    image:
      repository: container-registry.oracle.com/database/free
      tag: "<pinned-database-image-tag>"
For ADB-FREE, use:
server:
  database:
    type: ADB-FREE
    image:
      repository: container-registry.oracle.com/database/adb-free
      tag: "<pinned-database-image-tag>"
The extracted source archive also includes complete local examples in helm/examples/values-kind-sidb-free.yaml and helm/examples/values-kind-adb-free.yaml.
For SIDB-FREE and ADB-FREE, enable persistent storage to keep database data when the database Pod is replaced. The chart creates a PersistentVolumeClaim and uses the cluster's default storage class unless you specify storageClass:
server:
  database:
    persistence:
      enabled: true
      storageClass: fast-ssd # optional; omit to use the cluster default
      size: 50Gi
The claim is retained when you uninstall the release so you can recover the database. Set global.cleanupPVCs=true only when Helm should delete chart-managed PVCs with the release.
For an external database, first create a Secret containing the credentials:
kubectl -n ai-optimizer create secret generic db-authn \
  --from-literal=username='<database-username>' \
  --from-literal=password='<database-password>' \
  --from-literal=service='mydbhost.example.com:1521/MYSERVICE'
Then add its connection details:
server:
  database:
    type: OTHER
    other:
      dsn: "mydbhost.example.com:1521/MYSERVICE"
    authn:
      secretName: db-authn
For ADB-S, provide the database OCID and TNS alias. On OKE, set oke: true to use workload identity; the required IAM policies must already exist:
server:
  database:
    type: ADB-S
    oci:
      ocid: "ocid1.autonomousdatabase.oc1..."
    adb:
      serviceName: myadb_low
  ociConfig:
    oke: true
    region: us-ashburn-1
Reuse an OBaaS ADB-S Wallet
When AI Optimizer is installed as an OBaaS subchart and both applications use
the same ADB-S, OBaaS owns the AutonomousDatabase resource and its wallet
Secrets. Configure AI Optimizer to reuse those resources instead of creating
another set. In the OBaaS values file, set both useExisting: true and
existingWalletSource: obaas:
ai-optimizer:
  server:
    database:
      type: ADB-S
      adb:
        useExisting: true
        existingWalletSource: obaas
        serviceName: <adb-tns-alias>
      privAuthn:
        secretName: <shared-privileged-database-secret>
existingWalletSource: obaas takes effect only with useExisting: true.
With useExisting: true and no source selection, AI Optimizer expects
pre-existing wallet resources that use its default naming convention. With
useExisting: false, it creates and manages those resources using the same
default names. Explicit wallet Secret names take precedence when configured.
For an ADB-S deployment outside OKE, configure OCI credentials for OraOperator by following the OraOperator project. Then reference the ConfigMap and API-key Secret that it creates:
server:
  ociConfig:
    configMapName: <operator-config-map>
    keySecretName: <operator-api-key-secret>
For database connection requirements, see Database.
Optional Configuration
OCI and Model Credentials
For a non-OKE installation, the packaged helper generates an oci-config-file Kubernetes Secret from your OCI config file. It requires Python 3 but no third-party Python packages.
python3 helm/scripts/oci_config.py \
  --config ~/.oci/config \
  --namespace ai-optimizer |
  kubectl apply -f -
Reference it in the existing server: section to make the configuration available to the running Server:
server:
  ociConfig:
    fileSecretName: oci-config-file
This Secret does not configure OraOperator for an ADB-S deployment; use the OraOperator guidance above for that case. See Oracle Cloud Infrastructure for Server authentication methods.
To use a third-party model provider, create its API-key Secret and reference it in the existing server: section. For example:
kubectl -n ai-optimizer create secret generic openai-secret \
  --from-literal=apiKey='<api-key>'
server:
  models:
    openai:
      secretName: openai-secret
      secretKey: apiKey
For model configuration after deployment, see AI Models.
Application Settings
Add application environment settings through the chart-managed environment Secret:
server:
  envSecret:
    content:
      AIO_LOG_LEVEL: INFO
      AIO_GENAI_REGION: us-chicago-1
Values in server.envSecret.content override chart-generated dotenv settings. Process environment values injected into the pod take precedence over the dotenv file. See Environment Variables for application settings.
Client and Ollama
The Client is enabled by default. Disable it only when another client will connect to the Server:
client:
  enabled: false
Ollama is disabled by default. Enable it only on a cluster with suitable CPU, memory, and—where required by the selected models—GPU scheduling:
ollama:
  enabled: true
  resources:
    limits:
      nvidia.com/gpu: 1
Observability
Set server.otel.enabled to export OpenTelemetry data to your own collector. Provide an endpoint for a separately deployed SigNoz, Jaeger, Tempo, or vendor collector:
server:
  otel:
    enabled: true
    endpoint: http://signoz-otel-collector.observability.svc.cluster.local:4317
    insecure: true # plaintext gRPC inside the cluster
    resourceAttributes:
      service.namespace: ai-optimizer
    # logsEnabled: true # opt-in; review backend retention first
    headersSecret:
      name: otel-headers
Alternatively, enable the bundled SigNoz stack. The chart automatically sets the server's OTLP endpoint to the in-cluster collector; configure only the OpenTelemetry options that differ from their defaults:
signoz:
  enabled: true
server:
  otel:
    enabled: true
    insecure: true # the in-chart collector serves plaintext gRPC
The published image already includes the [otel] extra, so enabled: true works with the default image. Within Kubernetes, service.instance.id uses HOSTNAME (the pod name), and deployment.environment uses the chart's global.env value.
When tracing is enabled, the chart requires an endpoint unless tracesExporter: console is configured for local debugging or signoz.enabled=true provides the in-chart collector. helm template and helm install fail fast when no usable tracing endpoint is available.
The bundled observability components require substantial memory and retain their persistent volumes after uninstall. Set global.cleanupPVCs=true only when you intend to delete the chart-managed database and telemetry storage.
For instrumentation coverage, local and container deployment, and trace investigation, see Observability.
Install or Upgrade
Install the published chart using the values file in the extracted source directory:
helm upgrade --install ai-optimizer ai-optimizer/ai-optimizer \
  --version "${APP_VERSION}" \
  --namespace ai-optimizer \
  --create-namespace \
  --values deploy/values.yaml
Access the Client
With the Client enabled, access it locally:
kubectl -n ai-optimizer port-forward svc/ai-optimizer-client-http 8501:8501
Open http://localhost:8501 in a browser.
HTTPS and Public Access
For public Kubernetes access, terminate TLS at an ingress or gateway. The Helm chart ingress TLS example shows how to create a Kubernetes TLS Secret and reference it from the Server and Client ingress values.
You can enable TLS directly on a Client pod when it is accessed without ingress or gateway TLS. Set client.ssl.enabled to true; this also configures the Client health probes for HTTPS. To use a certificate stored in a Secret, mount it and supply its paths:
client:
  ssl:
    enabled: true
    certFile: /app/tls/tls.crt
    keyFile: /app/tls/tls.key
  volumes:
    - name: tls
      secret:
        secretName: client-tls
  volumeMounts:
    - name: tls
      mountPath: /app/tls
      readOnly: true
Try It Locally with Kind
Additional Requirements:
Create a Kind Cluster
Create kind-cluster-config.yaml with a port mapping from localhost:8501 to the Client's NodePort:
kind: Cluster
apiVersion: kind.x-k8s.io/v1alpha4
nodes:
  - role: control-plane
    extraPortMappings:
      - containerPort: 30080
        hostPort: 8501
        listenAddress: "127.0.0.1"
        protocol: TCP
The packaged Kind values file configures the Client Service to use the matching NodePort, 30080. Create the cluster with the configuration file:
kind create cluster -n ai-optimizer --config kind-cluster-config.yaml
Load the Images
kind load docker-image localhost/ai-optimizer-client:${APP_VERSION} -n ai-optimizer
kind load docker-image localhost/ai-optimizer-server:${APP_VERSION} -n ai-optimizer
The following command generates temporary inline API and cookie secrets for local evaluation. For a shared or persistent deployment, use Kubernetes Secrets as described in Create Kubernetes Secrets.
Install the Chart
helm upgrade --install ai-optimizer ai-optimizer/ai-optimizer \
  --version "${APP_VERSION}" \
  --namespace ai-optimizer \
  --create-namespace \
  --set-string global.api.apiKey="$(openssl rand -base64 32)" \
  --set-string client.cookieSecret="$(openssl rand -base64 32)" \
  --set-string server.image.tag="${APP_VERSION}" \
  --set-string client.image.tag="${APP_VERSION}" \
  --values helm/examples/values-kind-sidb-free.yaml
Access the Client
After the installation completes, open http://localhost:8501 in a browser.